Muting and Soloing Tracks
Most of the time, GarageBand plays all of your tracks simultaneously—and most of the time, that’s what you want.

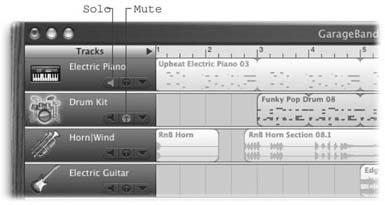
Figure 23-9. You can tackle the on/off status of your tracks in two ways: either by specifying which ones don’t play (by turning on their Mute buttons), or by specifying which tracks are the only ones that play (by turning on their Solo buttons).
Sometimes, though, it’s useful to ask one track to drop out for a minute. You might want to mute a track when:
You’ve recorded two different versions of a part, and you want to see which one sounds better.
You’re trying to isolate a wrong note, and you want to use the process of elimination to figure out which track it’s in.
The Playhead is bright red, indicating that the Mac is gasping under its load of tracks. So you’d like to lighten its burden by shutting off a couple of tracks without deleting them forever.
Silencing a track is easy: Just click the little speaker icon below the track’s name (see Figure 23-9). Or, if the track header is selected, just tap the letter M key on your keyboard.
The speaker, officially called the Mute button, lights up in blue, which means: “I’m shutting up until you change your mind.” The regions of notes in that track grow pale to drive home the point. (You can turn the Mute button on or off while the music is playing—a clever way to compare your mix with and without a certain ...
Get iLife '04: The Missing Manual now with the O’Reilly learning platform.
O’Reilly members experience books, live events, courses curated by job role, and more from O’Reilly and nearly 200 top publishers.

