Customizing the Toolbar
Like the toolbar in all Mac OS X Finder windows, the Editing toolbar—the one that appears when you open a photo in its own window—can be customized to contain the particular editing tools you use the most.
With at least one photo open in its own window, start by choosing Window → Customize Edit Toolbar. (Alternatively, you can click the Customize button on the toolbar, or Control-click a toolbar button and choose Customize Toolbar from the shortcut menu.) The toolbar’s customization panel fills the window (Figure 8-7). You now have a dozen more icons at your disposal, ready to be installed on the toolbar.
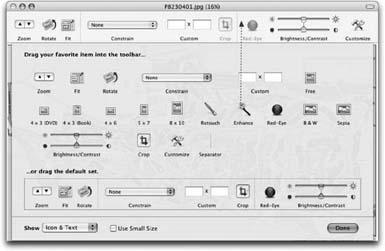
Figure 8-7. The ability to edit the toolbar can be very handy. Suppose, for example, that you tend to use the same Constrain settings (like 4 x 3) for most of your cropping. Just drag the proposed tool candidates upward into place, and then click Done.And now, a tip: If you find that the toolbar takes up too much space, Control-click anywhere on it and choose Text Only from the shortcut menu.
To put a new item on the toolbar, just drag it into position. To remove an existing tool, drag it off the toolbar. It vanishes in a puff of smoke, Mac OS X–style. Here are some of the changes you might consider making:
Several tools—including the Enhance button and the Retouch brush—don’t come factory-installed in the Editing toolbar. It’s up to you to add them.
iPhoto offers ...
Get iLife '04: The Missing Manual now with the O’Reilly learning platform.
O’Reilly members experience books, live events, courses curated by job role, and more from O’Reilly and nearly 200 top publishers.

