As the MP3 music craze of the late 1990s swept across the globe, software programs for playing the new music files on the computer began to pop up around the Internet. If you’re old enough, you may even remember using Mac programs like SoundApp, SoundJam MP, and MacAmp.
When iTunes debuted in January 2001, Apple reported that 275,000 people downloaded it in the first week. The iTunes software proved to be a versatile, robust all-around music management program made exclusively for Macintosh. And it was free.
Even in that first version of iTunes, you could import songs from a CD and convert them into MP3 files; play MP3s, audio CDs, and streaming Internet radio; create custom playlists; burn audio CDs without having to spring for extra CD burning software; zone out to groovy animated laser-light displays in the iTunes window while songs played; and transfer music to a few pre-iPod, Mac-friendly portable MP3 players.
Today, iTunes is much more. In fact, it’s the hub of the digital hub; it’s the only iLife program that communicates directly with all four of the other iLife programs. Among many other feats, it lets you download perfectly legal music files from well-known artists using the Music Store feature and zip them over to your iPod in no time, all from within iTunes and without buying a single CD.
The version that came with your copy of iLife ’04 is probably outdated at this point; Apple releases another version of iTunes every few months. But unlike the other iLife programs, iTunes is free. Each time Apple unleashes a new version, you’ll be notified by Mac OS X’s Software Update feature, which pops up on the screen and offers to update your copy via the Internet. Accept its invitation without fail.
This chapter is all about filling your copy of iTunes with music. Chapter 2 is all about playing that music (but here’s the gist of it: Double-click a song to hear it).
Before you go about stocking up on tunes, though, it’s worth taking a moment to get your bearings. The round-ended display at the center top of the iTunes window—the status area—tells you what song is playing, who’s playing it, which album it came from, and how much playing time remains. To the left are volume and song navigation controls; to the right is a search box for hunting down or looking up specific singers or songs. Figure 1-1 presents a guided tour of the controls and functions on the iTunes screen.
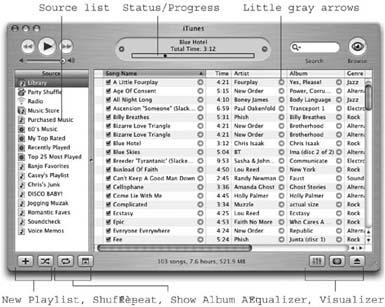
Figure 1-1. The iTunes window shows all of your playlists, the various places to find music in the Source list, and all of the songs in the chosen source. Here, for example, you can see the entire contents of the iTunes library.In version 4.5 and later, the circled gray arrows take you online to the iTunes Music Store. Or Option-click these little arrows to jump into iTunes’s Browser for the song or album you clicked (page 47).
The Source panel at the left of the iTunes window displays all of the audio sources you can tap into at the moment. If you have a CD in the computer’s drive, for example, it shows up in the Source list, as does your iPod when it’s connected.
Clicking a name in the Source column makes the main song-list area change accordingly, like this:
Click the icon of a CD you’ve inserted; the disc’s track list appears.
Click a playlist (page 51); the contents of that music mix appear in the window.
Click the Radio icon for a list of Internet radio stations, or the Party Shuffle icon to—well, see page 36.
Click the Music Store icon; you jump to Apple’s online music emporium where you can browse, preview, and buy songs (Chapter 4).
As shown in Figure 1-1, the iTunes window is brimming with tools for managing your music, all of which are described in detail in the following chapters. But first you’ll need some music to work with. The next section explores one of the most popular uses for iTunes—ripping digital audio files from compact discs.
Don’t be misled by the brushed-aluminum look of the iTunes window. In fact, you can push and pull the various parts of the window like taffy.
You can resize the panes within the iTunes window. Look for a shallow dot between panes; it denotes strips that you can drag to resize adjacent panes.
The main song list is separated into columns, which you can sort and rearrange. Click a column title (like Artist or Album) to sort the list alphabetically by that criterion. Click the black triangle next to the column title to reverse the sorting.
Change the order of the columns by dragging them. For example, if you want to have Album right next to the Song Name, drag the word Album horizontally until it’s next to Song Name.
UP TO SPEEDBox Full of Buttons
The round button up in the top-right corner of iTunes changes depending on what you’re doing. Here’s what each one means and when you see it.
The Browse button appears when you click the Library icon to look through your collection or shop in the iTunes Music Store.
This version of the Burn CD button shows up when a playlist is selected in the Sources area or you have a separate playlist window open onscreen.
If you have taken iTunes up on its offer to burn a CD by clicking on the previous button, this icon appears as the disc-burning process begins.
The Import button indicates you’ve inserted a CD into your computer and are ready to rip some songs into your iTunes library.
When the iTunes Visualizations are turned on, clicking the Options button lets you adjust the frame rate and other visual settings.
To check for new radio stations and other live streams available in the iTunes Radio area, click the Refresh button.
To adjust the width of a column, drag the vertical divider line on its right side.
To resize all the columns so that they precisely fit the information in them, Control-click any column title and choose, from the contextual menu, Auto Size All Columns. Double-clicking on the vertical column lines automatically resizes them to fit the text as well.
To add more columns (or less), Control-click any column title. From the pop-up list of column categories (Bit Rate, Date Added, and so on), choose the name of the column you want to add or remove. Column names with checkmarks are the ones that are currently visible.
Tip
Want to track your own listening habits? Turn on the Play Count in iTunes Options. Now you can see just how many times you have played “I Want You Back” by the Jackson 5 since you ripped that CD of old Motown gems to your hard drive. Checking out the Top 25 Most Played playlist in the Source window can also let you know where your ears have been lately.
If you intend to make a lot of adjustments to your list of columns, though, it’s much faster to make the changes all at once. Choose Edit → View Options to produce the dialog box shown in Figure 1-2, where you can turn columns on and off en masse.
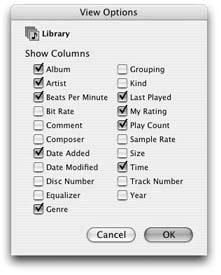
Figure 1-2. The View Options box from the iTunes Edit menu lets you see as many—or as few—categories for sorting your music as you can stand.Even in this tiny, unassuming dialog box, a trick or two awaits. If you Option-click any checkbox that’s turned on, you turn all of them off. And vice versa.If you want to turn all of them off except Album and Artist, for example, you’ll save time by Option-clicking a turned-on box to turn them all off—and then turning the two you want back on.
Lovely as the iTunes window may be, it can take up a heck of a lot of screen real estate. When you’re just playing music while you work on other things, you can shrink iTunes down to a svelte display panel that takes up a fraction of the size of the full window.
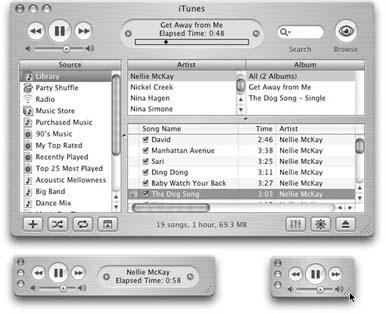
In fact, iTunes can run in three size modes: small, medium, or large (Figure 1-3). Here’s how you pull this off:
Medium. You can switch between large and medium by clicking the green zoom button at the top- or middle-left corner (or choosing Window → Zoom).
Figure 1-3. And what size music would you like today? You can choose large, medium, or small. Only the large version has the space to serve as command central for MP3s, Internet radio, visual effects, and the kitchen sink.
GEM IN THE ROUGHArbitrary Groupings
Speaking of the iTunes information columns: The column called Grouping lets you override the usual sorting criteria and keep together a bunch of songs of your own choosing. (If you don’t see the Grouping column, Control-click any column heading and choose Grouping, so that a checkmark appears next to its name.)
Many classical albums, for example, contain different symphonies, concertos, and other musical forms, all on one disc. How can you make sure that all of Mozart’s Concerto for Piano No. 5 in D Major (K 175) stays together, and doesn’t get mixed in with concertos 6 and 8 from the same CD?
Easy. Select all the “songs” that belong together (by
-clicking them). Then choose File → Get Info. iTunes asks if you’re sure you want to edit the file information for all of the selected pieces at once; yes, you do.
In the Get Info box, type Piano Concerto 5 (or whatever group name you want). Now, when you click OK, you return to the main iTunes list.
To sort your list by grouping name, so that grouped pieces appear consecutively in the list, just click the word Grouping at the top of the column.
Small. If your desktop isn’t big enough for even the small iTunes window in Figure 1-3 at lower left, try taking it down a notch. To create the mini bar shown at lower right in Figure 1-3, start with the medium-size window. Then drag the resize handle (the diagonal lines in the lower-right corner) leftward. To expand it, just reverse the process.
Get iLife '04: The Missing Manual now with the O’Reilly learning platform.
O’Reilly members experience books, live events, courses curated by job role, and more from O’Reilly and nearly 200 top publishers.

