Chapter 1. Getting Started
ONLINE SOCIAL NETWORKING IS A YOUNG BUT CROWDED FIELD, and any new site that makes people jump through hoops to get started isn’t long for this world. Luckily, getting started with Google+ is easy, and if you already use another one of Google’s services, diving in might require just a click or two.
Once you sign in, you get to decide how you want to use Google+. You can use it to connect with a very select group of friends, or to network with acquaintances, friends-of-friends, and the wider public through your profile and posts. The best part is that you get the final say over who can see every little bit of info you put online.
This chapter walks you through setting up your account, creating your profile, and setting visibility options to control who gets to see what.
Signing In and Joining Up
AS IS THE CASE with most Google offerings (such as Gmail, Google Docs, and Google Calendar), you need a Google account to use Google+. Most people get a Google account by signing up for Gmail, Google’s free email service (if you use Gmail, hop to the next paragraph), but you don’t need a Gmail address to use Google+. As long as you have some kind of email address, you can sign up for a Google account by heading to www.google.com/accounts. Simply click the “Sign up for a new Google Account” link in the upper right of that page, fill in the fields that appear, and then click “I accept. Create my account.”
As of this writing, Google+ is in beta, which means that some features might not work properly and some features may change abruptly. One aspect of Google+ that has changed since the site first launched is that you’re no longer required to have an invitation from somebody already set up with a Google+ account. Here are your options:
If you have an invitation email, the process is slightly different depending on whether you use Gmail. Whatever kind of email address you have, click the red “Join Google+” button in the invitation email. Here’s what happens next:
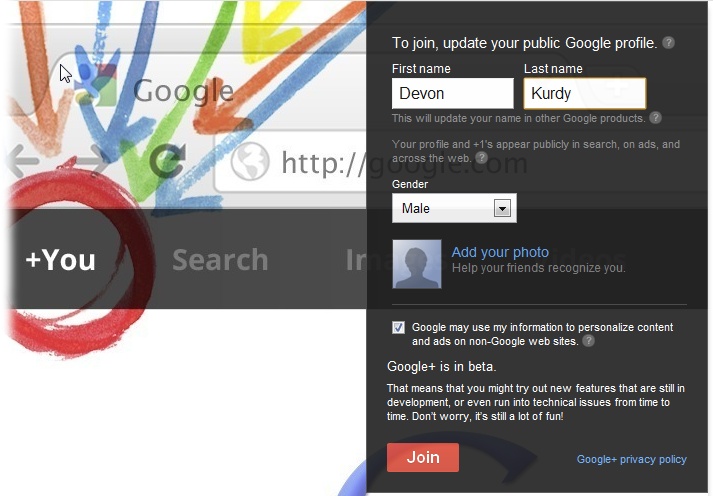
If you use Gmail you’ll see the box shown here, which already has your first name and last name filled in.
If you have an email address for your company or organization’s Google Apps setup (in other words, you sign into a site like www.google.com/a/something.com to get to your email), you can sign in with that account—just enter your full name@something.com email address in the email field.
If you use an email provider other than Gmail, you’ll see the Join Google+ screen. Click the red Sign In button to display the “Sign in with your Google Account” screen. Enter the full email address you used to create your Google account and your password, and then click the “Sign in” button. This takes you to the screen shown here.
Note
If you like, you can invite others to join Google+. The box on Inviting Friends explains how.
If you don’t have an invitation, simply head to www.plus.google.com. Click the red Sign In button and, on the page that appears, enter the full email address you used to create your Google account and your password, and then click the “Sign in” button. This takes you to the screen shown here.
Tip
If typing web addresses by hand that isn’t your idea of a good time, go to this book’s Missing CD page at www.missingmanuals.com/cds (yes, you’ll have to type that one by hand—sorry), where you’ll find a clickable list of all the web addresses mentioned in this book.
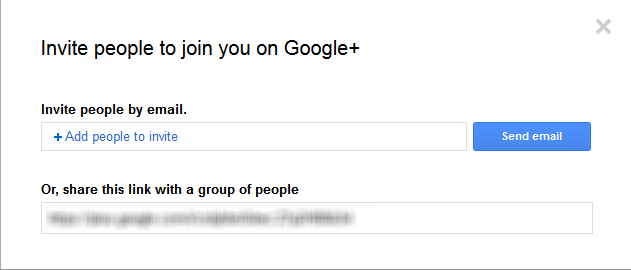
Even though you don’t need an invitation to join Google+, sending invitations to friends who aren’t yet members can help them get started more quickly, and gives you more people to interact with. To send an invite, log into Google+ and then click the Google+ logo at the top of the screen to make sure you’re on your Home page. On the right side of that page, click the “Invite friends” button. (If you don’t see this button, don’t panic: It’s likely to disappear in the near future, since having an invitation is no longer a requirement for joining Google+.)
The dialog box that appears gives you a couple of options: You can invite friends individually by clicking the “+ Add people to invite” field and either typing out the name of someone who’s in your Gmail, Yahoo, Hotmail, or other address book, or typing in a few friends’ email addresses (separated by commas); either way, click “Send email” when you’re done. A more efficient method is to select the link in the lower box, copy it by pressing Ctrl+C (⌘-C on a Mac), and then heading over to a different a social networking site you use—Facebook, Twitter, LinkedIn, or the like—and pasting it into a status update by pressing Ctrl+V (⌘-V on a Mac). That way, anyone who wants to join Google+ can do so by clicking the link in your post.
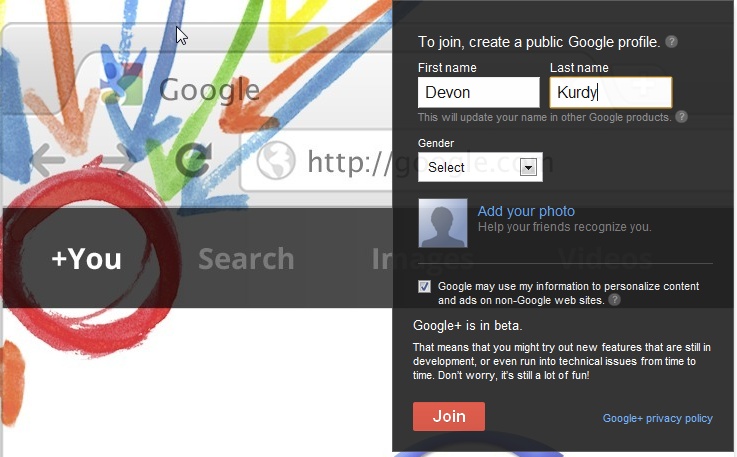
The first step in using Google + is to create a Google profile, a page that shows just a bit about you or a whole lot, depending on your preference. How much you share, and with whom, is up to you. The box that reads “To join, create a public Google profile” only asks for your first name, last name, and gender (Male, Female, or Other), and possibly your birthday. All of these fields are required. You’ll learn how to flesh out your profile starting on Fleshing Out Your Profile.
Note
Google+ has a fairly strict “common name” policy, at least as of this writing. That means they don’t want you to sign up under a pseudonym, brand name, parody name (God, Fake Steve Jobs), or anything other than your real name. Google isn’t reaching through your keyboard and fingerprinting you, but if their moderators or automatic search tools discover that you’re using a fake name, you’ll be asked to change it, and you could be booted off Google+ if you don’t comply. Once you’ve signed up under your real name, however, you can then set up a Page for a company, brand, or even a fictitious entity—see this book’s Missing CD page for details (www.missingmanuals.com/cds).
Google+ also suggests uploading a photo to “Help your friends recognize you.” While you don’t have to add a photo, it’s a good idea because it lets people know they’ve found you and not someone else who shares your name. That way, you’ll spare your friends from awkward “Do I know you?” conversations with strangers. If you’re a Google enthusiast or veteran of Google Buzz (a predecessor of Google+ that wasn’t very well received), you might already see an image on this first sign-up page. If not, or if you’d like to use a different photo, click the “Add photo” link or the silhouette next to it, and you’ll be prompted to pick a photo.
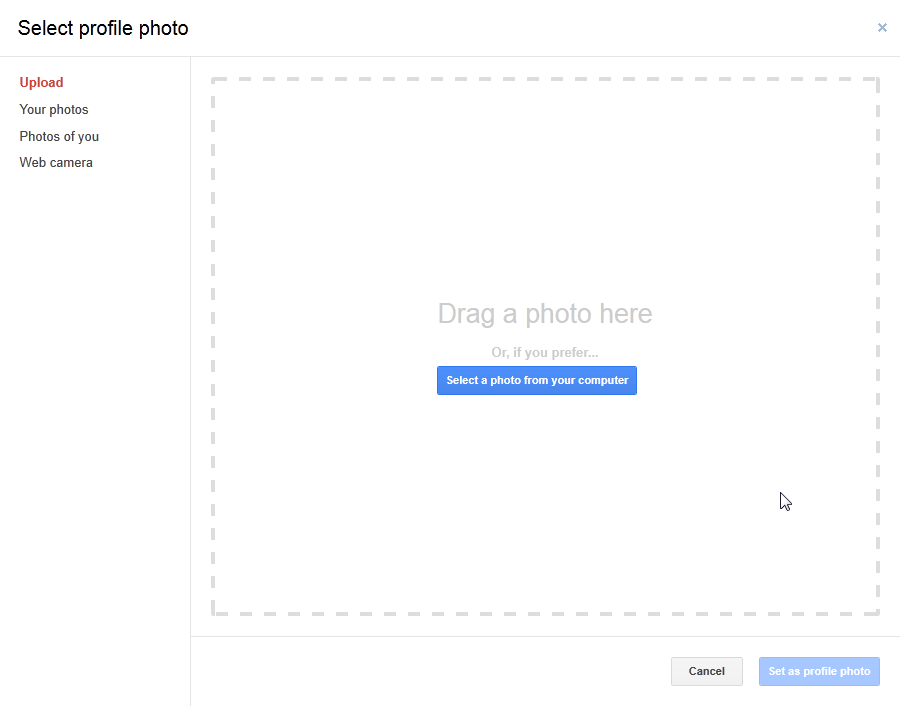
If you’re on your own computer and have a few pictures of yourself that you like, click the “Select a photo from your computer” button. In the file-selection box that appears, find the image you want to use (it can be a JPEG, GIF, or PNG file) and double-click it. Don’t worry if it’s not cropped properly, or even if it could look a bit better—you’ll be able to make those edits right in Google+, without needing any other software, as explained in a moment.
Tip
If you use Firefox, Chrome, Safari, or certain other browsers besides Internet Explorer, the “Select profile photo” dialog box gives you the option of selecting a photo by dragging instead. The process is just like moving a file on your computer with the mouse: Line up your web browser so you can see the image file you want (whether it’s saved on your desktop or you’ve located it in a file-viewing program like Windows Explorer, for example) and then simply drag the file into the dotted-line box within the “Select profile photo” dialog box. (If you use IE, you won’t see this dotted-line box.)
If you use Google’s Picasa Web Albums to store photos, you can click “Your photos” on the left-hand side of the “Select profile photo” dialog box and then pick a photo from your gallery. The other, less convenient options listed there are “Photos of you,” which tells Google+ to try to find photos in which you’ve already been tagged (Tagging Photos)—an unlikely occurrence at this early stage—and “From your phone,” which leads you through installing Google+ on your smart-phone. That’s quite a lot of work at this stage, though, and since you can change this photo at any time, just pick something fairly decent and upload it.
Tip
If you have a camera built into your computer and use Firefox, Chrome, or Safari as your web browser, you might see a “Web camera” option on the left of the picture-choosing box. If you like, go ahead and try taking a headshot using your webcam, but it can be tough to get a decently lit shot that shows your best side.
Once you choose a photo, Google+ displays controls that let you crop and rotate the image right in your web browser. Drag the four little white boxes to select the part of the image you want to use as your profile photo. You generally want to choose just your face, or perhaps your head and shoulders, so that your friends and acquaintances will be able to pick you out even if they’re looking at a tiny version of your profile photo. Far-off shots of your handstands at the beach won’t quite do (man, you really had a time in St. Lucia, didn’t you?). If you need to rotate the photo, click the icons to the right of the image to spin it left or right.
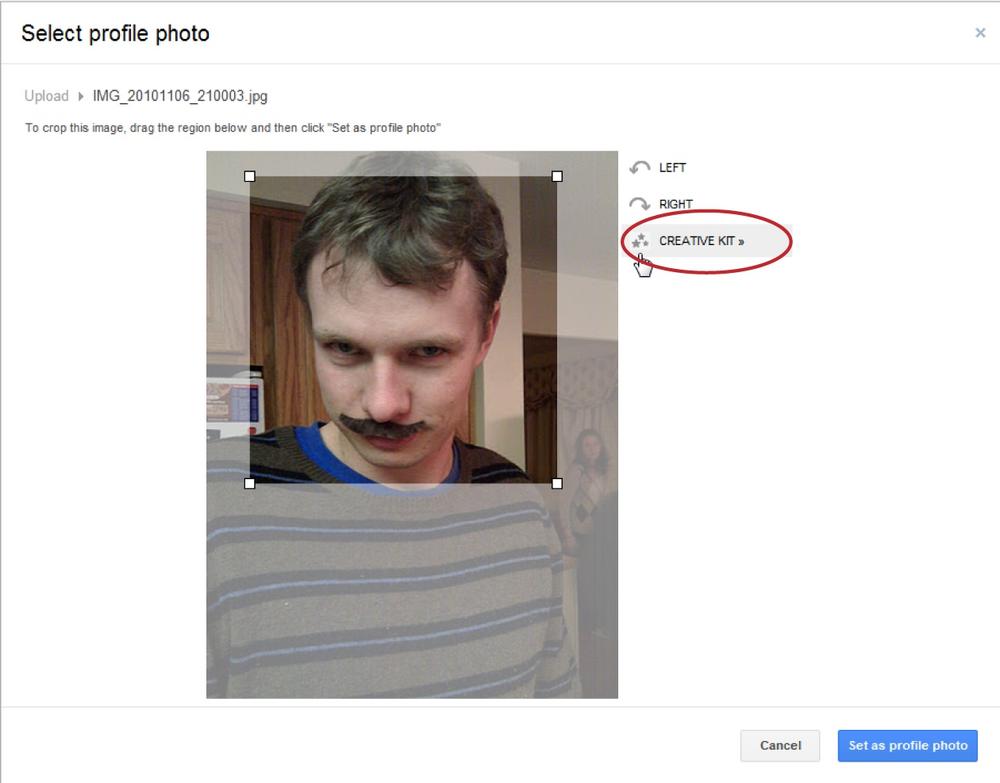
Need to do some serious tweaking to your photo? Click Creative Kit to edit it with a slightly customized version of Picnik, an image-editing program from Google that runs in your browser. When you do, the dialog box changes to include tools that let you adjust your photo in all kinds of ways. The four tabs at the top left let you choose from Basic Edits (like adjusting exposure and sharpening your image), Effects (such as adding filters or shapes), Vandalize (drawing, moustaches, and other goofy stuff) and Text (which, not surprisingly, lets you add text). You may see other options, too, depending on the season—like Halloween right around October 31. Click the icon that looks like a little gear if you want to work on your image in full-screen mode or access Picnik’s Help files.
Tip
You’re not restricted to using Picnik just on your profile photo. You can access its powers anytime to improve any photo, without even signing up for an account, at www.picnik.com.
When your profile image looks good, click the “Set as profile photo” button, and you’ll land back on the profile-setup page. Now’s a good time to take note of two notices on this page.
One is a checkbox that’s automatically turned on. If you leave it on, you’re agreeing to let Google use information from your Google+ account to “personalize content and ads on non-Google websites.” That sounds like a pretty big thing to just casually allow the world’s most powerful online-advertising firm to have access to, right?
You can click the ? icon after this disclaimer for more info. In short, what Google wants to do is allow websites that aren’t part of the Google universe to install Google+ buttons, toolbars, and the like, and make them work with your Google+ profile. For example, when you read an article online or view a friends’ photo on a photo-sharing site, you may see a little Google-styled +1 button (you learn more about how the +1 tool works starting on Interacting with Posts). If you click that button, other Google+ members you’re connected to will see that you like the article or photo. In addition, you might see online ads for stuff related to what you’ve given a +1. For instance, if you give a +1 to an article about a kitten getting rescued from a tree, you might start seeing ads for kitten chow, scratching posts, and the like on sites that use Google’s ad-display services. If the thought of personalized advertising creeps you out, then turn off this checkbox—and don’t click any +1 buttons you find around the Web.
The other caveat informs you that Google+ is in beta. That just means that you’re a guinea pig and that some Google+ features may not work properly. The paragraph also makes it clear that you, not Google, are responsible if any data you didn’t want to share somehow leaks out. So use common sense and don’t put anything on Google+ that you wouldn’t be comfortable sharing with your mom or your boss. (You can read the full Google+ privacy policy at www.google.com/intl/en/+/policy.)
With all that understood, you’re ready to click the Join button and get going for real. Once you do that, Google+ displays a page that asks you to find people you know on Google+ through your Hotmail or Yahoo Mail accounts. If you use either of those web-based email services, you can click the “Find people” button next to its name, enter your email password, and then add people to your list of Google+ contacts right away. But, as explained on Adding People to Circles, you can look people up this way at any time, so for now, go ahead and click Skip.
Note
After you click Join, you may also see a message box offering to link Google+ with your Picasa Web Albums (this box only appears if you’ve already posted some photos on Picasa). Google is warning you that it’s going to make it possible for you to share photos you stored in Picasa Web Albums through Google+ (though it won’t share them until you say so), and start putting photos you upload to Google+ into your Picasa stash. However, albums you set up with strict privacy settings remain private. And, as a nice bonus, you get quite a bit more space on Picasa, because Google will stop counting photos under a certain resolution (2048 x 2048, to be exact) and videos under 15 minutes toward your total allotment of Google storage. For most amateur photographers, that means an unlimited amount of space. You can check your storage usage, by the way, by visiting http://picasaweb.google.com (scroll to the bottom of the page). You have to click the “Link Google+ with Picasa Web” to continue into Google+, as clicking Cancel sends you back to the previous screen.
Next you’ll see a page that lists some “interesting and famous” people whose posts you might like to read. These folks are shown in a grid on the left side of the page, and you can switch to a different category of people by clicking the topics on the right—entertainment, news, music, and so on. If you don’t want to add anyone, just click Continue at the bottom of the page. If you happen to see someone you’re interested in, mouse over the “Add to circles” button next to their name, pick Following from the list that appears under your cursor, and then click the Continue button at the bottom of the page. (You’ll learn all about circles—including what the Following circle is and what public posts are—in Chapter 2.)
Note
If you decide not to connect with people in your email address book or with famous types, Google+ may display a pop-out warning that “You might be lonely.” Just click “Continue anyway,” and forget about Google’s concerns. You can easily add people to your Google+ network from lots of places, as you’ll soon see.
Fleshing Out Your Profile
YOU CAN JOIN GOOGLE+ by providing nothing more than your first name, last name, gender, and (maybe) birthdate, but it’s better to give your friends and the folks who run across your profile more to go on. So the second page you see after officially joining Google+ is one where you can add details to your profile.
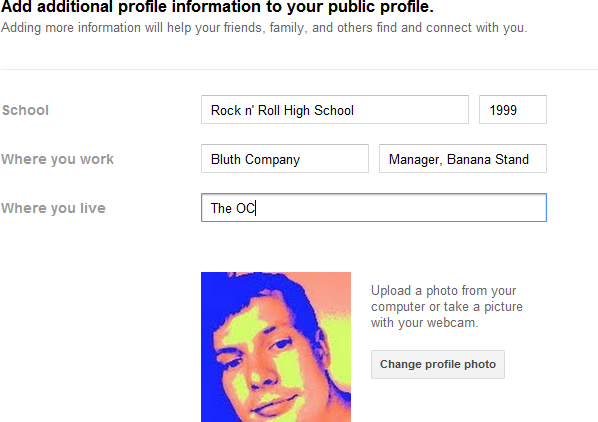
The fields on this page aren’t mandatory, but they are pretty standard for most social-networking sites (and even most job applications): the school you graduated from, the place you work, and where you live. Why would you want to fill in these fields if they’re not required? The box on What a Google Profile Does for You gives you the lowdown.
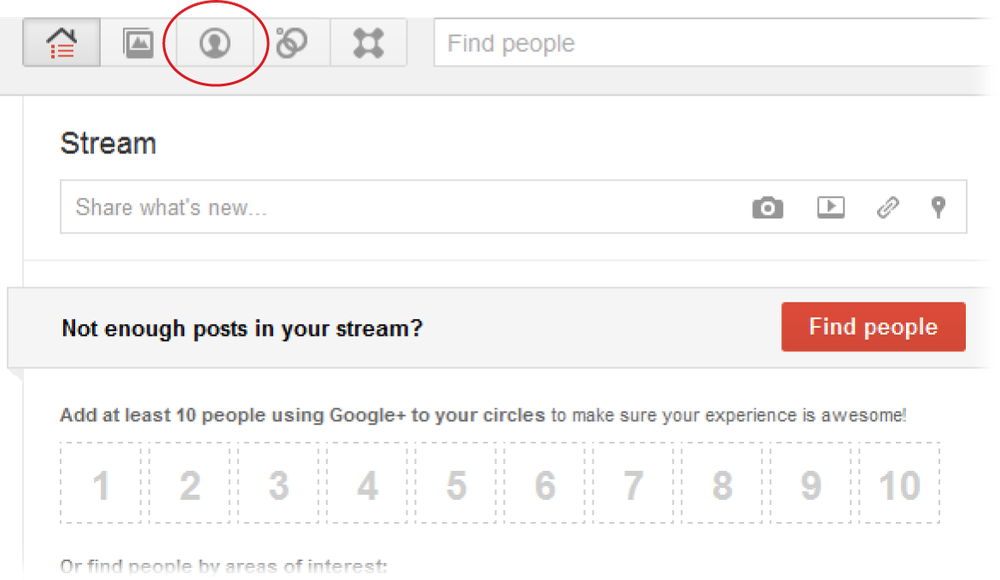
After clicking “Continue” on the “Add additional profile information…” page, you’ll arrive at the main Google+ screen, which shows—well, not a whole lot. That’s because you haven’t connected with anybody on Google+ yet, and with just a small portion of your profile filled out, folks might not instantly find you. Not to worry—that’ll change soon. Head to your profile page by clicking the Profile button in the gray row of buttons near the top of this screen—it has a small head silhouette in a circle on it.
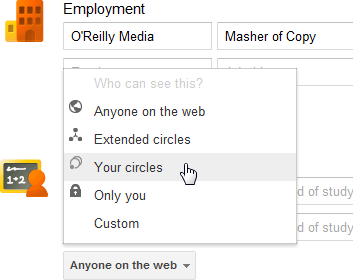
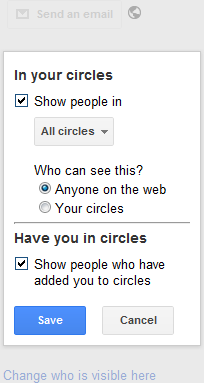
When you arrive at your profile, Google+ displays a white box that includes a few fields you can fill in to include a tagline and more details about yourself, like your employment and education history. Take note of the gray boxes under each of the profile pieces, including your photo. Click one of them, and you’ll see a bunch of visibility options:
Anyone on the web means just what it sounds like—anyone who searches for your name, stumbles across your profile page, or receives the web address for your profile can see those elements of your profile with this setting. This is the option Google+ chooses automatically unless you change it.
Extended circles and Your circles are things you’ll learn about in the next chapter. (Circles are the way you organize your Google+ contacts.) For now, consider these settings to mean “People I’ve specifically allowed to see this and/or friends of those people.”
Only you is just you, baby, and it’s the safest option if you’re not sure whether to share something. Google+ is, however, a social network, and so keeping stuff to yourself doesn’t make it worth much.
Custom lets you share info with particular people and circles. You’ll learn how on Writing a post while viewing your main stream.
You’ll have a better understanding of circles and Google+ sharing very soon, but for now, decide what you’re comfortable leaving public, and set the other bits as “Only you” or “Your circles” (which, at this point, contain only you).
Why should I incude anything beyond the required basics in my Google+ profile? What’s the point of letting strangers know where I’ve lived or sharing “bragging rights” with people I already know?
The answer, in part, is that the whole point of social networking sites—like Google+ and Facebook—is defining who you are, what you’re into, and how you’re doing to people you know and people you’re just meeting. But another big reason is because the profile you’re filling out in Google+ is the same one people may find when they search you out on the Web. It’s just a fact of modern life that people are likely searching for your name on the Web (probably via Google.com).
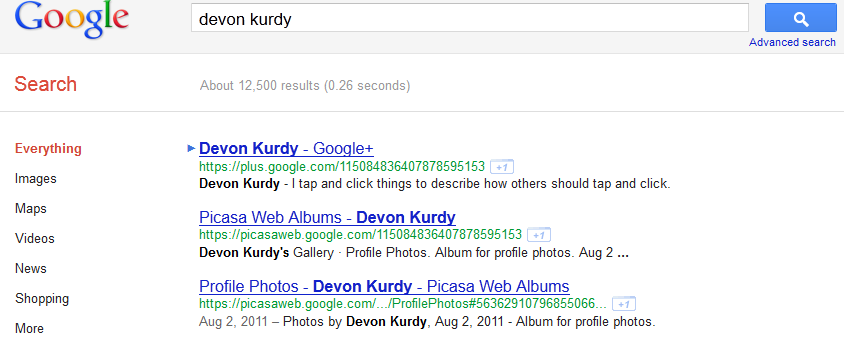
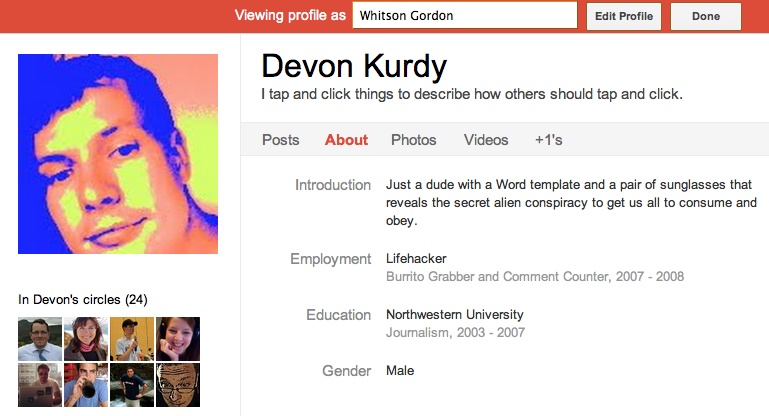
In the past, the answer to the question “How can I control what people see when they Google my name?” was “You can’t,” or perhaps “It requires a lot of work and/or a lot of money.” Your Google+ profile (which is the same thing as your Google profile) gives you a kind of official response when someone Googles your name—a specially marked link to your profile. For example, someone searching out Devon Kurdy might see mentions of him in blog posts, his Facebook profile, and perhaps an unfortunate reference to him in a police report from his confused punk-rock period in the late ’90s. But they’d also see a somewhat differently marked link to Devon’s official Google profile, as shown here, so they can at least see what he has to say about where he’s at these days before they read about his part in that 1998 Dead Kennedys after-party.
Your Google profile may not always be the first search result when someone Googles your name, especially if your name is very common, but it usually shows up on the first page of results.
Once you’ve entered what you want on your profile screen (it’s all optional), click “Continue to my profile.” If you’ve already clicked somewhere else, you can quickly jump to your profile from any page in Google+ by clicking the aptly named Profile button shown on Fleshing Out Your Profile. It’s one of the buttons at the top of every page, to the left of the search bar.
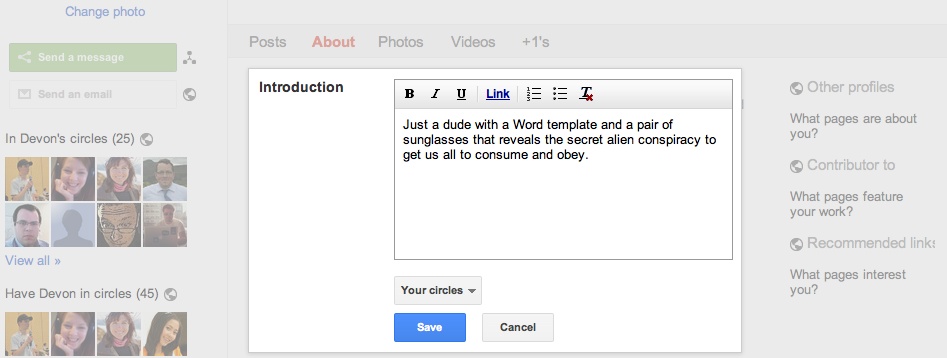
Your Profile page includes your name, your tagline (if you entered one), and your profile photo. Below your name and tagline are five tabs you can check out: Posts, About, Photos, Videos, and +1’s.

Editing Your Profile
The section you care about right now is About, which is the first page people will see when they find you on Google+. If the word “About” below your name isn’t in red text, click “About” to select it and see the information you’ve already provided. Then, click the blue Edit Profile button in the page’s upper right to get cracking.
A red bar appears near the top of the page to indicate that you’re editing, and when you move your cursor around the screen, whatever you’re pointing at gets highlighted in light blue. When you click, a box pops up so you can edit that particular bit of info. Exactly how you edit each of these sections differs slightly, but there are a couple of aspects they all have in common: A text box (which is usually filled with some italicized placeholder text to provide inspiration) where you enter your info, and a gray box with the visibility options described back on Fleshing Out Your Profile where you decide who can see each bit of your profile.
With these tools, you can create different versions of your profile for different contexts. For example, you might fill out just a few boxes of very basic information—current employer, a generic tagline—and make those visible to “Anyone on the web.” You can then add other, more personal bits—like “Bragging rights,” places you’ve lived, and your relationship status—and make them visible only to “Your circles” or “Extended circles,” which you can think of as “friends” and “friends of friends,” respectively. Because you can control who sees which portion of your profile, you don’t need to fill in generic, “safe” information that’s boring and unhelpful to people who might be interested; just restrict the juicy bits to the people you trust. But you might want to hold off on entering things like your home and work contact information until you have a few contacts and circles in place (see Chapter 2); then, you can use the “Custom” visibility option to choose exactly who can see this sensitive info.
Tip
Check out the little icons to the left of each of the visibility options. These icons appear next to each item in your profile when you’re editing it. They’re a handy way to see what level of visibility you’ve applied to each tidbit without having to click each item individually.
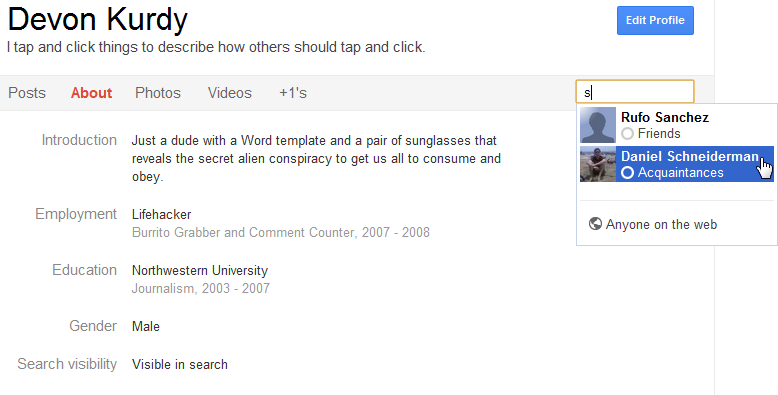
Some sections of your profile aren’t just text, however. Below your profile picture, you may see small images of people you’ve added to circles, and people who have added you—but it’s likely sparse, because you likely haven’t added anybody yet if you’re just getting started. Like everything else on your profile page, if you’ve clicked Edit Profile, this space includes a small globe icon you can click to change who can see your Google+ connections.
(Starting to see a trend? One of the major selling points of Google+, especially compared to other social-networking sites like Facebook, is the fine-grained control it gives you over who can see what, under what circumstances. Facebook has some settings to control stuff like this, but Google+ makes it clear what you’re letting friends, acquaintances, and complete strangers see.)
Most of the other fields on your profile are fairly self-explanatory, but here are a few that aren’t quite as obvious:
Send an email. Clicking this setting displays an “Allow people to email you from a link on your profile” checkbox. Turning on this box lets people who view your profile click the “Send an email” button and send a message to the address you used to sign up for Google+—but people who click this button never see your actual email address.
Add some photos here. Click this field, which appears below your name and tagline if you haven’t added any photos yet (and you probably haven’t), and you can upload photos from your computer (or, if available, photos from your Picasa Web Albums—see Pulling Images from Picasa Web Albums) to give viewers a look at who you are and what kinds of pants you own. The process is the same as the one you used to select your profile photo (Signing In and Joining Up); click the Add Photo square to get started.
Links. On the right side of your profile, three different sections let you show folks your work and interests, and give you a chance to link up other accounts:
“Other profiles” and connected accounts. When you click the “Other profiles” link, a box pops up that includes two options: “Add custom link” and “Manage connected accounts.” The first is a simple way to add a link to other sites where you maintain an account and post things regularly—like your blog or a forum you comment on frequently, for example. But if you regularly use Facebook, LinkedIn, or another online service, click “Manage connected accounts” to display a page that lets you connect your Google+ account to your other online accounts. You’ll learn more about importing contacts from other networks into Google+ in the next chapter, but for now, feel free to add links to your Facebook profile, LinkedIn resume, or other types of accounts listed here (click the “Connect an account” button to see more options). Doing so makes info in those other accounts show up in your Google web searches, and to make it easier to identify and add people you know on other sites to your Google+ circles.
“Contributor to” and “Recommended links”: Click either of these links if you want to add links to your favorite websites to your profile. You’ll see two text boxes: Label and URL. Type a description of the site or its name in the Label field (FC Buffalo Soccer, for example) and the web address in the URL field (www.fcbuffalo.org).
Other names. You’ll find this item near the bottom of your profile page. If people know you by a name other than the one you signed up for Google+ with—professionally, before marriage, or for any old reason—entering it here makes it easier for friends to find you, and gives your profile more context when people are searching you out.
Profile discovery. This important setting is at the very bottom of your profile—click it to see the “Help others discover my profile in search results” checkbox. Leave this setting turned on if you want your profile to be part of the results people see when they search for your name using Google and other search engines. Turn it off if you’d rather this profile not be visible to people searching you out on Google.com or other search engines.
Tip
You can also decide which tabs you want to include in the gray bar that lists Posts, About, and so on. The first two tabs—Posts and About—are always visible; you can’t turn them off. But if you click the Photos, Videos, or +1’s tab while editing your profile, you’ll see a “Show this tab on your profile” checkbox; turn it off to hide that particular tab from everyone, or turn it on to display the tab. (Alas, you can’t set custom visibility options for these tabs like you can with other sections of your profile—it’s all or nothing.)
All done editing? Mouse up to the red bar at the top of your profile and click “Done editing.”
If all the buttons on Google+ were as clearly labeled as the “Done editing” button, this book could be mighty short. Luckily for your humble author, the “View profile as” box in the upper right of your profile provides just the kind of mystery this book can solve.
This box lets you test out all the visibility options you set up for your profile page. Click it, and then click the “Anyone on the web” option that appears in the drop-down menu. Your profile page will re-load to show what people without any special connection to you can see. (The one exception is the red “Viewing profile as” bar that appears at the top of your profile, which no one besides you can see.)
If you already have a few people in your circles, you can start typing someone’s name in the “Viewing profile as” box on the red bar, and then select their name when it appears in the drop-down list to preview what that person can see. It almost goes without saying what a good idea it is to use this feature to preview what bosses, editors, overbearing friends, and all those other question marks in your social networks can see.
If you’re comfortable with what appears in the preview, click the Done button. Otherwise, click Edit Profile to take another crack at tweaking your visibility settings. Then preview how your profile looks to various people until you’re comfortable with who can see what.
Congratulations—you’re officially on Google+! You’ll definitely want to come back and edit your profile again as you add people to your circles, start using Google+ a bit more publicly, and learn more about how the site works. For now, though, you’ve got a profile that lets your friends find you, gives strangers just enough information, and keeps your misguided attempt at Lost fan fiction from dominating the Google search results for your name.
Note
If you own or manage a business, brand, or organization that wants to have a presence on Google+, you can do that as long as you’ve already set up a regular Google+ account. For the low-down on setting up Pages—a new feature that lets companies and other groups connect to people on Google+—head to this book’s Missing CD page at www.missingmanuals.com/cds.
Now that you’re up and running with a Google+ account and a profile, you’ve likely got a few questions about what circles are and how they work. Luckily, circles are the subject of the next chapter.
Get Google+: The Missing Manual now with the O’Reilly learning platform.
O’Reilly members experience books, live events, courses curated by job role, and more from O’Reilly and nearly 200 top publishers.

