Chapter 1. Making Multiple Copies
This chapter covers the various ways you can make linear and rotated copies by using the Move and Rotate tools. If you’ve done any basic work with SketchUp, you might already be familiar with the concepts in this chapter. Keep reading, however. Even some experienced users don’t know all there is about how to copy, which is a fundamental and important concept. (Plus it never hurts to review some basics.)
As you probably know, the Move tool is used to move objects, and the Rotate tool is used to rotate objects. For both tools, when you press the Ctrl/Option key, you will make copies. For linear copies, you can adjust the spacing and number of copies, and for rotated copies, you can adjust the angle between copies and the number of copies. For both kinds of copying, you can make these adjustments as many times as needed while the tool is still active. Keep in mind, however, that after you start a new Move or Rotate action, or activate a new tool, you can no longer adjust the spacing, angles, and so on.
1.1. Copying in Linear Arrays
Problem
You want to copy an object in a linear pattern (rows and columns).
Solution
Use the Move tool to make one copy and then adjust the number of copies and spacing between copies.
Discussion
To make copies, activate the Move tool and press the Ctrl key (Option on the Mac). SketchUp is very flexible in how you can set the spacing and number of copies: After the first copy is made, you can enter the number of copies you want and set the spacing between them. Until you activate a new tool or start a new Move operation, you can continue to adjust both the spacing and numbers.
Most often, you need to make several copies of something in the horizontal (red or green) or vertical (blue) direction. In this example, you will practice this scenario by placing rows of windows along a wall. In the Other Uses section, you’ll see other examples of linear arrays: placing desks in a classroom, creating a neighborhood of identical houses, and arranging keys in a musical keyboard.
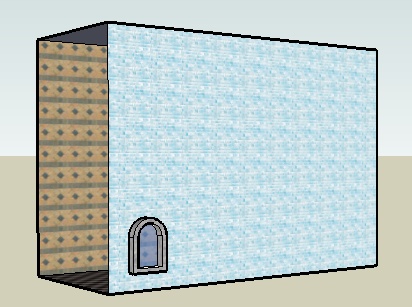
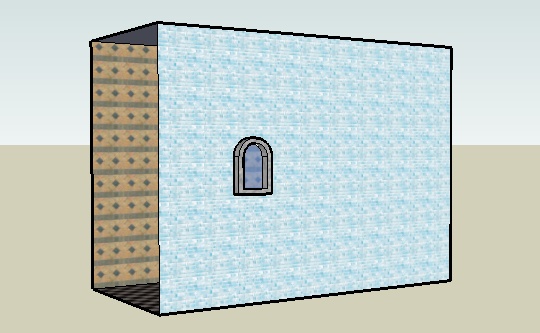
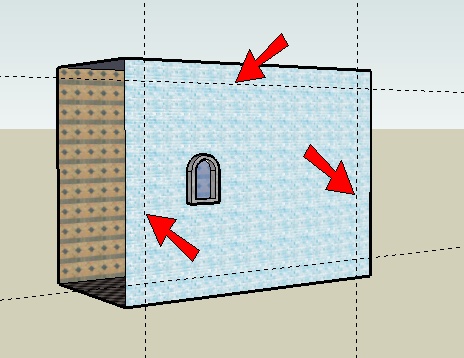
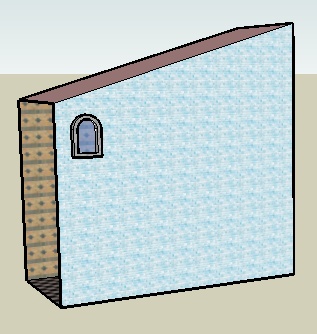
Start with a building like the one shown in Figure 1-1, which has one small window at the lower-left corner of the front face. You can create your model from scratch, or download my Linear Array model from the 3D Warehouse. Because the window will be copied, it should be a component. Why a component? A component is easy to select and will keep the file size small.
Note
Aside from the reasons already mentioned, components are an extremely powerful feature of SketchUp, and you should take advantage of them wherever you can. Components are covered in detail in Chapter 7.
Activate Move and press the Ctrl/Option key. (You need to only tap the key; you don’t have to keep it pressed.) You should see a + sign on the cursor symbol.
Note
When you use the Ctrl/Option key to make a copy, you can tap the key either before or after clicking move points. You can also tap Ctrl/Option repeatedly to toggle copying on and off.
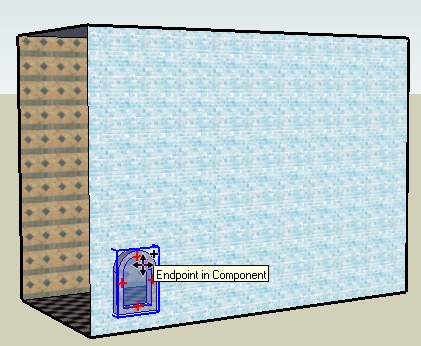
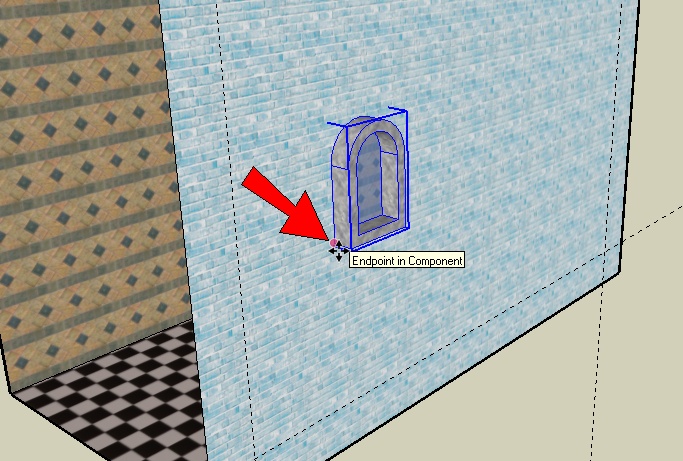
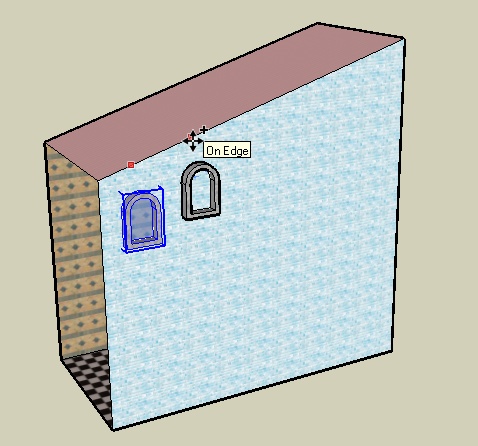
Move the cursor over the window, which becomes highlighted in a bounding box (Figure 1-2). Click anywhere on the window, but do not click on one of the red + signs, as these will switch you from Move to Rotate mode.
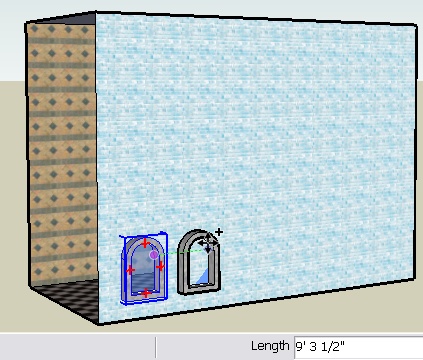
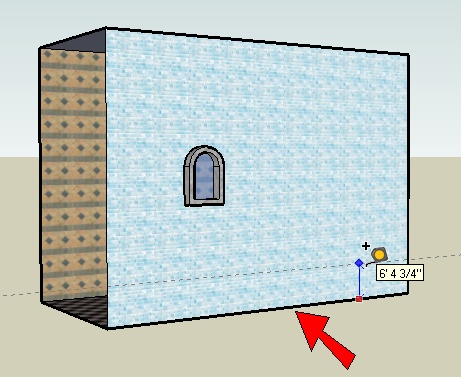
The second point places the copy. Move the mouse directly to the right, in the green or red axis direction, as shown in Figure 1-3. (Whether the direction is green or red depends on how you oriented your model.) While you’re moving the mouse, look at the Length box, which indicates the distance between copies.
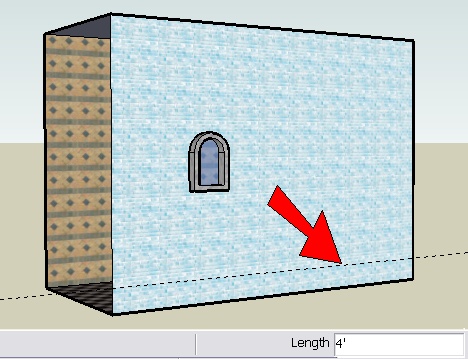
Click to place the copy. After the copy is placed, the window glass cuts the wall, and you can see through it.
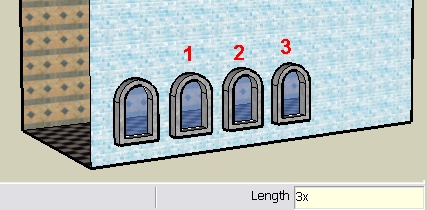
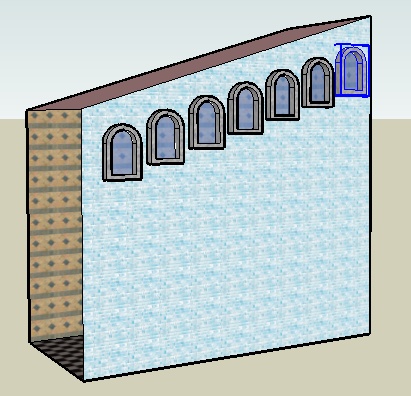
Making an external linear array in SketchUp is easy: Type the number of copies you want, followed by an x, and then press Enter. Type 3x and press Enter, for a total of four windows (Figure 1-4).
Note
Do not click in the Length field; just type and press Enter. If you click to enter the Length field, SketchUp will think you are ending the current action.
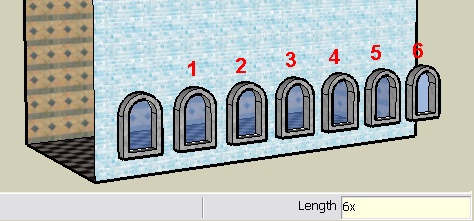
As long as you don’t start another Move operation or activate another tool, you can change your mind about numbers and spacing. For example, entering 6x yields seven windows, which is too many (Figure 1-5).
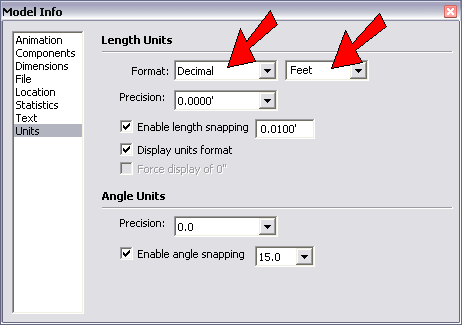
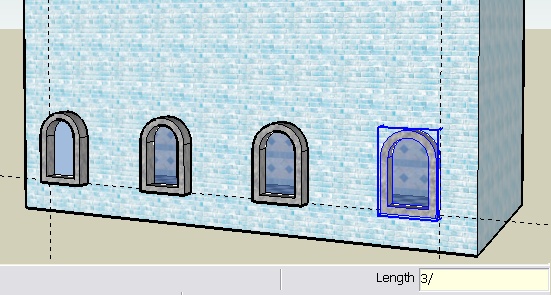
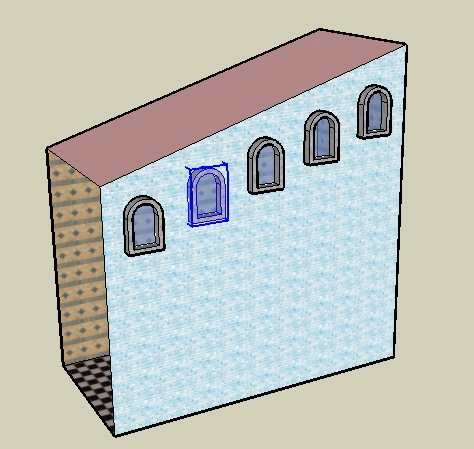
Enter 5x to produce five copies, for a total of six windows (Figure 1-6). This is better, but the spacing isn’t quite right. The windows should be closer together.
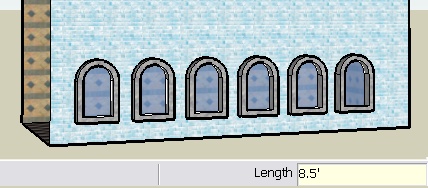
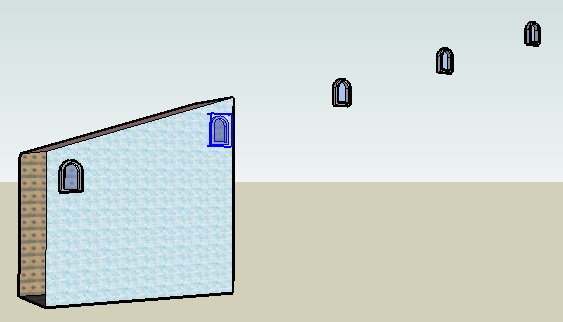
To make the windows 8 feet apart, type 8′ and press Enter. (If your units are Architectural, you need to include the apostrophe for the foot symbol.) As you can see in Figure 1-7, this looks too crowded.
Try 8′ 6″ (Architectural format for 8 feet and 6 inches). You can enter this dimension most easily as 8.5′. This still looks too crowded (Figure 1-8).
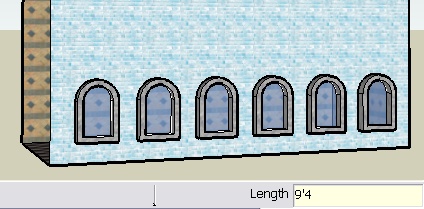
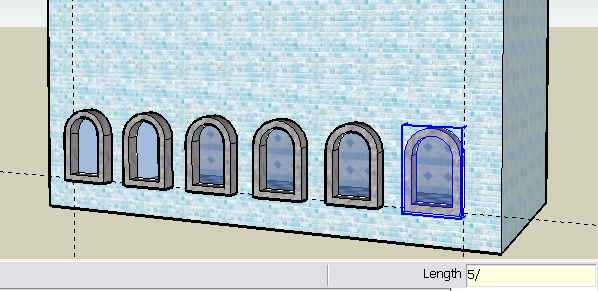
Keep trying out new numbers until your spacing looks right. As shown in Figure 1-9, I settled on spacing of 9′ 4″, which can be entered like this: 9′4. (The inch symbol is not needed because that is the default unit.)
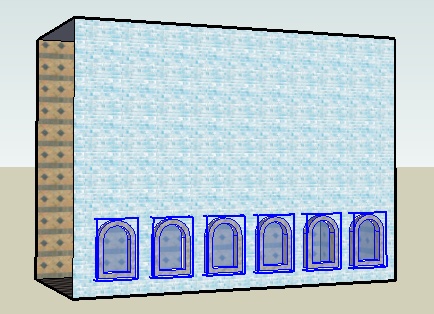
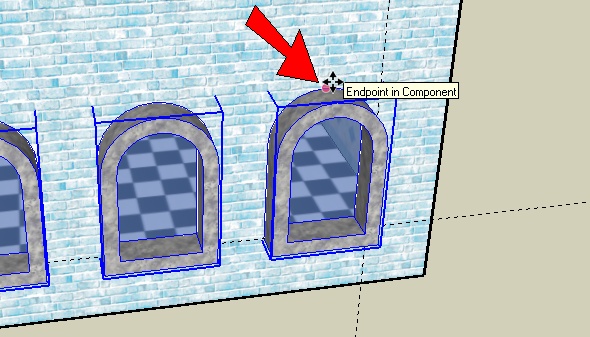
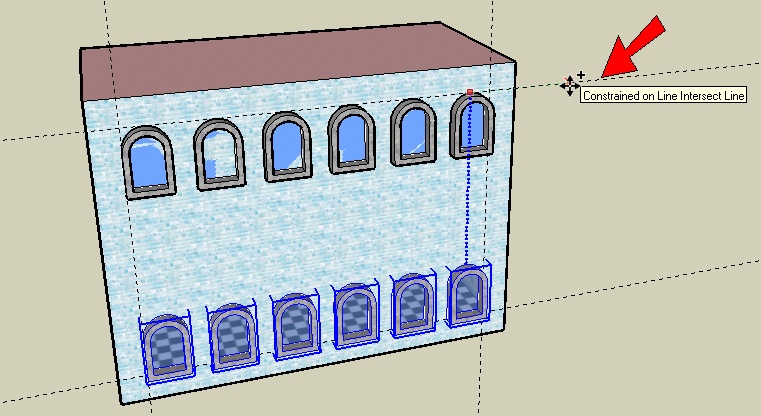
When your row of windows looks right, you can copy the entire row. The Move tool will actively select only one object at a time, so when you want to copy multiple objects, you must first preselect the objects. Activate Select and select all of the windows in the row, as shown in Figure 1-11. (Holding the Shift key enables you to select multiple objects.)
Activate Move and press Ctrl/Option. Click anywhere for the first move point—on a face, edge, or in blank space. Then click the second move point straight above the first move point, in the blue direction (Figure 1-12).
SketchUp moves the selected objects by the distance and direction between the two move points.
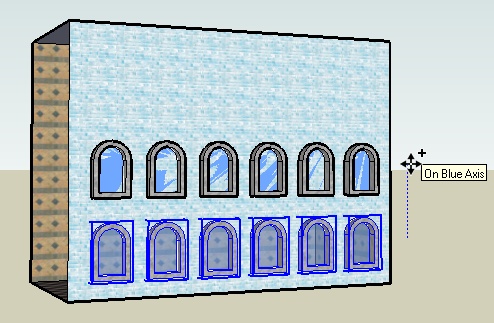
Enter 2x (or whatever number works for you) and adjust the spacing to fill the wall with windows (Figure 1-13).
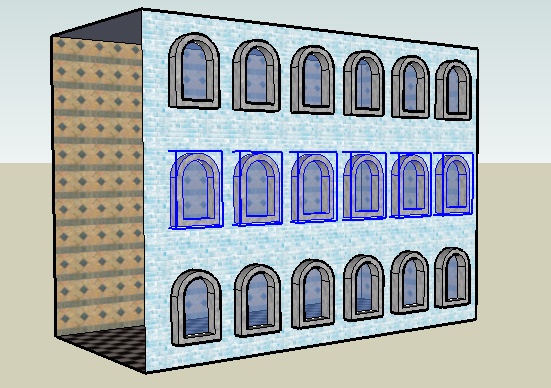
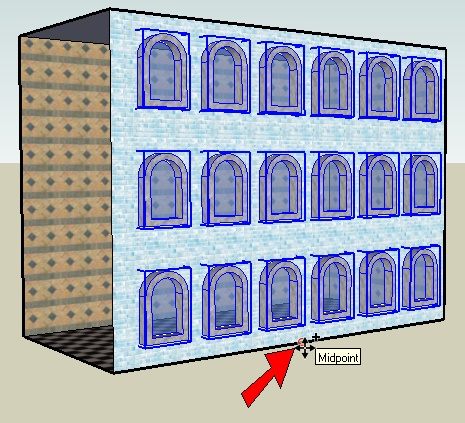
Now you can copy all of these windows to the back of the building. Select them all, activate Move with Ctrl/Option, and for the first move point, click the midpoint shown in Figure 1-14. This midpoint is used so that the position of the windows relative to the front wall will be the same for the windows copied to the back wall.
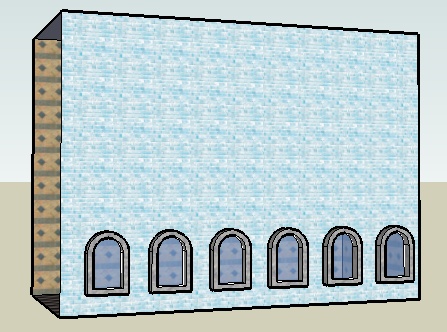
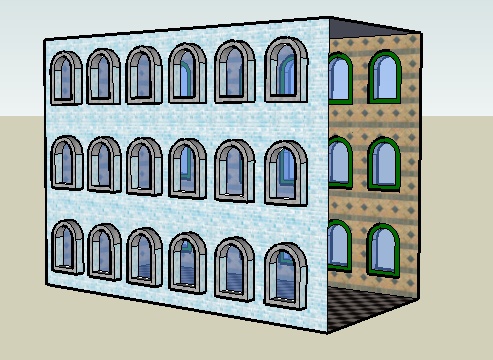
Orbit to face the back wall, and click the same midpoint on this wall. The finished building is shown in Figure 1-15.

Other Uses
There are endless possibilities for external linear array copies, but here are just a few:
Figure 1-16 shows repeated chair-and-desk components that fill a classroom.
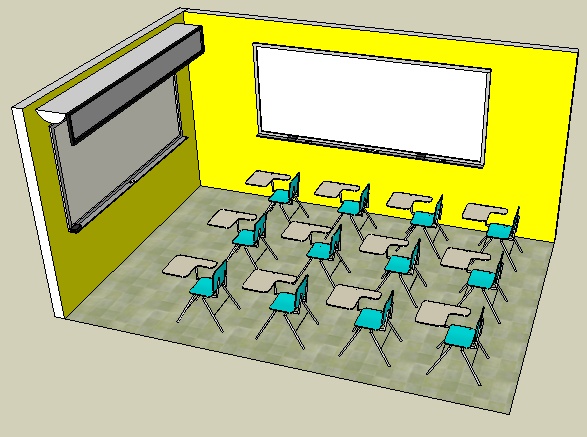
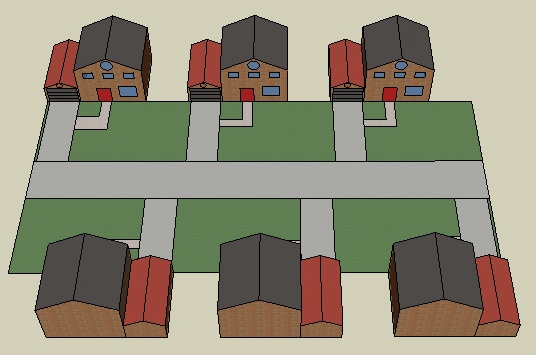
Figure 1-17 shows houses copied to make a neighborhood. (To copy the houses from one side of the street to the other, you can turn them to face the right way with the Flip option on the pop-up menu.)
Note
To make a neighborhood with houses of different colors, see Recipe 7.8.
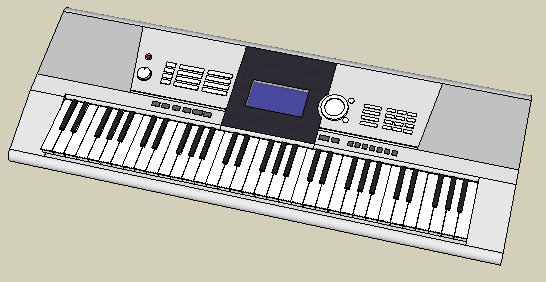
Figure 1-18 shows a set of piano keys copied to make a keyboard. The buttons at the top are also copied components.
1.2. Creating Linear Internal Arrays
Solution
Use construction lines for exact placement, and use the “forward slash” format for the number of copies.
Discussion
In this scenario, you know where the first and last objects are located, and want to space objects evenly between them. The format for placing a specific number of copies between two objects is to enter the desired number of copies, followed by the / (forward slash) symbol. (The forward slash symbol denotes division.) For example, if you make a copy of an object 20 feet away, and then type 4/ and press Enter, you will have five objects (four copies plus one original), with four equal spaces of 5 feet each in between copies.
To help you align your copies, you can use construction lines, which are temporary guide lines that can easily be erased or hidden when you’re finished with them. Construction lines are created with the Tape Measure tool.
In this example, you’ll use construction lines to place the first and last windows in a row, and then use the forward slash format to place more windows in between. In the Other Uses section, you’ll see how an internal array can be used to space pickets of a fence.
Start with a model like the one shown in Figure 1-19, which has one window in the middle of the front wall. You can create your model from scratch, or download my Internal Linear Array model from the 3D Warehouse. The window should be a component.
Note
If you want to create this model from scratch, see the sidebar Want to Create this Model Yourself? in Recipe 1.1.
In addition to measuring, the Tape Measure tool can be used for creating construction lines. Activate Tape Measure. You should see a + sign attached to your cursor, but if not, press the Ctrl/Option key (otherwise, you will only be taking a measurement). Click anywhere on the lower edge of the wall (don’t click on an endpoint), and move the cursor straight up, creating an offset construction line as shown in Figure 1-20. The offset distance appears next to the cursor.
To make the offset exact, type the offset distance and press Enter. For this example, type 4′ for 4 feet (Figure 1-21).
Note
You can use the Tape Measure to resize an entire model, group, or component. This is shown in Recipe 10.10, Recipe 10.11, and Recipe 10.12.
Create construction lines at the same offset distance from the other three edges of this wall (Figure 1-22).
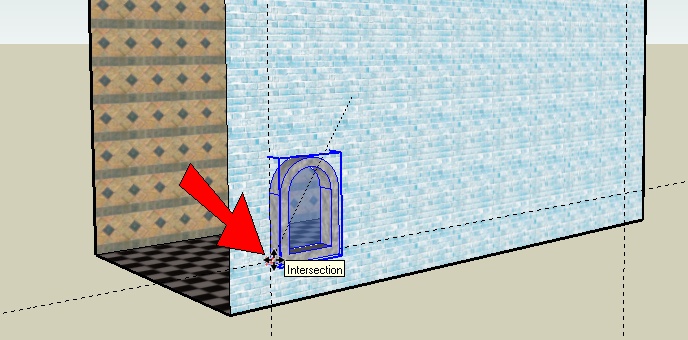
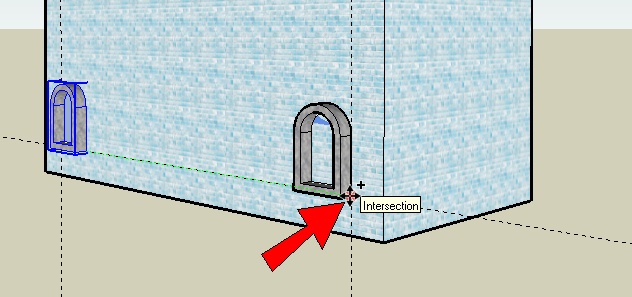
You can now move the window into place. Select it, activate Move, and for the first move point, click the window’s lower-left corner, where the back of the window meets the wall (Figure 1-23).
Place this corner at the intersection point of the bottom and left construction lines, as shown in Figure 1-24 (make sure you see the Intersection inference, which is a snap point).
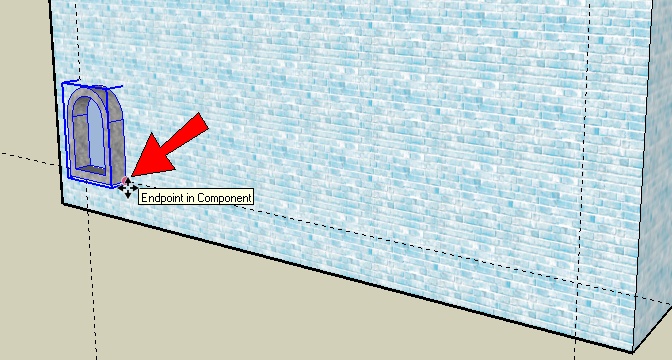
To place a copy on the other side, click the first move point on the lower-right back corner of the window (Figure 1-25).
Press Ctrl/Option, and click the second move point at the intersection of the right and bottom construction lines (Figure 1-26).
Type 3/ and press Enter (don’t forget the forward slash symbol after the number). This gives you four windows (three copies plus the original), with three equal spaces in between (Figure 1-27).
You can still change your mind; in Figure 1-28, for example, I switched to five copied windows (5/).
To make additional evenly spaced rows, select all of the windows, and for the first move point, click any one of the windows at its top point (Figure 1-29).
Start to move the copy up vertically (blue direction), and press and hold the Shift key to lock in the blue direction. With Shift pressed, click anywhere on the top construction line (Figure 1-30).
You could also tap (but not hold) the up arrow key to lock the blue direction, which saves you from having to keep Shift pressed. How you lock directions is a personal preference. Locking directions and other constraints are covered in depth in Chapter 5.
Enter 2/ to get three rows, and you’re finished.
To erase the construction lines, you can use the Eraser tool and click each one, or choose Edit→Delete Guides. (You can also hide construction lines by choosing View→Hide Guides.) The completed model is shown in Figure 1-31.

Other Uses
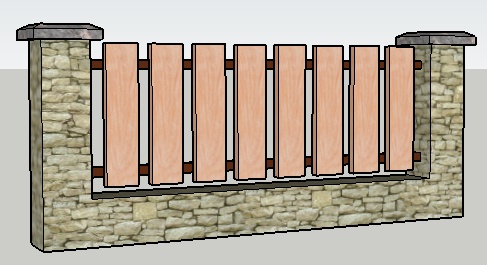
An internal linear array can be used to space pickets of a fence. Figure 1-32 shows a fence in which the first picket is copied to the end of the fence.
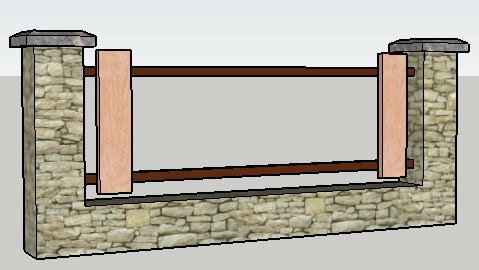
In Figure 1-33, the 4/ spacing creates four copies of the picket.
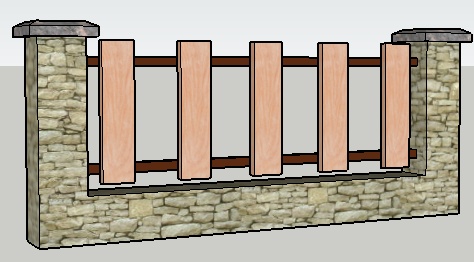
In Figure 1-34, the 7/ spacing creates seven copies, producing a denser fence.
1.3. Building a Nonorthogonal Linear Array
Solution
When defining the move points, use reference geometry that defines the move direction.
Discussion
In the previous recipes, the copies have followed the red, green, or blue directions. When you want to move in another direction, first be sure that you have objects in your model that define the direction you want to use. In this example, the model has an edge that defines the move direction, and both move points will be clicked along this edge.
Start with a building like the one shown in Figure 1-35, with a sloped top and one window in the top-left corner of the front wall. You can create your model from scratch, or download my Sloped Linear Array model from the 3D Warehouse. The window should be a component.
Note
If you want to create this model from scratch, see the sidebar Want to Create this Model Yourself? in Recipe 1.1. To slope the roof, select one of the top side edges and move it straight up.
Select the window and activate Move. Press Ctrl/Option. For the move distance and direction, click two points along the sloped edge, as shown in Figure 1-36. (If your window jumps to the wrong face, wiggle the mouse to tweak it into place.)
Using the method demonstrated in Recipe 1.1, enter the number of copies you want (say, 4x) and adjust the spacing to get a line of sloped windows (Figure 1-37). The spacing is the distance measured along the diagonal edge.
You can change your mind and use an internal array as shown in Recipe 1.2. Just enter the distance between the first and last windows. The distance in this example is 50 feet. You will still have the same number of windows as before, but they will be spaced so that only two appear on the building (Figure 1-38). You may have to zoom out to see the rest of the windows.
Enter 6/, or whatever number works for you, to get your internal array of windows (Figure 1-39). All of the copies now appear between the first and last windows.
1.4. Copying in Circular Arrays
Solution
Use the Rotate tool to make copies, adjusting the number of copies and the angle between copies.
Discussion
To make copies with the Rotate tool, you must first preselect the objects to be copied. Then activate the Rotate tool and press the Ctrl key (Option on the Mac). You can enter the angle between copies before or after you place the copy. After the first copy is made, you can enter the number of copies you want. Until you activate a new tool or start a new Rotate operation, you can continue to adjust both the angle and numbers.
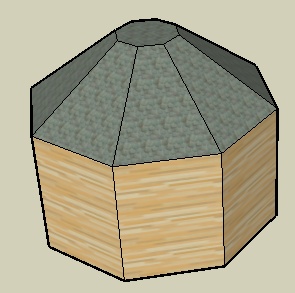
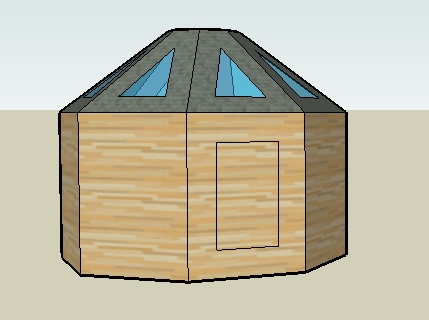
This example is an octagonal-shaped building, in which windows and doors will be copied in a circular pattern, to fit on the walls.
In Other Uses, you’ll see how rotated copies can be used to make a jewel-studded bracelet, a dining room set, a Ferris wheel, and a circular group of columns.
Start with an octagon-shaped building as shown in Figure 1-40, with a sloped octagonal roof. You can create your model from scratch, or download my Circular Array model from the 3D Warehouse.
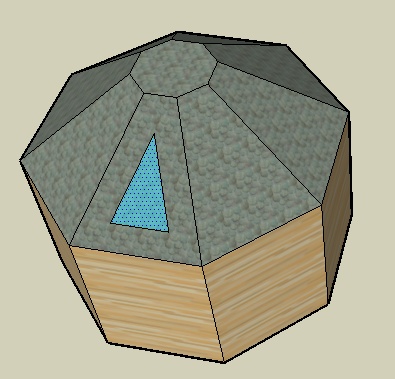
To create one of the roof windows, use the Offset tool to make a triangle inside one of the roof faces. Trim any extra edges, and paint the window with glass.
Select this new window face (Figure 1-41).
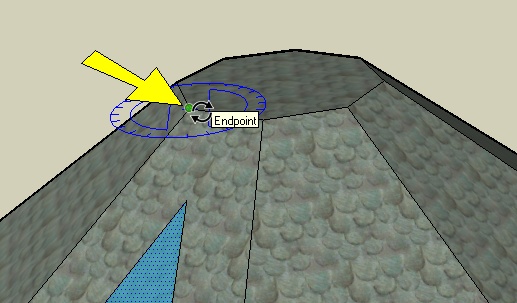
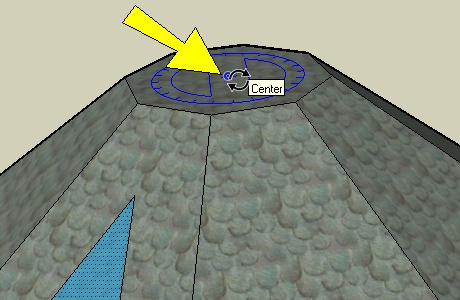
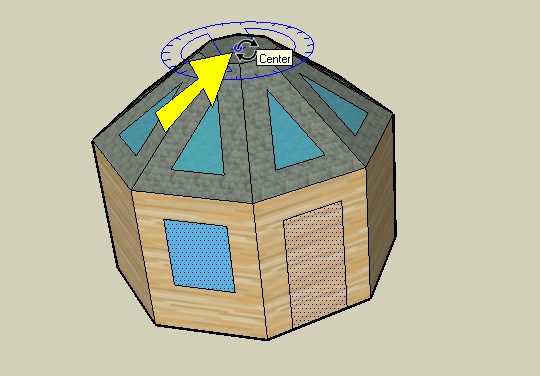
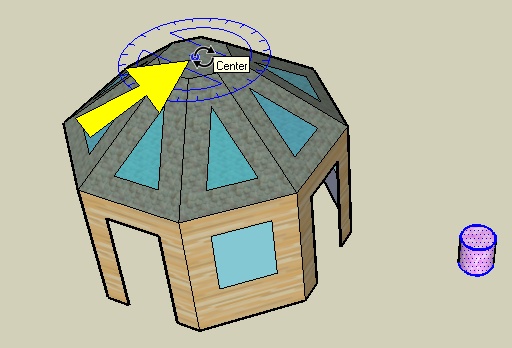
Activate Rotate. The first click places the center of rotation, which should be the center of the top octagonal face. Before you can find this point, you need to remind SketchUp of that inference point, so hover over one of the corner points of the top octagon (Figure 1-42).
Having found the circumference of the octagon, SketchUp can now find its center point. Move the cursor to the center and click the center point, as shown in Figure 1-43.
Note
SketchUp always keeps the last five defined points in its immediate memory buffer. If you are looking for an object created more than five clicks ago, you need to move that object up into the buffer. Hovering over a point or edge does just this.
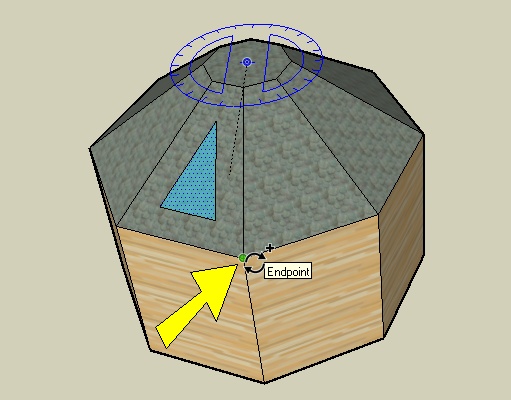
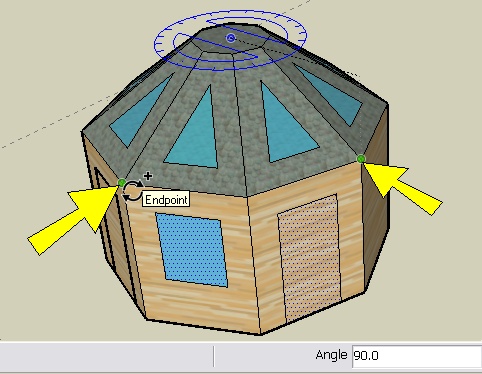
The next two clicks define the rotation angle. The first click defines the angle’s baseline, and the second click defines the rotation angle relative to the baseline. Press Ctrl/Option to make a copy (look for the + sign on the cursor), and click any corner of any octagon (top, middle, or bottom of the building), as shown in Figure 1-44.
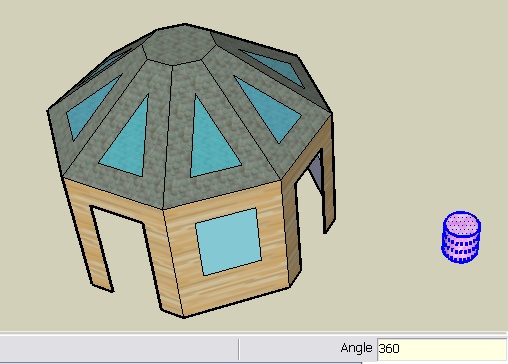
Click an adjacent octagon corner, and the Angle field informs you that the angle is 45 degrees (Figure 1-45).
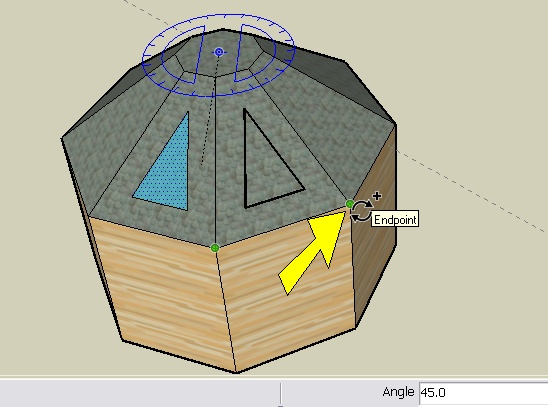
In this example, 45 degrees is the correct angle (360 / 8 = 45). If you wanted to try out a different angle, you would just type it and press Enter. (You can also simply enter an angle value instead of clicking the second rotation point.)
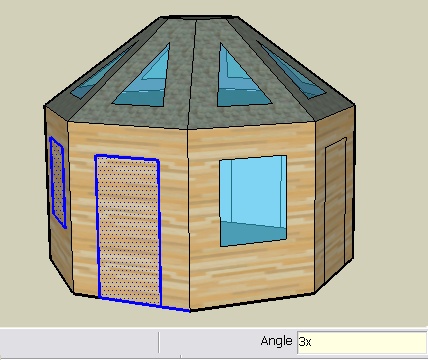
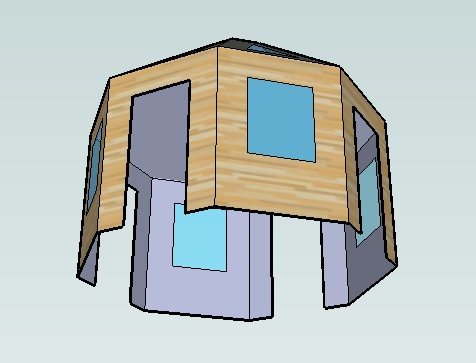
Enter 7x, and you have eight total windows (Figure 1-46).
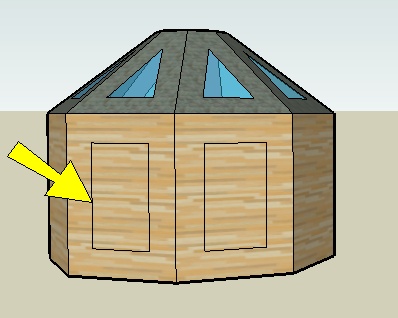
Now you’ll make alternating windows and doors on the vertical faces. Activate Offset again, and place your cursor inside one of the faces, as shown in Figure 1-47 (don’t click yet).
While the face is highlighted, double-click on it. This offsets the face by the same offset distance you used to make the triangular roof window (Figure 1-48).
Make the same offset on an adjacent face (Figure 1-49).
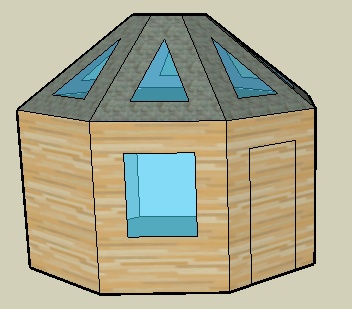
One offset rectangle will become a door, and the other will become a window. To make the door, move the bottom edge straight down to meet the ground. The door faces will eventually be erased, but it’s hard to copy what isn’t there, so leave the door face there for now. To make the window, move the bottom edge up and paint the face. The window and door are shown in Figure 1-50.
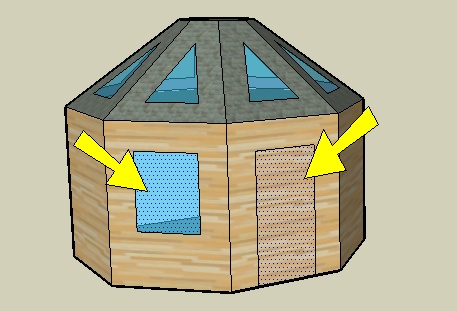
Select both of these faces (Figure 1-51).
Activate Rotate and click the same center point as before, at the center of the top octagon (Figure 1-52).
Because you are copying both faces at once, the rotation will be double what it was previously. Click two corner points that are 90 degrees apart (Figure 1-53).
Enter 3x, and every face should have either a window or a door (Figure 1-54).
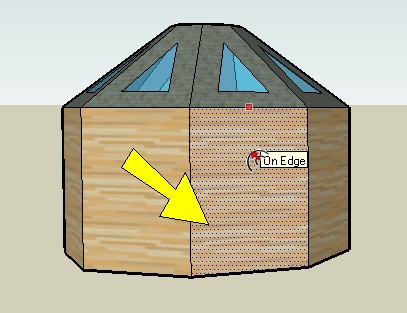
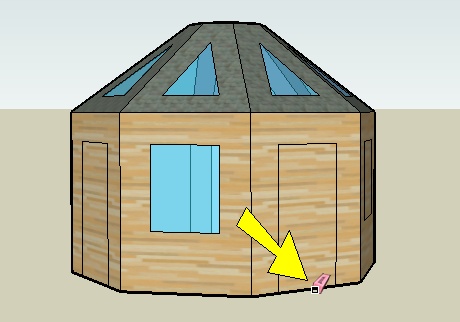
To remove the door face, use the Eraser tool on the edge shown in Figure 1-55.
Repeat this step for the other three doors.
If any window faces aren’t painted correctly, fix them with the Paint tool. Figure 1-56 shows the building viewed from below.

Other Uses
Here are a few examples of where rotated copies are used.
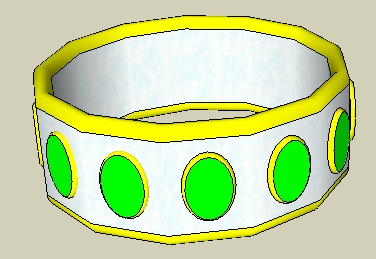
You can copy emeralds around a ring or bracelet (Figure 1-57).
You can arrange chairs around a circular table (Figure 1-58).

You can arrange pairs of columns in an open, circular pattern (Figure 1-59), perhaps for a hotel lobby or ballroom.

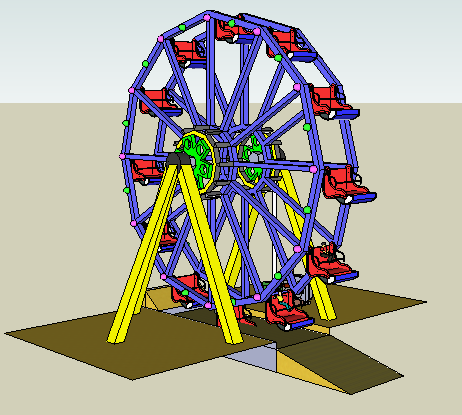
Finally, you can create supports and seats for a Ferris wheel (Figure 1-60).
1.5. Creating Circular Internal Arrays
Problem
You want to place your first and last rotated copies, and space additional objects between them.
Solution
Use the Rotate tool to make the last copy, and specify the number of internal copies in between using the forward slash format.
Discussion
In this scenario, you know where the first and last objects are located, and want to space objects evenly between them. The format for placing a specific number of copies between two rotate-copied objects is to enter the desired number of copies, followed by the / (forward slash) symbol, which denotes division. For example, if you make a copy of an object 90 degrees away, and then type 3/ and press Enter, you will have four objects (three copies plus one original), with three equal spaces of 30 degrees between copies.
In this example, you’ll place a ring of planters around the model you created in Recipe 1.4. In the Other Uses section, you’ll see how a circular internal array can be used to place chairs around a lecture podium.
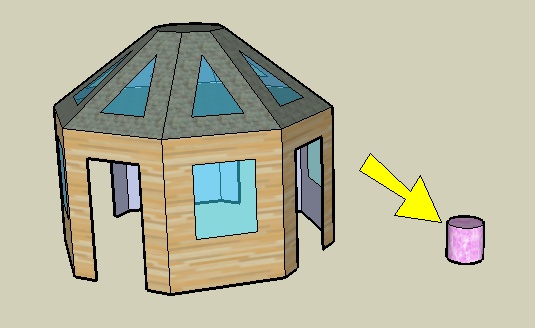
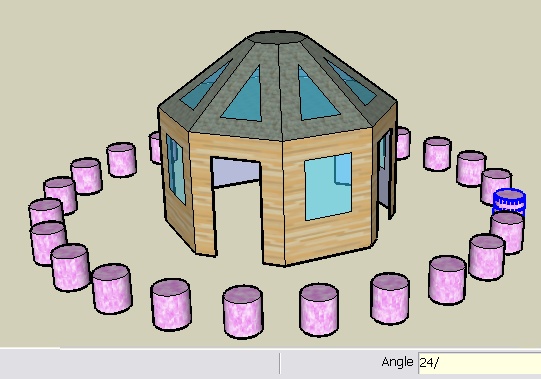
Start with the model you completed in Recipe 1.4. Instead of making an actual planter with a plant in it, or taking the trouble to find a component for it, use a simplified cylinder instead. Somewhere outside the building, draw a circle and pull it up to represent a planter (Figure 1-61). Because it will be copied, make this cylinder a component. (If you don’t have this model, you can download my Circular Internal Array model from the 3D Warehouse.)
Select the planter, activate Rotate, and place the center of rotation at the center of the building (Figure 1-62).
Create a copy 360 degrees away. This is a full turn around the circle, which means the copy is placed exactly on top of the original (Figure 1-63).
Enter 12/ (use the slash symbol) to get a total of 13 planters evenly spaced around the circle, as shown in Figure 1-64. (The last planter shares the same space as the first copy, so it appears that you have 12 planters.)
To get more planters, enter 24/ (Figure 1-65).
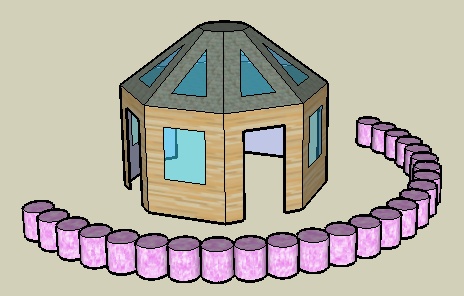
You can adjust the total rotation angle as well. Enter 180 to set 25 planters spaced within a 180-degree angle. This time there is no overlap between the first and last planters, so you can see all 25 planters (Figure 1-66).

Other Uses
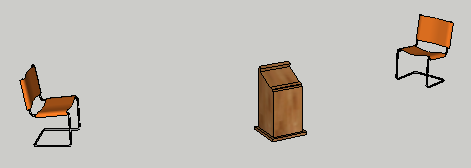
A circular internal array can be used to place chairs in a circular pattern around a lecture podium.
Figure 1-67 shows the first and last chair in the room. Their location is determined by the maximum viewing angle from the chair to the lecture podium.
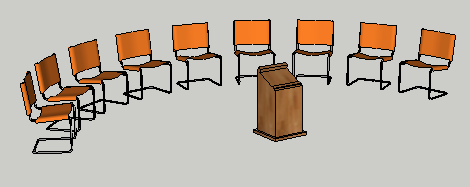
For four copies of the chair, use 4/ spacing (Figure 1-68).

The 8/ spacing shown Figure 1-69 can be used for a more crowded lecture.
Get Google SketchUp Cookbook now with the O’Reilly learning platform.
O’Reilly members experience books, live events, courses curated by job role, and more from O’Reilly and nearly 200 top publishers.

