A Google Account is your passport to the Google apps universe. It gives you a way to sign in just once and access all of Google’s goodies. It’s also where you add new programs, change your name or password, and do other across-the-board management. And here’s the best part: A Google Account is free. As in totally, completely, won’t-cost-you-a-dime free.
If you’ve created an account for any Google offering—like Gmail, Google Docs, or Google Calendar—you’ve already got a Google Account. So you can skip the section on signing up and turn to You’re All Signed Up—Now What? to learn more about what you can do with your account.
On the other hand, maybe you’ve made it well into the 21st Century without a Google Account, thank you very much. If that’s the case, your time has come: You need an account to use Gmail, Google Docs, Google Calendar, and many other Google tools. In addition, when you’re signed into your Google Account, you can customize your apps, check out recommendations made just for you, and get even better search results. This chapter shows you how to get started.
Note
The bulk of this chapter addresses the boring but necessary sign-up procedures required to uncork the Google apps magic. If you’ve already got a Google Account, or consider account sign-up guidance a crutch needed only by lesser mortals, feel free to skip ahead to Chapter 2, where the heart of the Google apps coverage begins.
It takes only a couple of minutes—you can pop a celebratory pizza in the microwave and be done before the timer dings. Then, as you munch on a slice or two, you just have to pick which programs you want to use, and add a bit of personal info.
Note
If you use Google Apps through your organization—for example, if you sign into Gmail with a user name that looks like myname@mycompany.com—you don’t need to create a separate Google Account. Your organization creates and manages your apps through its own Web site. (See Chapter 10 for more information about Google Apps for organizations.)
Start by going to Google’s home page (http://www.google.com) and, in the upper-right corner, click the link that says, “Sign in”. Alternatively, you can go straight to the Google Accounts sign-in page at http://www.google.com/accounts.
Whichever route you take, the Google Accounts sign-in page looks like Figure 1-1. After you’ve opened your account, you’ll see this page again whenever you want to sign in and use your Google services. For now, though, click the right-hand “Create an account now” link, and you’re taken to the page shown in Figure 1-2.
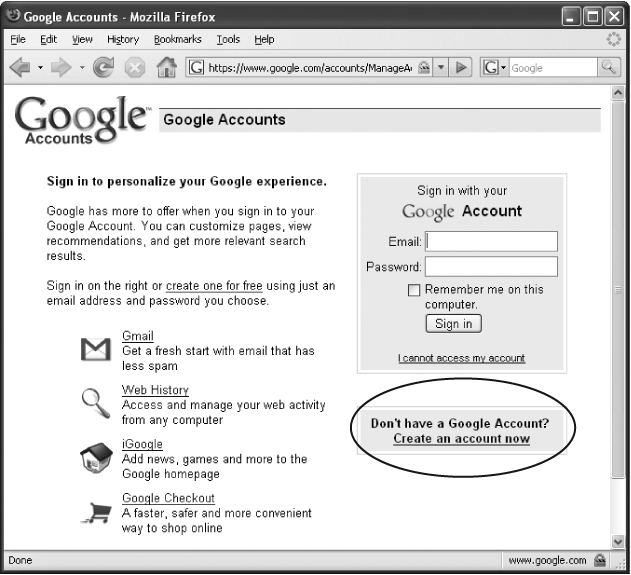
Figure 1-1. Clicking the “Sign in” link on Google’s home page takes you here. The left-hand side of the page tempts you with various programs you can use once you sign up. The right-hand side is where you’ll sign into the Google Account you’re about to create. To get started, click “Create an account now” (circled).
Tip
If you have questions about Google Accounts before (or even after) you sign up, more help awaits at www.google.com/support/accounts.
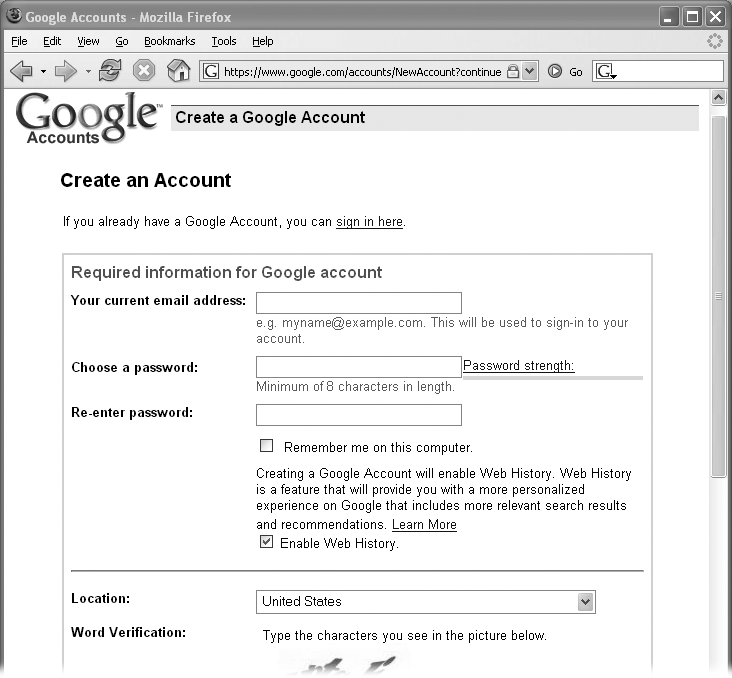
Figure 1-2. Here’s the page you fill out to create a new account. It asks for pretty basic info: You supply an email address, a password, and your country, and then fill out the spam-preventing word verification box (you can’t see it here) and agree to Google’s terms of service (see the box on Uninstall the Toolbar).
Google’s sign-up form is simple; you can fill it out and start using your new Google Account in mere seconds. Here’s what’s on it:
Your current email address. Type in the email address you use right now, like johndoe@yahoo.com or janesmith@mycompany.com. (After you’ve read Chapter 5, you’ll probably want to switch to Gmail, but you can open a Google Account using any working email address.)
Choose a password. Your Google Account password has to be at least eight characters long and can contain letters, numbers, and symbols. See the box below for tips on creating a good password.
Re-enter password. Nothing is more annoying than locking yourself out because you entered a typo when creating your password—and now you have no clue what the password is. To make sure that doesn’t happen, retype your password here (don’t copy and paste it from the box above—that’ll just duplicate any typos).
Remember me on this computer. If you’re setting up your account on a computer nobody else uses, turn on this checkbox to save a little sign-in time. Google responds by automatically filling in your login info every time you visit the sign-in screen. But if you’re on a shared computer (at a public library, for example), leave this box turned off so no one else can get into your account.
Enable Web History. When you’re signed in to your Google Account, Web History keeps track of your searches as you wander around the Web. When you sign up, Google turns it on by default, and that means you can take a look back at sites you’ve visited, search them, and get personalized Search results based on your history. Since you can access your Web History from any computer with an Internet connection, it’s like having a permanently handy record of all the searches you’ve ever done. The box on Signing Up for a Google Account has more about Web History to help you decide whether you want it in your Google Account.
Word verification. You may have seen similar combinations of wavy, skewed letters (and sometimes numbers) on other Web pages. Word verification makes sure you’re a real, live person, not an automated “bot” that crawls the Web and signs up for accounts to use for spamming and other nefarious purposes. Take a look at those wavy letters, filter them through your human brain, and type them into the box (capitalization doesn’t matter).
Terms of Service. You’ve got to agree to Google’s terms of service if you want to open an account. Give them a quick read, or check out the box on Uninstall the Toolbar for the highlights.
When you’ve filled everything out, give the page a quick once-over to make sure it all looks good. Then click “I accept. Create my account.” Google sends you a verification email like the one in Figure 1-3. Click the link in the email and your account is up and running. (If clicking the link doesn’t do anything, copy the link and paste it into your browser’s address bar.) Your browser opens a page that says Google has verified your account. From here, click the link to go to your brand-new Google Account.
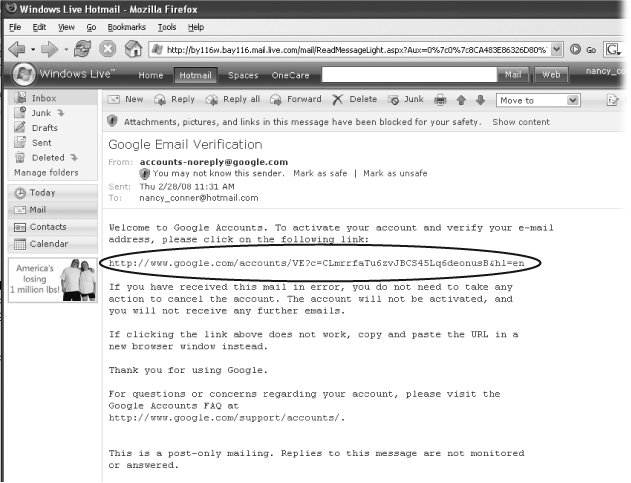
Figure 1-3. Google sends you a verification email like this one to make sure you’re not a spam bot. To complete the sign-up process, click the link (circled), or copy and paste it into your Web browser’s address bar. Make sure you do one or the other—Google won’t set up your account until you verify your email address.
Note
Don’t reply to the verification email. If you do, your email will get lost in cyberspace, since nobody at Google looks at or replies to these verification emails. Instead, look for answers at the Google Accounts Help page: www.google.com/support/accounts. Better yet, keep reading this book.
If the verification email doesn’t show up (it can take mere seconds, but give it at least 15 minutes before going to Plan B), you’ve got a few options:
Check your spam folder. Whatever your email provider calls it—Spam, Junk, Bulk Mail—it’s possible your Google Accounts verification email landed there by mistake.
Tell your spam filter Google’s cool. If the verification email isn’t in your spam folder, it may have been blocked by your overzealous spam filter. To make sure the verification email gets through, add this address to your address book: accounts-noreply@google.com.
Request another verification email. If you can’t find the verification anywhere in your email program, point your browser to www.google.com/accounts and try to sign in anyway. The Account Verification Page appears, where you see a message like this: “To have the verification email resent, click here.” Click the link to have Google send another verification email.
Start from square one. Everyone makes mistakes. You may have mistyped your email address when you signed up. Try again, following the instructions on Signing Up for a Google Account. (And this time, triple-check to make sure you haven’t made any typos on the Create an Account page.)
You can sign into your new Google Account by going to Google’s home page and clicking the upper-right “Sign in” link, or by going to www.google.com/accounts. Just enter the email address you used to create the account, along with your password, and then click the “Sign in” button.
Note
If you already have Gmail, you can sign into your Google Account with your Gmail user name, which is the part of your Gmail address that comes before @gmail.com. So if your Gmail address is janedoe@gmail.com, your user name is janedoe.
The first time you sign in, you see a page that looks something like Figure 1-4.
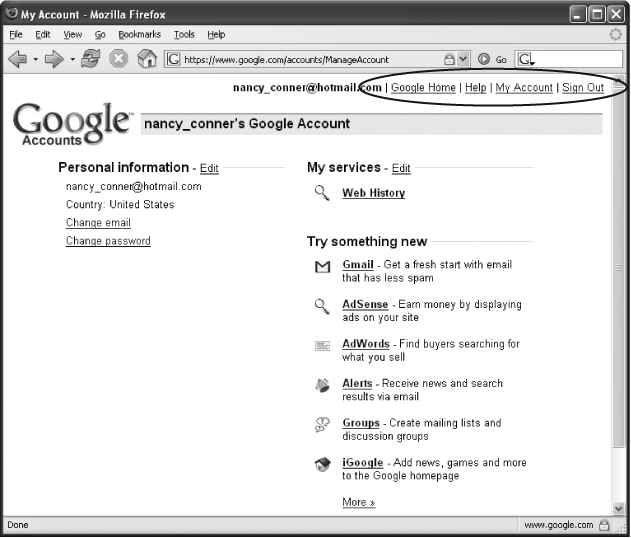
Figure 1-4. Your Google Account page is split into three sections. On the left, Personal Information lets you view and edit the info associated with your account (flip to Edit Your Account Information for the lowdown on managing these details). On the right, under the “My services” heading, Google shows which programs you’re currently signed up for. Below that, under “Try something new”, is a list of other Google products you can sign up for—just click a link to get started. The links in the upper-right (circled) let you jump to different parts of your account, get help, or sign out.
At the top of the page, Google displays the email address or user name you used to sign in. (You can change your email address or user name by editing your personal information; see ???.)
Note
You can have more than one Google Account—for example, maybe you want one Gmail address for work and another for personal stuff—but Google lets you sign into only one account at a time.
The links in the top-right part of the page help you find your way around your Google Account:
Google Home. Click this link to go to the familiar Google search page (www.google.com).
Help. Lost? Confused? Got a quick question? Clicking Help takes you to the Google Accounts Help page, which covers all the ins and outs of using your account.
Note
Where the Help link takes you depends on the Google app you’re using when you click it. If you’re using Gmail, for example, it takes you to the Gmail Help page. To get to Google Accounts Help, click the Help link while you’re on the page pictured in Figure 1-4, or go to www.google.com/support/accounts.
My Account. Clicking this link brings you back to the page shown in Figure 1-4.
Sign Out. When you’re ready to say buh-bye to Google apps, click this link.
The rest of your Google Account page is divided into three sections:
Personal information. Here’s the info you gave Google when signing up for your account. To manage these details—to change your name, say—click the Edit link. You also get links for changing your email address and password.
My services. This section lists Google apps for which you’re currently signed up. Click the name of any program to launch it, or click Edit to delete a program (Delete a Google App) or close your account (Close Your Google Account).
Try something new. In this section, Google tempts you with any offerings you haven’t signed up for—yet. If you’re ready to take the plunge, click the name of whatever you’re interested in. Click the More link to see the whole smorgasbord of Google products and services you can choose among.
Sooner or later you’re going to want to modify your Google Account settings—do things like add a back-up email address, specify your time zone, start using a new program, and so on. This section tells you how to manage your account so it meets your needs.
As you probably noticed when signing up, Google doesn’t ask for a lot of personal info to create an account. But what if you want your account to be a little more personalized? Say you prefer to be greeted by name (rather than by email address) on your Google Account page. No problem. Just head over to “Personal information” section of the Google Account page (Figure 1-4) and click its Edit link. The page shown in Figure 1-5 appears.
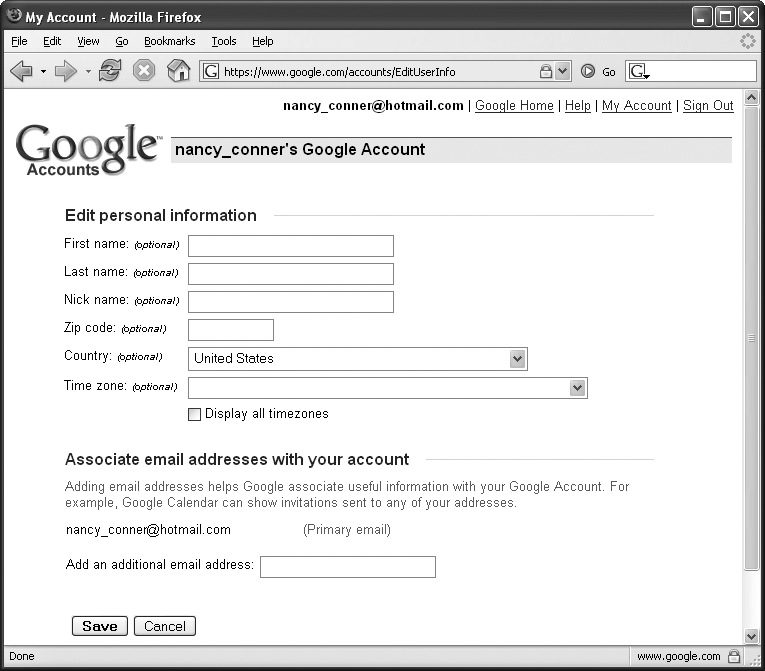
Figure 1-5. Use this form to change the personal info in your Google Account. All the stuff gathered here is optional—you don’t have to add your name, but your Google apps might feel more like “yours” if you do.
Things change with time: A wedding or divorce changes your name, or you move to a different Zip code, time zone, or even country. Use this section to add or change any of the following (optional) settings:
You need just one email address to open your Google Account, but you can associate other addresses with it, too. This can come in handy, for instance, when someone invites you to an event they’ve created on their Google Calendar (Chapter 7)—whichever email address the other person uses for the invitation (maybe they’ve got that old alumni address you occasionally use), you can respond.
When you type an address into the “Add an additional email address” text box, and then click Save, Google fires off a verification email. As soon as you click the verification link, Google adds the address to your account.
Note
If you’ve got a separate Gmail account, you can’t add that address to this Google Account. Why not? That Gmail address already has a Google Account of its own, as the Note on Change your email address explains.
If you change your mind and want to remove an additional email address from your Google account, just come back to this page, find the account you want to ax, and then click its Remove link.
To change your primary email address, start on your Google Account page (www.google.com/accounts). In the “Personal information” section, click the “Change email” link.
Note
If you originally opened your Google Account by signing up for Gmail (instead of, say, following the instructions in “Signing Up” on Signing Up for a Google Account), you don’t see a “Change email” link, because you automatically get a Google Account with your Gmail account. However, if you want to get rid of Gmail (see Delete a Google App for how to delete an application) without having to set up all your other apps from square one, you can associate your Google Account with a different email address, and then delete Gmail, leaving your other apps untouched.
Google takes you to the page shown in Figure 1-6, which is actually a little confusing. It shows your account’s primary email address in the box labeled “Your current email address”. So far, so good. But this is also the box where you type the email address you’re changing to, even though nothing on the page indicates that. In the box below it, type your Google Account password, and then click “Save email address”.
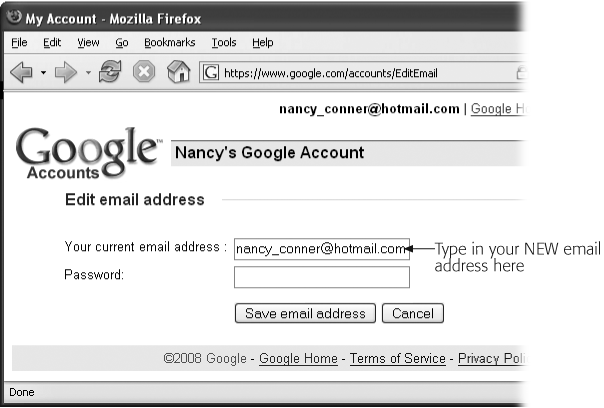
Figure 1-6. On the “Edit email address” page, the address you currently use to sign into your Google Account appears in the box. Replace that address with the new one, and then, in the Password box, type your Google Account password (not the password for the email address you entered).
Google sends you a verification email to the address you entered. Zip over to your other email account and check your inbox. Open the verification email, click the link in it, and you’re done.
When Google sends the verification email to your new address, it also sends a notification to your old address, a nice security feature that helps prevent someone from hijacking your account. If you are indeed changing your primary email address, just ignore the notification. If, however, the notification arrives out of the blue, click the link it contains. That takes you to the Google Accounts Help center, where you can fill out a form to contact Google and get the problem straightened out.
After you’ve changed the primary email address, use the new address as your user name the next time you sign in. Google doesn’t recognize the old one anymore.
Security experts recommend changing your password every once in a while to make sure no one else gets their mitts on it. If you’re the type who actually follows that (sound) advice, head to your Google Account page (www.google.com/accounts) and click the “Change password” link. Google opens the “Change password” page, shown in Figure 1-7.
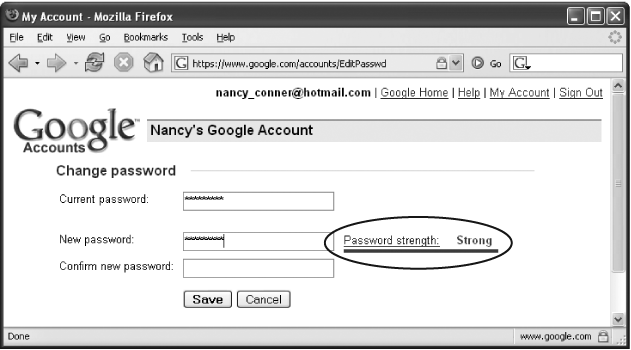
Figure 1-7. As you type your new password, Google gauges its strength for you (circled) by testing it against known password-stealing strategies (like entering every word in the dictionary, for instance). The stronger the password, the more secure your Google Account.
On the “Change password” page, in the “Current password” box, type your current password (the one you’re getting rid of). Below it, in the “New password” box, type your shiny new password. To guard against typos, type it again in the “Confirm new password” box. Click Save, and your new password takes effect. Don’t forget it! (But if you do, check out the box on You’re All Signed Up—Now What?.)
Tip
For suggestions on what makes a good password, see the box on Signing Up for a Google Account.
If you started using Gmail before you discovered you even had a Google Account, you don’t see a “Change email” link in the “Personal information” section. Gmail users can’t change the primary email address for their Google Accounts. Instead, you see a “Change security question” link; it’s your way of protecting yourself when you accidentally blog about, say, your first teacher’s name. Clicking the link takes you to the page shown in Figure 1-8.
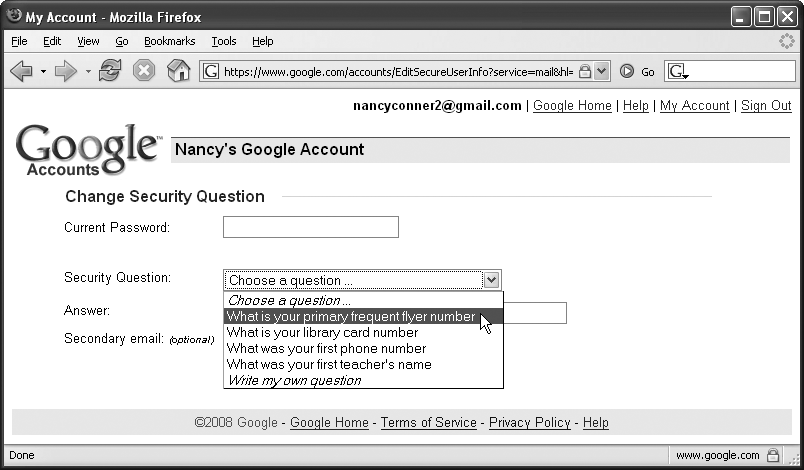
Figure 1-8. When you sign up for Gmail, you have to provide a security question and answer. If you want, you can change those here.
Google uses your security question to verify your identity if you forget your Gmail password. To change your security question, type your password in the box that asks for it. Click the Security Question drop-down menu to see a list of Google’s suggested questions. (You can also write your own; select “Write your own question from the list” and Google adds another text box where you can type your question.) Next, answer the question so Google can check it against future attempts. If you want to add a secondary email address to your Google Account (helpful if you forget your user name), you can also do that here. When you’re done, click Save.
If you’ve created your account by following the instructions on Signing Up for a Google Account (as opposed to creating the account by default when you signed up Gmail or Google Calendar), you may not have any programs in your account to start with. No problem: Your account page gives you easy access to Google’s offerings. They appear in the “Try something new” section of your Google Account page (www.google.com/accounts).
Don’t see the program you want? At the bottom-right of the page, click the More link to see the full list. You have literally dozens to choose from, some of which you’re probably already familiar with: Google Maps, Google News, Google Earth, YouTube, Picasa (a photo-editing and sharing site), and many more.
To start using a program, click the name of the item you want. You may have to provide Google with a little info—like a user name and security question/answer if you want to sign up for Gmail—but this takes only a minute or two.
When you start using Google apps, you’ll probably go directly to the home page of the program you want to use, like http://docs.google.com for Google Docs, www.gmail.com for Gmail, and so on. But if you’re on your Google Account page (www.google.com/accounts) and you want to leap from there to one of your apps, just look in the “My services” section. Find the program you want to use, click its name, and off you go.
Once you have a Google Account, it’s so easy to add programs that you’re likely to try out a whole bunch. If you find that, later on, one or two of them don’t meet your needs or you don’t use them all that much, it’s easy to prune things down with just a click or two. You can delete Gmail, Browser Sync, Web History, Orkut, and Google Video from your Google Account.
First, go to your Google Account page and click the Edit link next to “My services”; the page shown in Figure 1-9 appears.
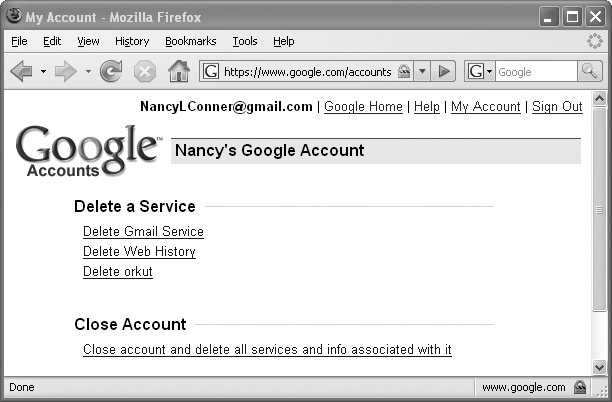
Figure 1-9. If you want to delete an application from your account, select from the “Delete a Service” list. If you want to close your Google Account (and all your Google apps), click the bottom link.
Each item in the “Delete a Service” section is a link. Find whatever you want to get rid of, and click its name.
The page you see next is tailored to the particular program you chose to delete, but whichever page you see, it has two main purposes:
Google apps are so well designed, simple to use, and convenient to access that you probably won’t ever want to get rid of your Google Account. But if for some reason that time does come, vaporizing your account (and all your apps with it) starts with a visit to the Google Account page (www.google.com/accounts).
In your “My services” section, click the Edit link, and then click “Close account and delete all services and info associated with it”. Google makes that link extra descriptive so you know exactly what’ll happen if you choose to proceed to the next page, Delete Google Account (Figure 1-10).
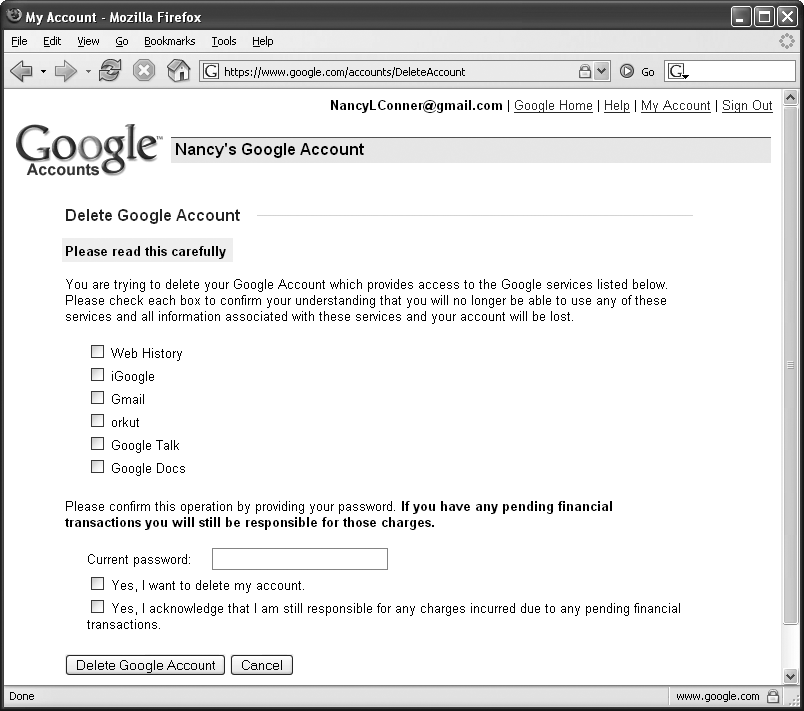
Figure 1-10. To make sure you know what you’re losing when you close your Google Account, Google lists everything associated with your account. If you want to preserve one or two items on the list, click Cancel and see the previous section to learn how to delete individual programs without closing your account.
Google wants to make really, really sure you don’t accidentally delete a Google app. So on the Delete Google Account page, it lists all the services associated with your account. You have to look at them all and turn on each checkbox, one by one, before you can delete the account.
Note
Closing your account just means that you won’t be able to use the Google goodies listed on the Delete Google Account page—stuff that requires an account. But you can still read Google News, watch YouTube videos, check out Google Maps, and so on.
Google also wants to make sure you understand that, if you owe Google money, canceling the account doesn’t cancel your debt. (Most Google apps are free. But you can, for example, buy extra storage space for Gmail.)
If you’re still sure you want to delete your account, enter your password into the “Current password” box. Then turn on the two checkboxes that confirm you want to delete the account and that, if you owe Google money, you’ll still pay. (If you don’t owe Google any money—and chances are you don’t—you still need to turn on that checkbox to cancel the account.) Finally, click the Delete Google Account button. That’s it—your Google Account is history.
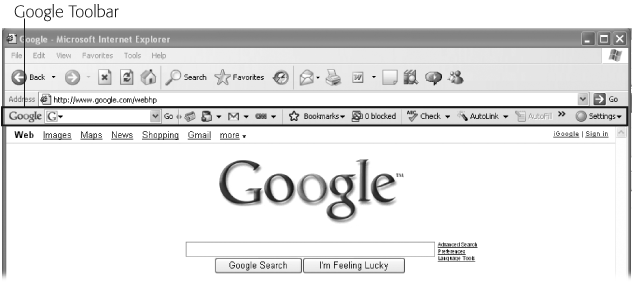
Even though you don’t need a Google Account to download the Google Toolbar, it’s good to learn about it early on because the Toolbar can supercharge your account and make managing it a breeze. The Google Toolbar, shown in Figure 1-11, is a customizable toolbar that rides piggyback on a Web browser and puts your favorite Google apps—and more—right at your fingertips.
There are several different versions of the Toolbar floating around. The version you have depends on the browser you use, and when you installed the Toolbar. Versions covered here include Toolbar 4 and 5 for Internet Explorer, and Toolbar 2 and 3 for Firefox.
Note
Google Toolbar has oodles of features, some of which aren’t covered here. Because this book is about Google apps, this section focuses on the parts of the Toolbar you can use to make working with Google apps faster, easier, and more efficient; specifically, using the Toolbar with Gmail, Google Docs, Google Calendar, and your Google Account. To find out everything you can do with the Toolbar, visit http://www.google.com/support/toolbar.
Before you get started, make sure you have the right equipment for using the Toolbar. Here’s what you need:
To use Google Toolbar with Internet Explorer:
Web browser: Internet Explorer version 6.0 or higher.
Tip
Sorry Mac fans: The Google Toolbar doesn’t work with Safari. To get Firefox, or to upgrade to the latest and greatest version, go to www.firefox.com, and then click the big green Download Firefox–Free button. To install or upgrade Internet Explorer, surf over to Microsoft’s Download Center at www.microsoft.com/downloads.
Getting Google Toolbar onto your computer takes only a few minutes. From your Google Account page (www.google.com/accounts), look for Google Toolbar under “Try something new”. If you don’t see it there, click the More link, and then, on the page that opens, click Toolbar. Alternatively, point your Web browser to http://toolbar.google.com.
If you’re not on your Google Account page (or if you haven’t opened a Google Account yet), go to the Google home page (www.google.com), click the “more” link at the top of the page, and then click “even more”. On the page that opens, scroll down till you see the Toolbar link, and then click it.
Note
This section describes the steps for downloading the Toolbar to use with Firefox. If you’re downloading the Toolbar for Internet Explorer, the process is similar.
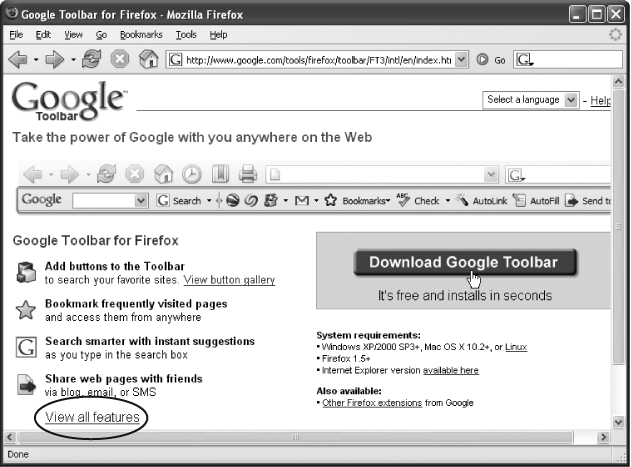
The Google Toolbar page (Figure 1-12) is where you download the Toolbar to your computer. Just follow these steps:
Click the big, blue Download Google Toolbar button—you can’t miss it.
Google shows you the Toolbar privacy policy. Read the box on Uninstall the Toolbar for the highlights, so you know what you’re agreeing to.
Figure 1-12. Google’s Toolbar page gives you an idea of what you can do with the Toolbar. Click the “View all features” link (circled) to find out some of the cool things the Toolbar can do: Send Web pages to your friends, show how Google ranks the page you’re viewing, block pop-ups, and more. If you’re ready to take the plunge, click Download Google Toolbar.
If you’re fine with the terms, click “Agree and Install”.
Your computer may open a window telling you that a Web site is trying to download software to your computer, and asking for your okay.
Your computer downloads the files you need to install the Toolbar.
After the download is complete, quit your Web browser, and then launch it again.
When your browser reopens, you see the welcome message shown in Figure 1-13.
You have some decisions to make before you start using the Toolbar. In the welcome message window, you can adjust these settings:
Select your search site. Choose the country you reside in. This tells Google which of its dozens of international search sites you want to use.
Use Google as my default search engine. If you want Google to be your default search engine, leave this checkbox turned on. If you prefer another search engine, turn it off.
Allow downloads from Google. Leaving this checkbox turned on means that Google will periodically (and automatically) update your new Toolbar. If you want the latest and greatest improvements to the Toolbar without having to lift a finger, leave it on. If you’d prefer not to have Google mess around with your Toolbar without your knowledge, turn it off.
Enable/Disable PageRank and Enhanced Safe Browsing. The PageRank button gauges a Web page’s popularity, based on things like how many other pages link to it. When you enable PageRank, the Toolbar sends the Web addresses of pages you visit back to Google, so that Google can rank them for you. Similarly, Enhanced Safe Browsing warns you about iffy Web pages—again, by sending Web addresses to Google so it can check them out. (Google may log suspicious Web addresses.) Some people are uncomfortable sending this information to Google; if you’re one of them, turn on the “Disable PageRank and Enhanced Safe Browsing” radio button. If you want to use these services with the Toolbar, turn on the Enable radio button.
Usage statistics. If you turn on this checkbox, then you automatically share certain info with Google: whether the Toolbar installed successfully, how well the Toolbar works as you use it, and how often you use the buttons on the Toolbar. Google doesn’t collect your name, your email address, or the addresses of Web pages you look at. Again, though, some folks like to maximize their privacy. If you don’t feel like sharing information about how you use the Toolbar, leave this checkbox turned off.

You can start using the Toolbar right away. Read on to learn how you can customize it to include the buttons you use most.
Now that you’ve installed Google Toolbar, you can use it to make your Web browsing speedier. This section gives you an overview of what’s on the Toolbar and how you can tweak it to work harder for you.
Tip
To learn all the ins and outs of what the Toolbar can do, visit Google’s Toolbar Help Center at http://www.google.com/support/toolbar. Once there, click the tab for the browser you use: Internet Explorer or Firefox.
The Google Toolbar arrives in your browser with a standard set of buttons (Figure 1-14). These might vary a bit, depending on your Web browser and the selections you made in the welcome message window (Figure 1-13).
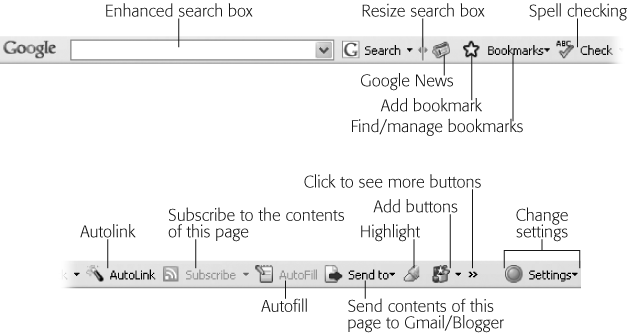
Figure 1-14. The standard buttons on the Google Toolbar for Firefox. If you’ve installed the Toolbar for Internet Explorer, it looks slightly different.
Note
The Google Toolbars for Firefox and Internet Explorer are slightly different, with different sets of standard buttons. Figure 1-11 shows Toolbar 5 installed in Internet Explorer 6, so you can compare it with the Firefox version shown in Figure 1-14. Some of the differences: the Google Toolbar for IE has a pop-up blocker/unblocker, a spell checker, and a button that shows CNN news headlines among the standard buttons it displays.
Here’s a brief rundown of the standard buttons for Firefox and what they do:
Enhanced Search box. Why “enhanced”? Two reasons: As you type in a search term, Google guesses what you might be looking for and offers suggestions (it also remembers what you’ve typed, in case you want to find that term again). And when you click the Search button’s down arrow, you have your choice of where to search. Select a search type, and the icon on the Search button changes to show which of these you’re using:
I’m feeling lucky (takes you straight to Google’s top result for your term)
Search Froogle (now called Google Product Search—less witty, perhaps, but certainly more descriptive) to compare prices on items you want to buy.
Search the Google Button Gallery. (Find new buttons to add to your Toolbar, in categories such as News, Tools, and Fun & Games. For example, you can add a button that shows you the current top stories on CNN and takes you to CNN.com with one click.)
Resize Search box. Click this line and hold down your mouse button, and then drag it to the left or right to make the Search box smaller or larger.
Google News. Click this button, and your browser whisks you straight to Google News, where you can read current headlines and search for news articles.
Gmail. Get one-click access to your Gmail inbox, as well as notification of new messages (Gmail tells you all about using this button).
Free online dictionary. Need to look up a word? Highlight the word, and then click the button that looks like a blue book. You whiz right over to dictionary.reference.com to find out what it means.
Add buttons. As Add a button explains, you can customize your Toolbar by adding and removing buttons. Click this button to see a list of Google-suggested buttons, such as Google Blog Search and a Dictionary button, to make your surfing even more efficient.
Bookmark this page. Click the star to add the current Web page to your Google Bookmarks (a list of shortcuts to favorite Web sites). Google Bookmarks stores your bookmarks in your Google Account, not in your browser, so you can access them from anywhere you have an Internet connection. Sign into your Google Account. If you have Web History (Signing Up for a Google Account) turned on, then Google stores your bookmarks there. You can also add a Bookmarks gadget to your iGoogle page (Chapter 8).
Find/manage Google Bookmarks. Use this button to add or remove a bookmark, organize existing bookmarks, or import bookmarks from your Web browser.
AutoLink. This button recognizes and links to certain kinds of information, such as street addresses, package tracking numbers, and publishers’ ISBN numbers (for books). For example, if you’re looking at a restaurant’s Web page, AutoLink detects its address and creates a link to a map page, showing you exactly where the restaurant is.
AutoFill. This button can save you some typing when you fill out forms on the Web. If you click this button, up pops a form where you fill in personal info like your name, address, and phone number. Then, when you visit a Web page that has a form asking for this information, one click of this button fills it in for you.
Tip
For step-by-step instructions on using AutoFill, visit the Google Toolbar Help Center: www.google.com/support/toolbar.
Send to. When you click this button, Google sends the page—or the part of the page you’ve selected by dragging your cursor—to one of these three places (you choose):
Gmail. Use Gmail to send the page or selection to yourself or someone else.
Blogger. If you have a Blogger account, this button sends the page or selection to that account, using it as the start of a new blog entry.
SMS. This option sends the page or selection as a text message to the cellphone number you specify.
Highlighting. When you use the Toolbar to do a search, click this button, and Google highlights your search term wherever it appears on the page. Click the button again to turn highlighting off.
More arrow. If you have a lot of buttons on your Toolbar, some may be hidden (you can fit only so many buttons across the width of a computer screen). Click this arrow to see any buttons not currently on display.
Settings. Click this button to sign into or out of your Google Account, add or remove buttons (see the next section), change the Toolbar’s layout, report a suspicious Web site, or get help using the Toolbar.
Google’s Button Gallery contains dozens of buttons you can use to customize your Toolbar. To add a new button, click Add Buttons (shown in Figure 1-14) or the down arrow next to it. Clicking the down arrow presents a short list of Google-related buttons you can add (Google Blog Search or Stock Search, for instance). Clicking the button itself takes you to the Google Toolbar Button Gallery, shown in Figure 1-15. In the Button Gallery, you can browse within categories or search for a specific word or phrase. When you find a button you want to add, simply click “Add to Toolbar”—it’s that easy.
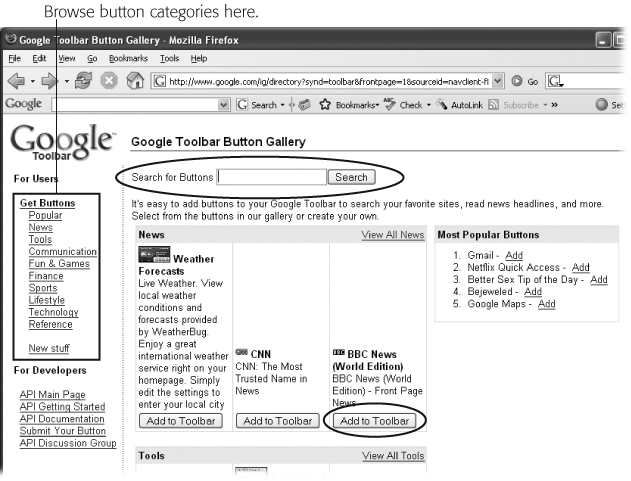
Figure 1-15. The Button Gallery offers a wealth of specialized toolbar buttons for every interest. To browse within a category, choose one from the left-hand menu. Or use the Search box (circled) to find buttons related to a particular word or phrase (like career or travel). The top five most-added buttons appear in the box on the right. When you find a button you want to add to your Toolbar, click its “Add to Toolbar” button (also circled).
You can move buttons around on the Toolbar, if you like. Go to the Buttons tab of the Toolbar Options box (Settings→Options→Buttons), shown in Figure 1-16. In the “Custom buttons” section, click to select the button you want to move, and then click the Move Up or Move Down buttons to rearrange your Toolbar. (If the Move Up or Move Down button stays grayed-out, it means you can’t move the button you’ve chosen in that direction.) When you’ve moved the buttons to where you want them, click OK.
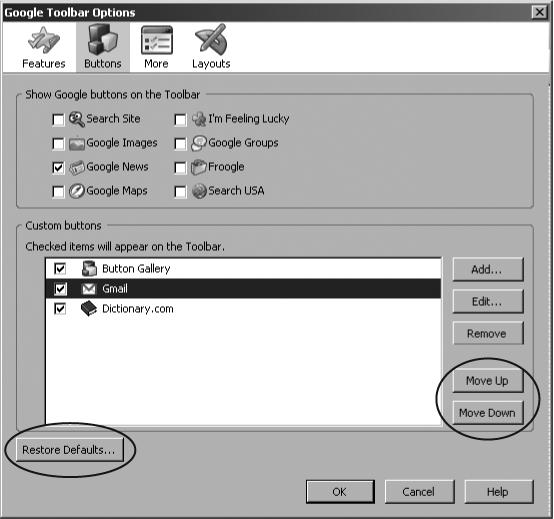
Figure 1-16. The top part of the Google Toolbar Options box shows a set of Google buttons you can add to (or remove from) your Toolbar. The bottom part shows custom buttons. If a checkbox is turned on, the button’s on your Toolbar; turn on checkboxes for any buttons you want to add. To move a button, click it in the “Custom Buttons” window, and then use the lower-right Move Up/Move Down buttons (circled). If you decide you want your buttons the way they were when you downloaded the Toolbar, click Restore Defaults (also circled).
As you adorn your Toolbar with custom buttons, you may find there are some buttons you don’t use a whole lot. You can most quickly remove a button from your Google Toolbar by right-clicking (control-clicking on a Mac) the Toolbar, and then selecting Customize to open the Customize Toolbar dialog box.
What you do next depends on whether you use Firefox or Internet Explorer. In Firefox, drag buttons off the Toolbar and into the Customize Toolbar dialog box (you may have to move the box so you can see your whole Toolbar). In Internet Explorer, select a button in the dialog box, and then click Remove to take it off the Toolbar.
Alternatively, you can remove a button from the Toolbar via the Toolbar’s own settings. To get rid of a button that way, follow these steps:
On the far right of the Toolbar, click Settings→Options. (If you use Toolbar 5 for Internet Explorer, click the Toolbar Options button.)
The Buttons tab (Figure 1-16) shows all the buttons you currently have on your Toolbar. If a button’s checkbox is turned on, it’s on the Toolbar.
Turn off the checkbox next to any button you want to get rid of (you can always come back to this box and turn it on again later). Click OK.
When you follow the steps for removing a button, the Google Toolbar doesn’t display the button any more, but the button is still hanging around so you can turn it back on. To delete a custom button from the Toolbar entirely, head to the Buttons tab of the Toolbar Options box (Settings→Options→Button tab). Next, select the button you want to delete by clicking its name. Then click the right-hand Remove button, and the button is gone, gone, gone.
If you have a change of heart and want the button back, simply follow the steps to add a button (Add a button).
As you browse the Button Gallery, you probably notice a number of buttons related to Google apps. Added to your Toolbar, these buttons let you navigate to any Google app with just a click—and do a whole lot more. This section describes some ways to use the Toolbar with Google apps.
Wherever you are on the Web, you can sign into your Google Account through the Toolbar. Click the far-right Settings button→Sign In, and enter your email address (or Gmail user name) and password. If you’re signed in, then the Settings button lets you sign out (Settings→Sign Out).
If you use the Firefox version of Google Toolbar, you can use the Docs feature to open files in Google Docs (Chapter 2 and Chapter 3). With this feature turned on, if you’re on a Web page and you click a link to open a file, then it opens in Google Docs. Dragging a file icon—like a Word document’s piece of paper icon—into a browser window also opens that file in Google Docs. (If you use Windows, double-clicking the icon in Windows Explorer does the same thing.)
Note
The Docs feature doesn’t add a button to your Toolbar. Instead, it works quietly behind the scenes, so you can easily open files in Google Docs.
You turn on the Docs feature from the Features tab of the Toolbar Options box (Settings→Options→Features, or Toolbar Options→Features if you use Toolbar 5 for Internet Explorer), shown in Figure 1-17.
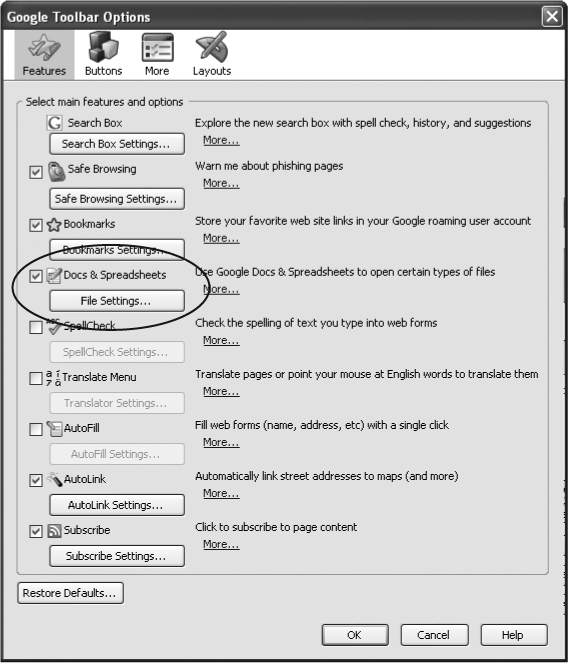
Figure 1-17. Turn on the Docs & Spreadsheets checkbox (circled) to make documents open in Google Docs. To fine-tune this feature, click the File Settings button.
To start using the Docs feature, turn on the Docs & Spreadsheets checkbox. If you want to specify which files open in Google Docs, click the File Settings button to open the Files Settings box, shown in Figure 1-18. Google Docs can open files with any of these extensions: .doc, .xls, .sxw, .odt, .ods, .rtf, and .csv. (These formats are common word processing and spreadsheet formats.) Turn off the checkboxes next to any file types you don’t want to open in Google Docs, and specify how you want to open them. You can:
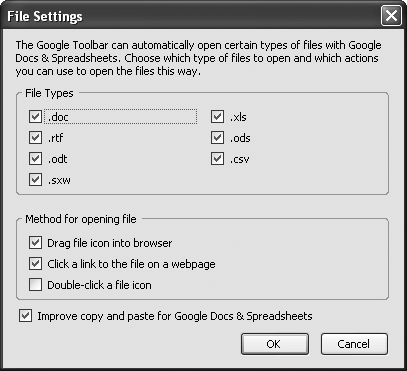
When you’ve got things how you want them, click OK, and then, in the Toolbar Options box, click OK again.
If you use Gmail, the Toolbar can keep you up to speed with what’s in your inbox as you surf the Web. Here’s what the Toolbar’s Gmail button lets you do:
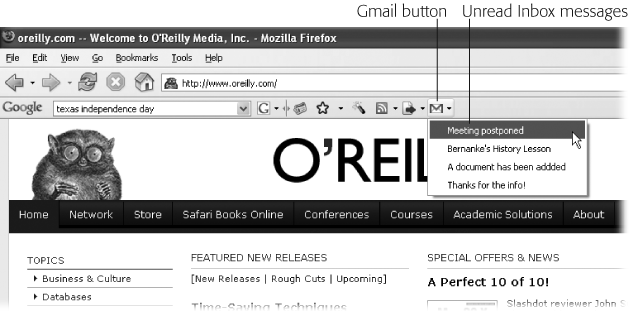
Get notified of new Gmail messages. The Gmail button gives you a peek into your Gmail inbox without having to leave the Web page you’re on. When you’re surfing the Web and you get a new email, the Gmail button lets you know by changing its icon from a closed envelope to an open one. Click the button’s down arrow to see a list of the unread messages in your inbox, as shown in Figure 1-19. Select a message to open it in a new window. From there, you can reply to the message or go to your Gmail inbox.
Figure 1-19. The Gmail button gives you one-click access to your Gmail account. Click the Gmail icon to go to Gmail, or click the button’s down arrow to see the subject lines of any unread messages in your inbox. If you want to read a message on the list, click it, and Google opens it in a new window.
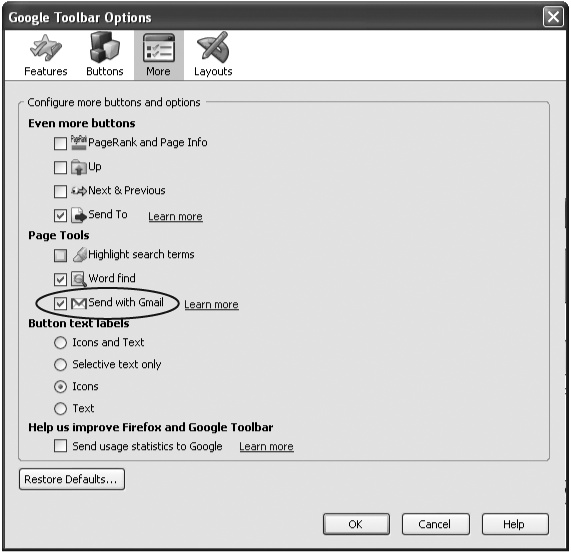
Send emails from Gmail. Say you’re looking at a Web page, and you click an “Email us” link—but your browser opens an email program that’s not Gmail to send the message. You can set your Gmail Toolbar so that mailto links automatically open Gmail. In Firefox, head to the Toolbar Options box’s More tab (Settings→Options→More), shown in Figure 1-20. In the Page Tools section, turn on the “Send with Gmail” checkbox, and then click OK to make it official. (If you’re using Toolbar 5 for Internet Explorer, click the wrench icon to open the Options window. From there, click the Tools tab, turn on the “Send to” checkbox, and then click Save.) Now, when you click a mailto link, a Gmail window opens so you can compose your message.
If you use Google Calendar (Chapter 7) to keep your crazy schedule running smoothly, you can work with Calendar straight from the Google Toolbar. Go to the Button Gallery (Add a button), search for Google Calendar to find the button—Figure 1-21 shows what it looks like—and then add it to the Toolbar (see Add a button). After you’ve got the button on your Toolbar, click it to go straight to Google Calendar. (If you’re not already signed in to your Google Account, you can sign in on the way.)
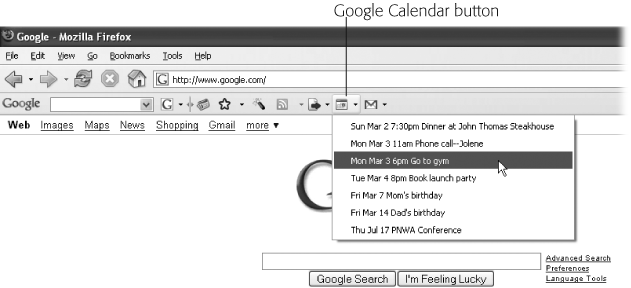
Figure 1-21. Click the Google Calendar button’s drop-down arrow to see upcoming events (up to 10) scheduled in the Calendar. Click an event to edit it in Google Calendar.
You can do a few other nifty things with the Google Calendar button on your Toolbar:
See upcoming events. Click the button’s drop-down arrow to see a list of the next 10 events on your calendar (see Figure 1-21). Click an event to see or edit its details.
Add an event to your calendar. Type the details of an event (date, time, occasion, and so on) into the Toolbar’s Search box, and then click the Google Calendar button. You’re whisked off to the form for creating a new Calendar event (Adding Events), with the info you typed already filled in.
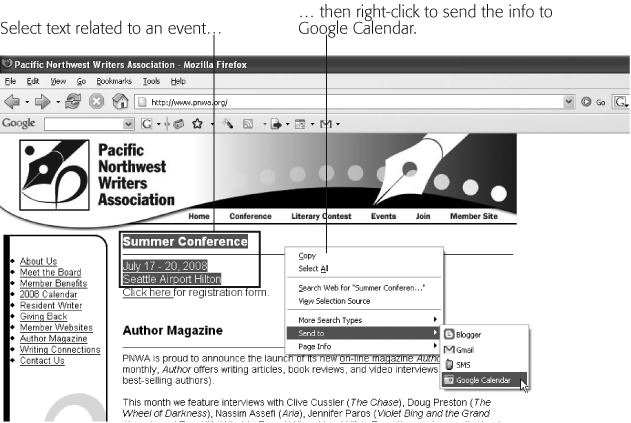
Use a Web site to create a new event on your calendar. When you add the Calendar button to your Toolbar, you can get a head start in creating events for your Calendar. Say you’re looking at the Web site of a conference you plan to attend. You can copy info straight from the site, and use it to create an event in your calendar. Select the text you want to use, and then right-click (if you’re on a Mac with a one-button mouse, control-click). From the shortcut menu (shown in Figure 1-22), choose “Send to”→Google Calendar. Your browser takes you right to Google Calendar’s form for creating a new event (Adding Events), with the text you selected already filled in. Edit the info (if necessary), and then click Save Changes to put the event on your calendar.
Some people have so many toolbars cluttering up their browsers that there’s hardly any room left for Web pages. If you find the Google Toolbar useful but don’t want it at the top of your screen all the time, you have a couple of options: You can hide the Toolbar or edit it to make it more compact. Or, if you’ve given the Toolbar a test drive and you decide it’s not for you, you can easily uninstall it.
You can hide the Toolbar so it doesn’t show up in your Web browser, and then pull it up whenever you need it. To hide a toolbar in Firefox or Internet Explorer 6 or earlier, select View→Toolbars to see a list of toolbars in your browser. If there’s a checkmark next to Google Toolbar, the Toolbar is visible. Select Google Toolbar to remove the checkmark and hide the Toolbar. When you want to show the Toolbar again, just repeat the process to toggle the Toolbar back on: View→Toolbars→Google Toolbar.
The Toolbar Options box lets you tweak the layout of your Toolbar to save space. On the Toolbar, click Settings→Options→Layouts tab to open the dialog box shown in Figure 1-23. (If you’re using Toolbar 5 for Internet Explorer 7, click the Toolbar Options button—the one that looks like a wrench—and then Layouts.)
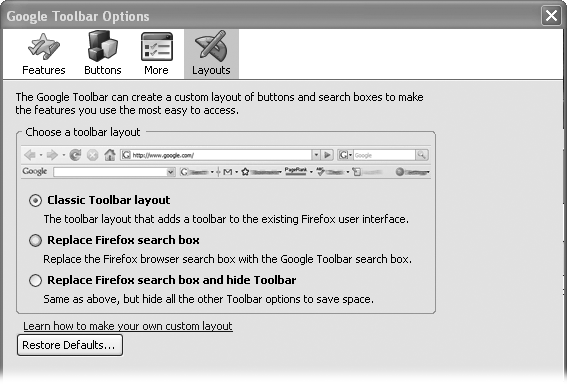
In the Layouts tab, you can make the Toolbar more compact by turning on “Replace [Firefox/Internet Explorer] search box and hide Toolbar” (the exact wording depends on you browser). This option gives you the power of Google-enhanced searching without all those other buttons crowding your screen. When you need one of those buttons, just click the drop-down arrow next to the G beside the Google search box. In the menu that pops up, click Show Google Toolbar.
If you decide you want to restore the full Toolbar, go back to the Layouts tab and turn on the “Classic Toolbar layout” radio button.
If you want to remove the Toolbar from your computer, you can take one of several routes:
Uninstall using the Toolbar itself. This method should work no matter what browser or operating system you use. Go to Settings→Help→Uninstall. (If you’re using Toolbar 5 for Internet Explorer, click the arrow on the Toolbar Options button, and then Uninstall.) A new window opens, warning you that you’re about to remove the Toolbar from your computer for good. The window has a text box where you can tell the folks at Google why you decided not to stick with the Toolbar (it’s optional). Click “Uninstall the Google Toolbar”, and it’s gone.
Uninstall using Firefox. If you use Firefox as your browser, you can use Firefox’s uninstall procedure to get rid of the Toolbar. Open a Firefox browser window, and then click Tools→“Add ons” (for Firefox 2) or Extensions (for earlier versions of Firefox). A window opens, showing programs you’ve added to Firefox. Select “Google Toolbar for Firefox,” and then click the Uninstall button. Close Firefox (if you have multiple windows open, then make sure you close them all); the next time you fire it up, the Google Toolbar will be gone.
Uninstall using the Windows Control Panel. To uninstall Google Toolbar’s Internet Explorer version using the Control Panel, select Start→Settings→Control Panel. In the Control Panel window, double-click “Add or Remove Programs”. Windows opens the “Add or Remove Programs” window and fills it with a list of programs you have installed on your computer. Find and select “Google Toolbar for IE”, and then click the Remove button.
Get Google Apps: The Missing Manual now with the O’Reilly learning platform.
O’Reilly members experience books, live events, courses curated by job role, and more from O’Reilly and nearly 200 top publishers.

