So we caught a few baby waves in the last chapter, and by now you should feel comfortable navigating and using the Google Wave Client. In this chapter we’ll spend some time further familiarizing ourselves with the Google Wave Client, and we’ll discuss the use of more complex extensions. This will be the last chapter that deals directly with the Google Wave Client; for discussion about the Google Wave Platform, see Google Wave: Up and Running.
The ability to include various types of media in blips adds even greater value to our dialogue with other participants on a wave. I won’t get into clichés about pictures and numbers of words, but I am pretty sure you will agree that media, especially images and videos, can enhance the quality and context of a conversation in a wave.
There are various ways of adding media to a wave, and in Chapter 2 I briefly discussed how Google Wave supports media and attachments. Google Wave Client makes it extremely easy to add media to a wave. And because media is displayed at the blip level, rather than at the general wave level, participants are able to more readily understand the context of the media as it relates to a particular part (or parts) of a conversation.
Let’s try out some of the ways in which we can add media to a wave using the Google Wave Client. Go ahead and create a new wave titled “Media Integration Wave” and then start a reply to your initial blip.
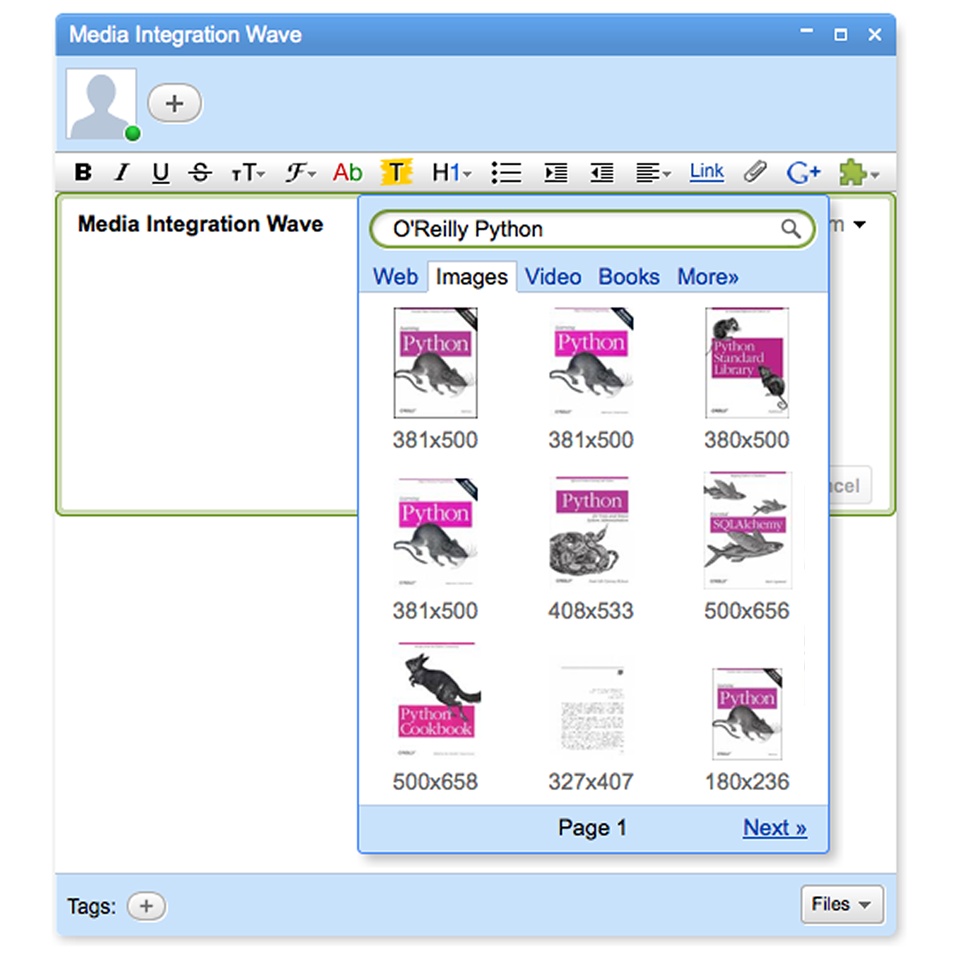
First, we’ll add an image using the integrated Google Search available in the rich text toolbar. Click on the G+ icon to bring up the Google Search gadget and select the “images” tab. Just for fun, type “O’Reilly Python” into the search box. You should see various book covers with a mouse displayed in the search results, and you can add any of these images to a blip simply by clicking on it (see Figure 4-1).
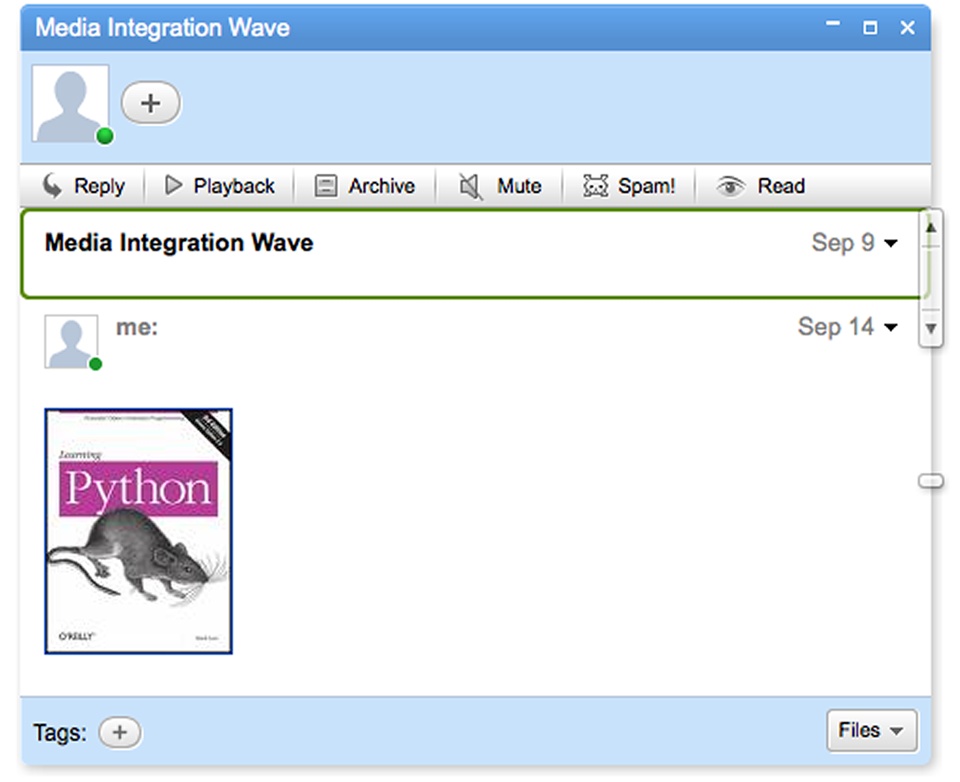
Not bad, we’ve added an image from the web without much fuss (see Figure 4-2). Note that the image you added is automatically displayed as a thumbnail. Clicking on the thumbnail will open a new Google image search page that references the image you added.
Tip
You can also “preview” an image added to a blip by clicking on the “plus” icon that appears on the top right of the image thumbnail when you hover your cursor over the image. Clicking on the plus icon will enlarge the image to fit within the blip. A minus icon can be used to minimize the image back to its thumbnail.
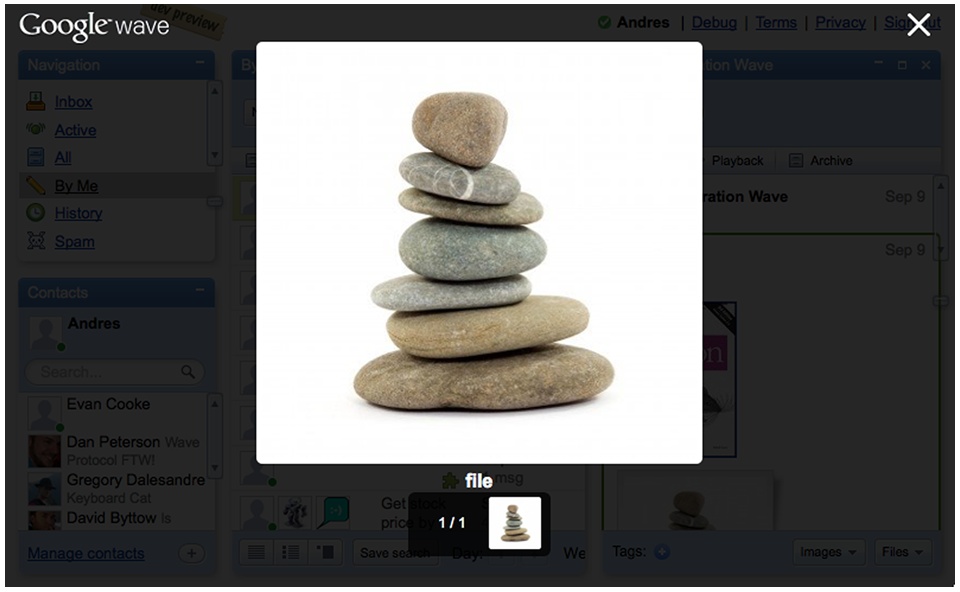
Next, we’ll add some media to a blip via the attachment button in the rich text editor toolbar. We’ll simply click on the paper clip attachment icon and then select a file on a local or network drive. Notice that adding media to a blip is just like adding an attachment to an email, except for the fact that once uploaded the image is immediately added to the wave (look ma, no send button!), and thus accessible to all participants. Note that in this instance, clicking on the thumbnail will open the full size image as an overlay on the Google Wave web page (see Figure 4-3).
If you have Google Gears installed, you can also simply drag and drop media files into a blip from your desktop or any accessible local drive. This is essentially the same as using the attachment button, although obviously it is a bit easier and more visually intuitive. Also note that you can drag and drop multiple images (and files) into a blip at once using this technique, rather than uploading them one at a time as attachments.[25]
Tip
You can view all of the uploaded images on a wave as a slide show by selecting “View as slide show” from the “Images” drop-down menu on the bottom right of the conversation pane. You can also use the same drop-down menu to download all of the images on a wave at once.
A movie can be added to a blip either by using the Google search gadget (in much the same way as adding an image) or by adding a URL to a blip that refers to a YouTube movie. The Google search results include video from a variety of sources, and when a selection is made from the search results, a hyperlink to the movie is added to the blip.
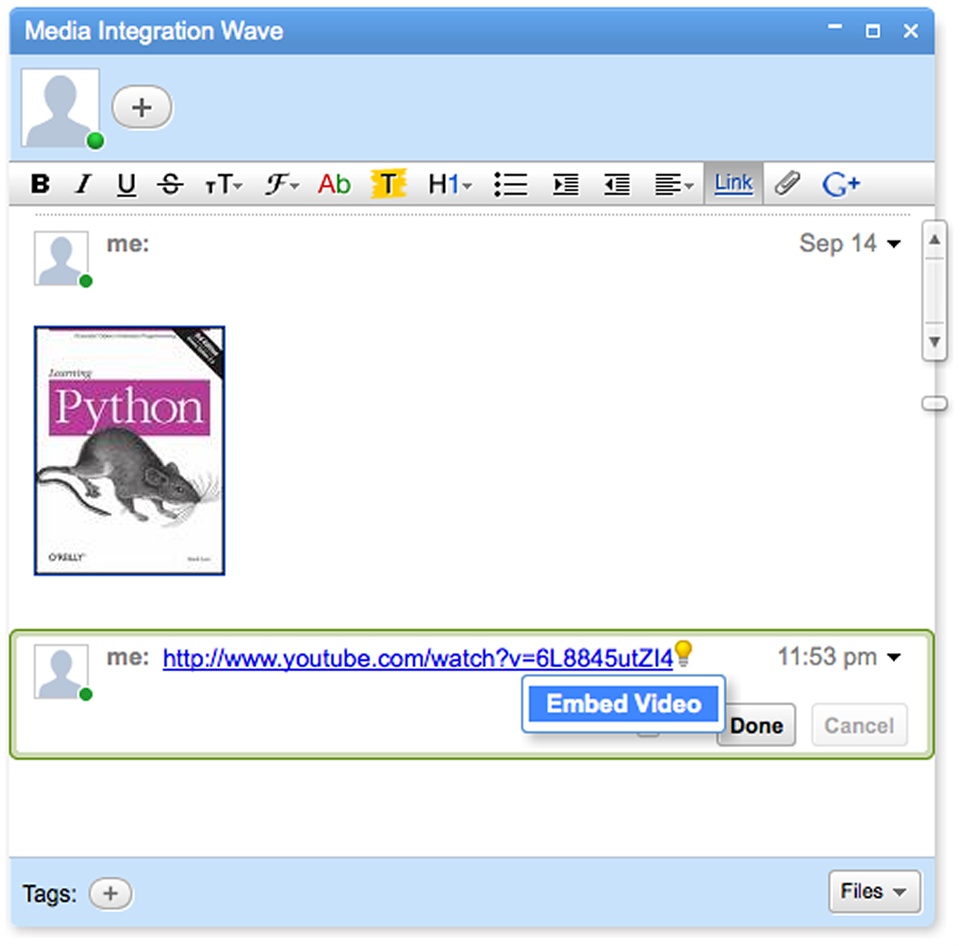
When you add a hyperlink to YouTube, the Google Wave Client automatically recognizes it as a movie, and a “tip” icon (a light bulb) displays next to the hyperlink (Figure 4-4). Clicking on the tip displays a drop-down menu with several options, including adding a thumbnail image or embedding the movie (as a gadget).
Go ahead and try it out yourself. Find a movie on YouTube you like, and copy/paste its URL to your blip (or you can use the Google search gadget and find a movie from YouTube). In Figure 4-5, you can see that I added a movie of the spectacular Iguazu Falls on the Brazil-Argentina border.
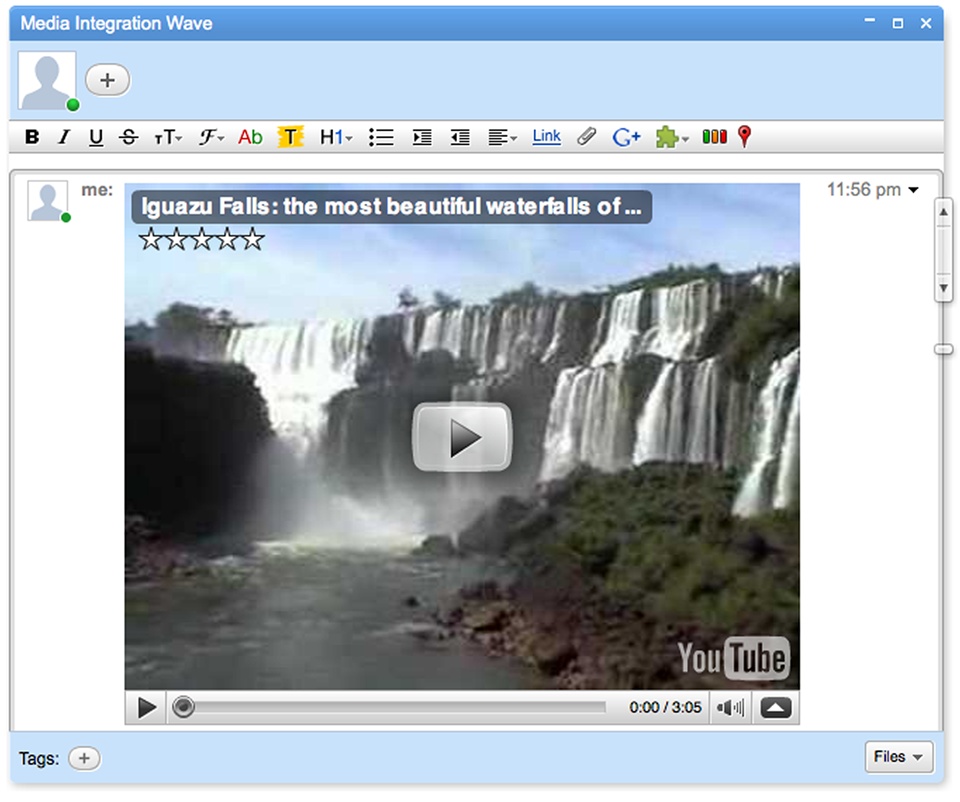
The ability to quickly add movies like this, and have them display inline in a wave is great, but unfortunately this feature is limited to movies available on YouTube (at least for now). However, as with the Google gadget search results, you can always add a hyperlink to a movie’s URL. Also keep in mind that in the future you’ll likely be able to use a gadget (or gadgets) that provide access to movies for a particular service provider to embed movies inline the same way as with YouTube movies.
Tip
Movie files can be added to a blip as an attachment, although it’s likely best to keep these attachments to short movies, due to the large file size of longer movies.
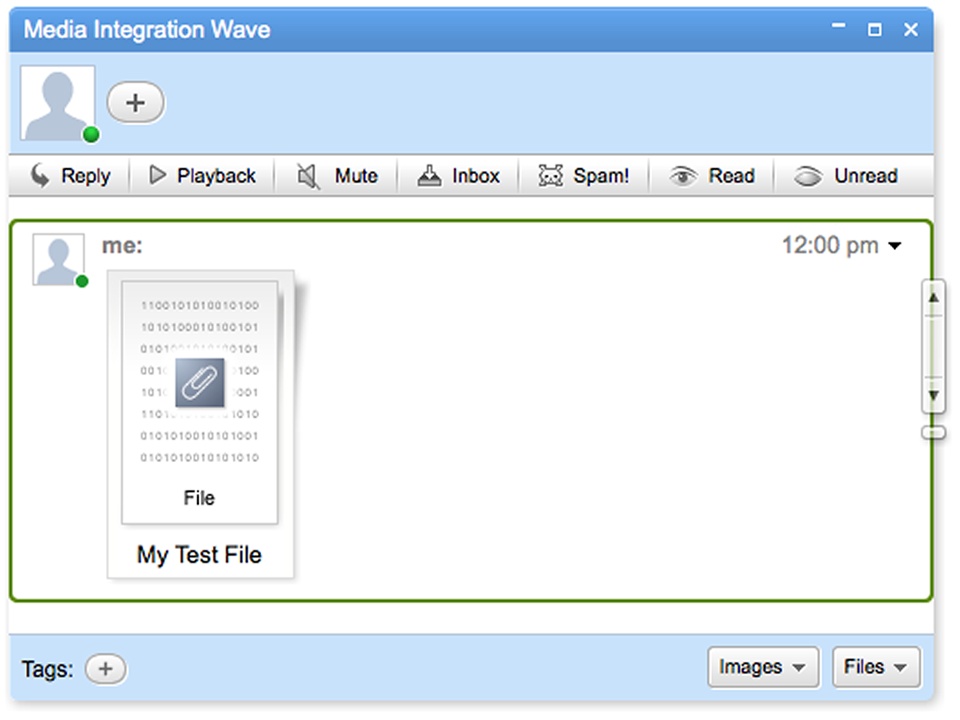
Working with attachments in the Google Wave Client is quite easy. Adding attachments to a blip can be accomplished in the same way as adding images. You can drag and drop files or you can load files locally from your computer.
File attachments are displayed using a small file thumbnail (Figure 4-6). The Google Wave Client aptly titles the attachment with the original file name, but you can rename the attachment with a more user-friendly title by clicking on the title text and entering in your own title.
Tip
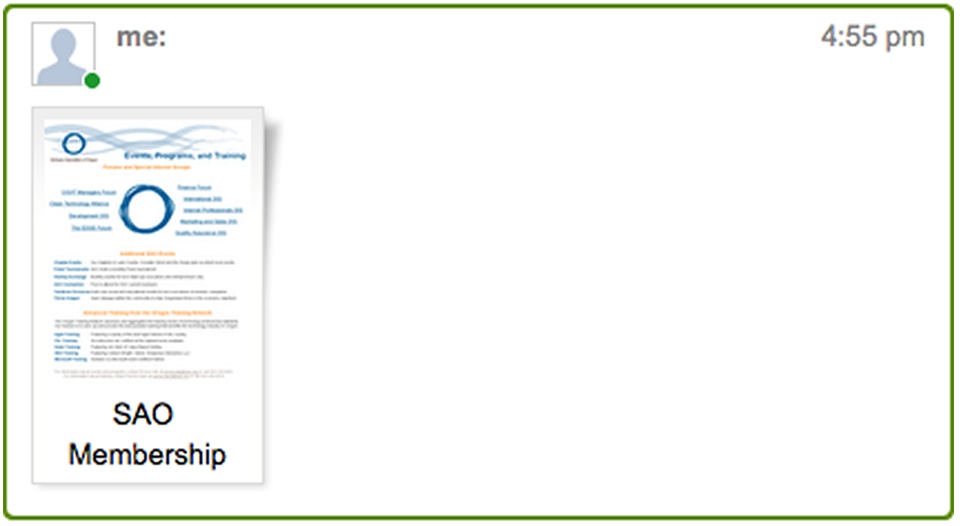
The Google Wave Client displays a thumbnail of the first page of Adobe PDF files. Thus it is possible to give a PDF document a quick visual scan prior to electing to download it (Figure 4-7).
Downloading file attachments from a wave is as easy as clicking on the file thumbnail in a blip. If the file type is natively supported in your browser (e.g., PDF files in most browsers), then the attachment is opened in a new browser page. Otherwise, you can download the file locally just as with other file downloads from the web.
Warning
Remember that any attachments you add to a blip are visible to all participants of the wavelet that contains the blip. So unless you start a new wavelet via a private reply, any attachments you add to a general conversation in a wave will be available to all participants.
Fortunately the Google Wave client isn’t limited to clicking and dragging with your mouse. A set of keyboard shortcuts provide a great way to become more efficient with navigation and participation, although it may take a little while for you to memorize the shortcuts.
Listed below are keyboard shortcuts supported as of the writing of this book[26]:
Inbox Pane
Ctrl + Click (Command + Click on Mac): Opens a wave as another instance in the conversation pane (i.e., the conversation pane can have more than one wave, although only one wave is visible at a time).
Space Bar: When you select a wave in your inbox, you can hit the space bar to cycle through the blips added to the wave since you last viewed it. Note that blips are selected/highlighed in chronological order.
Shift + Enter: Creates a new reply to the last blip on the wave currently open in the conversation pane.
Conversation Pane
Ctrl + R: Creates a reply to the currently selected blip. This is the same function as using the Enter key.
Ctrl + E: Edit the currently selected blip.
Ctrl + Enter: Creates an inline reply at the cursor location within the content of a blip.
Ctrl + Space: Marks all unread blips as read in the currently selected wave.
Enter: Creates a reply to the currently selected blip.
Home/End Keys: Selects the first/last blip in a wave.
Shift + Enter: Creates a new blip as a reply to the currently selected blip in a wave. If you are editing a blip, this shortcut will save your blip (the equivalent of clicking on the “Done” button).
Space Bar: You can hit the space bar to cycle through the blips added to the wave since you last viewed it. Note that blips are selected/highlighed in chronological order. This is the same function as hitting the space bar in the navigation pane.
Up/Down Arrow Keys: Sequentially select blips moving up or down the list of blips in a wave.
Editing and Formatting Blips
Ctrl + B: Makes selected text bold.
Ctrl + G: Toggles text color control.
Ctrl + I: Makes selected text italic.
Ctrl + 1,2,3,or 4: Make the current line a heading, with the heading size based on the input number.
Ctrl + 5: Add bullets to a blip.
Ctrl + 6: Resets text formatting to normal, with the exception of bold and italic formatting.
Ctrl + 7: Left align text.
Ctrl + 8: Right align text.
Tip
Even if keyboard shortcuts aren’t your thing, I still encourage you to try them out as a way to further familiarize yourself with the client and its features.
Remember the search bar at the top of the inbox pane? Well, in addition to doing global keyword searches on waves in your inbox, you can use certain operators as prefixes in the search bar to get more refined and precise search results. You may have already noticed this when using saved searches or custom folders. For example, you may have noticed that the search bar contains the text “By:Me” when you click on the By Me folder in the navigation pane.
You can search by keywords, the status of a wave (e.g., unread), participants, dates, and much more. Listed below are common search operators used in the inbox search box (keep in mind that you can combine multiple operators and/or expressions).[27]:
Keywords
about:[keyword] - Performs a global search on waves which have [keyword] occurring anywhere. This is the same as using [keyword].
title:[keyword] - Finds waves that have [keyword] in the title.
caption:[keyword] - Finds waves that have an attachment where [keyword] occurs in the caption.
Status
is:read - Finds all read waves.
is:unread - Finds all unread waves.
is:mute - Finds all muted waves.
is:unmute - Finds all non-muted waves.
is:active - Currently the same as is:unread.
is:note - Finds all waves that have you as the only participant and contributor (i.e., sole participant waves).
Participants
from:[address] - Finds waves from the participant identified by the [address].
from:me - Finds waves in which you have participated.
by:[address] - The same as from:[address].
to:[address] - Finds waves that encompass a conversation between you and the participant identified by the [address].
with:[address] - Finds waves that have the participant identified by the given [address] explicitly listed.
owner:[address] - Finds waves created by the participant identified by the given [address].
only:[address] - Finds waves to which only the participant specified by the given [address] contributed.
is:active - Currently the same as is:unread.
is:note - Finds all waves that have you as the only participant and contributor (i.e., sole participant waves).
Dates
past:[date term] - Finds all waves in the last period (see available date terms below) as [date term].
previous:[date term] - Finds all waves in the period before the last period as [date term].
before:[date term] - Finds all waves before a certain period as [date term].
after:[date term] - Finds all waves after a certain period as [date term].
Available date terms:
day
week
month
year
[n]days (e.g., 3days); can also be abbreviated as [n]d (e.g., 3d)
[n]weeks (e.g., 3weeks); can also be abbreviated as [n]w (e.g., 3w)
[n]months (e.g., 3months); can also be abbreviated as [n]m (e.g., 3m)
[n]years (e.g., 3years); can also be abbreviated as [n]y (e.g., 3y)
Folders
in:[folder name] - Find waves in the folder with the given name (including custom folders).
in:[search name] - Find waves in the saved search with the given name.
is:unfiled - Find waves that have not been moved to a user folder.
is:filed - Find waves that have been moved to a folder.
Attachments
has:attachment - Finds waves that have one or more attachments.
has:document - Finds waves with an attachment that is a document.
has:image - Finds waves with an attachments that is an image.
caption:[keyword] - Finds waves with an attachment that has a caption containing [keyword].
mimetype:[keyword] - Finds waves with an attachment that has a mimetype containing [keyword].
Tags
tag:[tag name] - Finds waves with the tag [tag name].
Gadgets
has:gadget - Finds waves that contain one or more gadgets.
gadget:[keyword] - Finds waves that contain a gadget with the name that contains [keyword].
gadgeturl:[keyword] - Finds waves that contain a gadget with a URL that contains [keyword].
gadgettitle:[keyword] - Finds waves that contain a gadget with a title that contains [keyword]
Expressions
Expressions can also be used in combination with the search operators listed above. Here are some of the common expression searches that can be used:
term1 and term2 (or term1 & term2) - Finds waves with both terms, regardless of position. You can skip this operator altogether if you wish, as it is set as the default type.
term1 | term2 | term3 - Finds waves with at least one of the terms.
-term1 - Finds waves that do not contain the term.
“term1...term2” - Finds waves that contain the exact phrase between quotes.
“[term1 term2]” - Finds waves that have contain one or more terms in sequential order.
Sample searches
Here are a few sample searches to give you a better idea of how to use the operators and expressions above:
by:me has:image - Finds waves in which I have created blips and that contain at least one image.
“Google Wave: Up and Running” - Finds waves that contain the title of this book.
“Andres Ferrate” previous:month - Finds waves from the previous month that contain my name.
in:APIS is:unmuted past:10d - Finds unmuted waves in my “APIs” folder from the past ten days.
Oregon & (California | -Washington) - Finds waves that contain Oregon and which either contain California or do not contain Washington.
Tip
As with keyboard shortcuts, even if you prefer to use point and click functionality in the Google Wave client, I strongly suggest you become more familiar with the search box and the use of operators and expressions. It may take a little bit of time for you to memorize some of the operators and expressions, but they can save you time when you are navigating around an inbox and folders filled with a multitude of waves.
Although the wiki-like editing capabilities of Google Wave represent a valuable feature, there is some debate about whether participants should edit other participant’s blips or their own blips. The underlying issue is whether editing a participant’s blip after the fact is an effective way of contributing to a conversation. Because Google Wave is so new, an accepted protocol or approach to dealing with this issue has not emerged per se.
At present, it seems that a balance can be struck with regard to establishing a protocol for editing blips. It seems that the best use of the editing feature in the Google Wave Client is for correcting small errors in text, deleting outdated information, and/or adding updated information. However, there is also the question of whether edits or deletions of a blip likely are best left to the original author, with the rationale that participants can reply to the blip in question and ask the author to take action.
There is also a subtle nuance for authors of a blip when it comes to making edits to their own blips. In the same light as making edits to other’s blips, it seems that the editing capabilities are most applicable to small edits, whereas larger edits may best be handled by an author replying to their own blip. The reasoning for this is that a reply to a blip is more explicit and thus more easily discernible.
As your use of Google Wave increases, you will be able to determine your preferred approach for edits, including your comfort level with regard to having others edit your blips or other participants’ blips. Subsequently, this may also depend on whether a wave is being used more as an ephemeral running conversation rather than as a reference document.
Tip
Keep in mind that we’re talking about a new model for communication and collaboration on the web, so approaches and community-based consensus for editing blips may change as “waviquette” evolves through additional use and participation by a broader set of users.
In the course of using Google Wave to communicate and collaborate with others, you likely will find yourself in conversations that include dozens, perhaps even hundreds of participants. Keeping track of all of the action in several threads, including who wrote what and what they wrote can become an overwhelming experience.
Typically large waves have more than a single thread, and as participants add blips, more and more threads emerge. This is a great facet of Google Wave, but it can also limit the effectiveness of a conversation if these numerous threads grow to encompass too broad a conversation.
Warning
The dynamic and open nature of waves is great, but it can easily lead to waves that grow to be unmanageable, especially if numerous unrelated or disjointed threads emerge within the general theme or topic of a wave.
One way that you can manage these types of waves is to create a new wave to continue a conversation from an unrelated or irrelevant thread. Once you start a new wave, and add other participants as needed, you can add a link to the new wave on the original wave and vice versa. This is a good way to keep the valuable information that emerged during the conversation of the parent wave, while at the same time isolating and reducing the amount of unrelated information in a wave.
Tip
You can add a link to another wave by dragging and dropping a wave from the inbox to an editable blip in the conversation pane.
Keep in mind that if you are interacting in a wave as more of an observer than an active participant, you can use the playback feature in the conversation pane to get an idea of the latest activity. Rather than using the space bar to cycle through blips, you can either playback an entire wave, or you can skip ahead to view some of the recently added (or edited) blips.
Even as I write this book, there seems to be an overwhelming degree of interest in Google Wave extensions within the general developer community. This high level of interest is beneficial for both end users and developers. The ongoing development of new extensions and gadgets represents an ever-increasing set of tools and resources available for a diverse set of Google Wave Client users. In similar fashion, the knowledgebase for development with the Google Wave Platform seemingly will increase as more developers contribute to the Google Wave extensions “ecosystem.”
The use of robots and gadgets inherently is subject to trial and error, and it may take you a few tries with different robots and gadgets to determine their suitability for use in particular waves in the Google Wave Client.
There is a Google Wave samples gallery that serves as a running index of both robots and gadgets. The samples gallery can be found at http://wave-samples-gallery.appspot.com.
The samples gallery is a great starting point to learn about robots developed by members of the Google Wave team and third party developers, and it allows you to search or filter listings by various parameters, including keywords. Figure 4-8 shows the samples gallery filtered to show only robots.
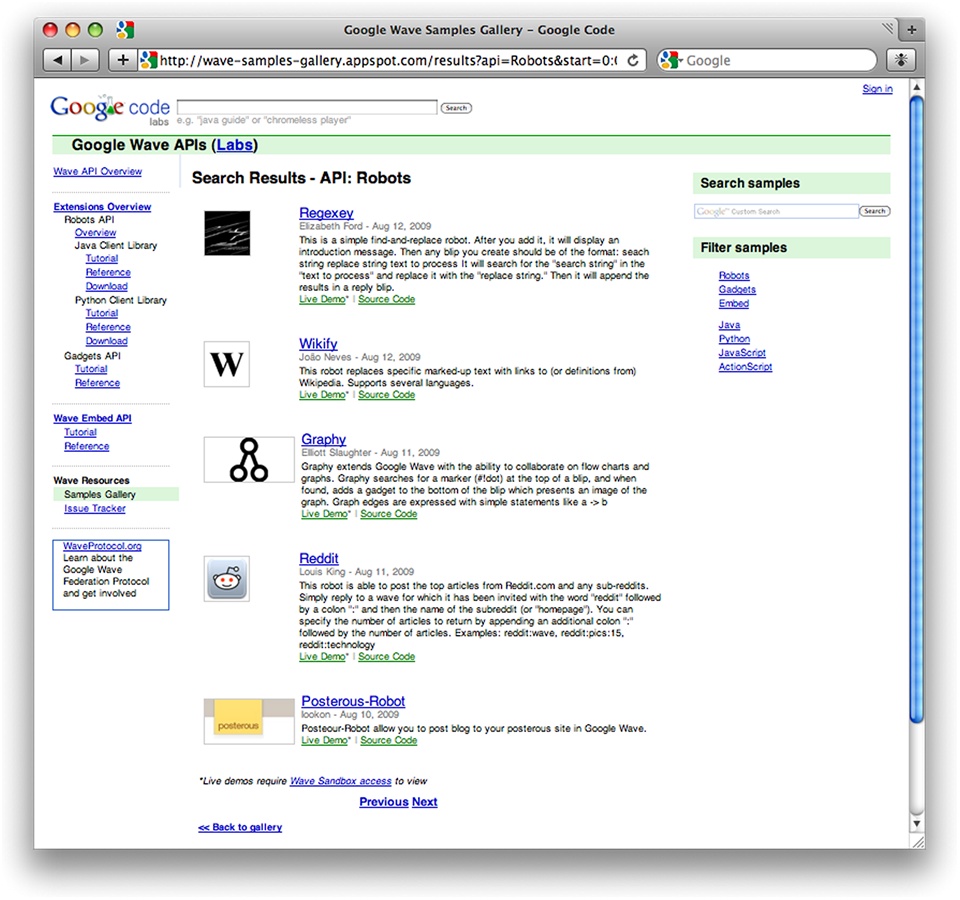
As you can see, each listing includes a short description of each robot, a demonstration wave, and source code (if available). So for example, if you’re looking for a social news robot, you might find the Reddit robot a handy addition to your wave.
In the previous chapter we worked with a few basic robots to get an idea of how these automated participants can interact with us in a wave. Let’s turn now and take a look at some more complex robots and how they can be used with waves.[28].
Bloggy (blog-wave@appspot.com) is a robot that publishes the contents of a wave to blog sites. Programmed in Python, Bloggy highlights how robots can interact with third party services to integrate content from the Google Wave client to other web sites. Bloggy works by dynamically creating a blog that contains your waves at http://blog-wave.appspot.com/<your Google Wave username>. The blog is based on a template from Blogger, Google’s blogging platform, and each wave is displayed within a blog page as an embedded wave. If you take a look at Figure 4-9 you can see the test wave in which I added Bloggy and added some blips.
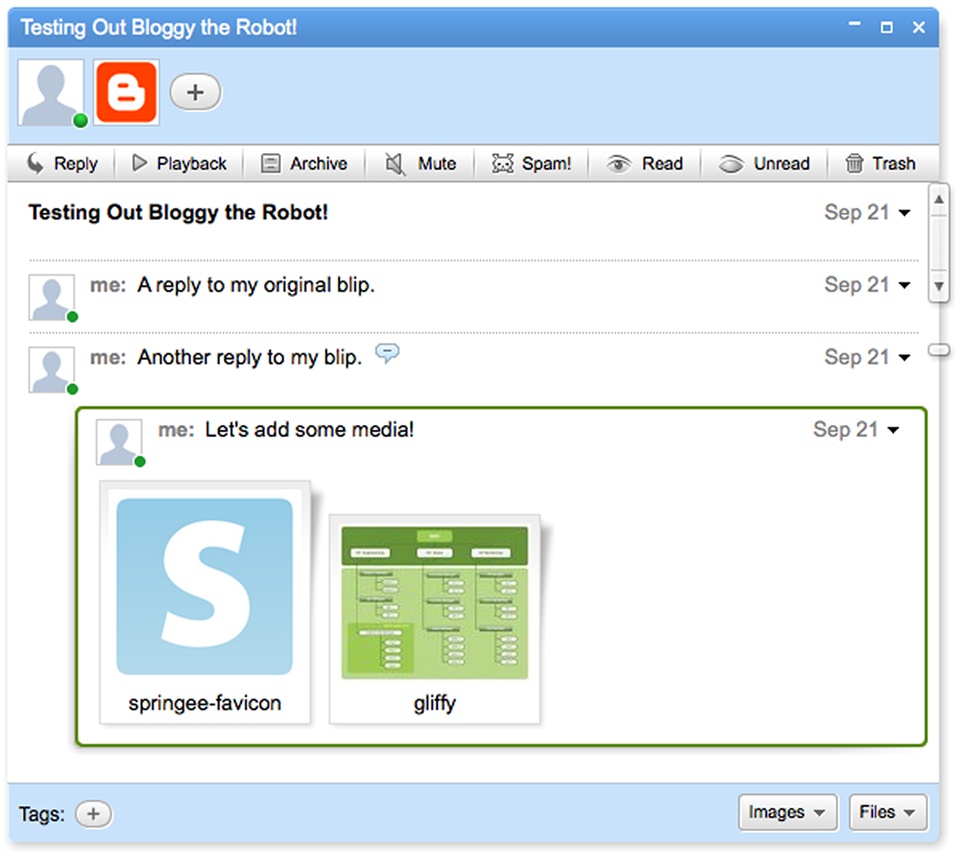
Figure 4-9. After I added Bloggy to my wave, I added a few blips and some media, which Bloggy published to a new blog (Figure 4-10).
Shortly after I added Bloggy, the wave was added to http://blog-wave.appspot.com/cartosoft (“Cartosoft” is the name of my company, which I used to sign up for early developer access to Google Wave). The same wave created in the Google Wave Client is visible on the blog that Bloggy created for me (Figure 4-10).
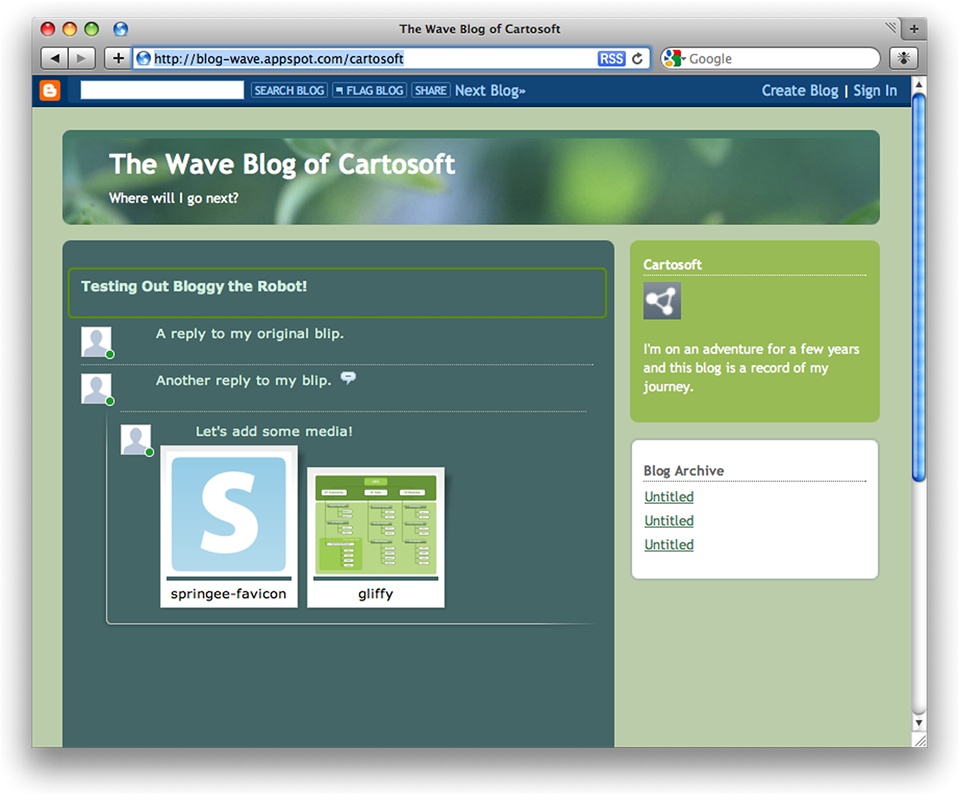
Changes to the wave are updated in real-time on the blog. Note that because the wave is embedded, other participants I add to the wave could reply from the blog page itself. Go ahead and try it out yourself. Create a new wave, add Bloggy as a participant (blog-wave@appspot.com), and then check out your new blog at http://blog-wave.appspot.com/<your Google Wave username>.
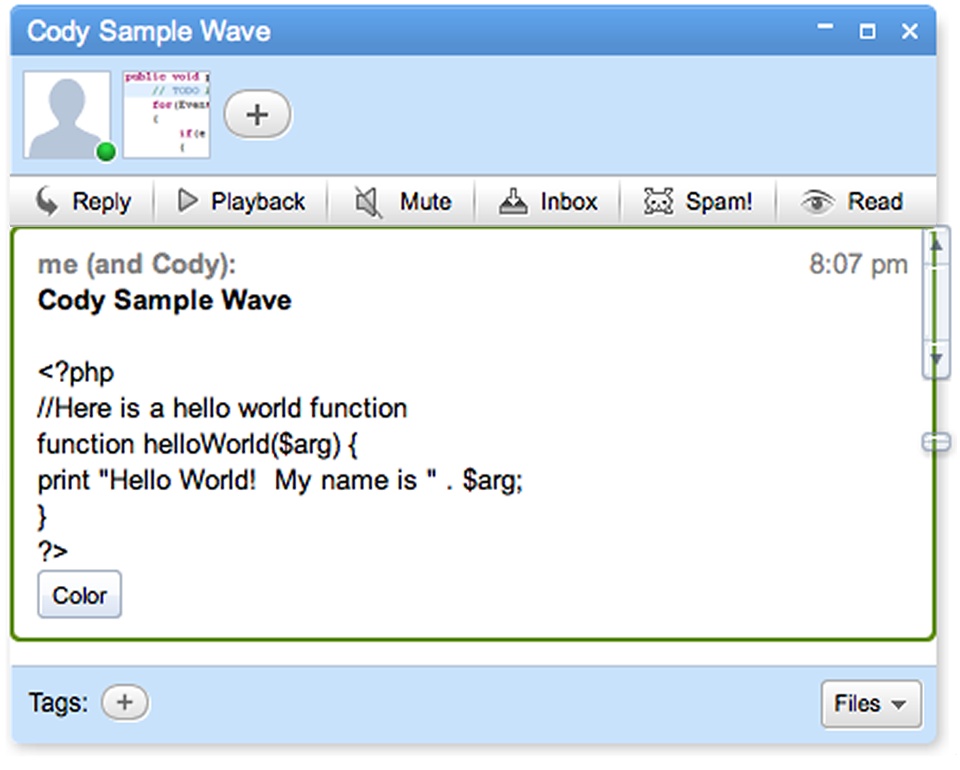
Cody (codeditor@appspot.com) is a programming code formating robot. Programmed in Java, Cody responds to input by participants by adding a “Color” button to the bottom of a blip (see Figure 4-11).
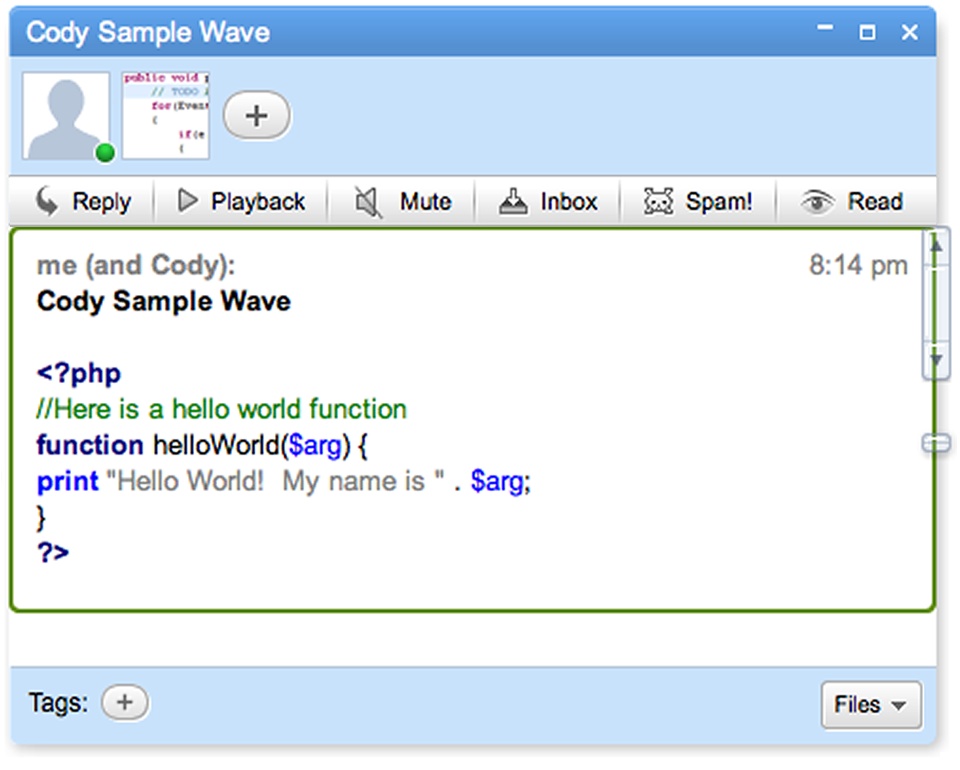
When this button is clicked, Cody reformats the blip and highlights code in different colors according to the language that it detects or that you specify. As you can see, the PHP code that I input into my original blip is reformatted after I click on the “Color” button (Figure 4-12).
Cody is a nice example of how robots can serve as virtual assistants that enhance your blips without much intrusion. You should try out a couple of different types of code with Cody, including Java, HTML, and JavaScript.
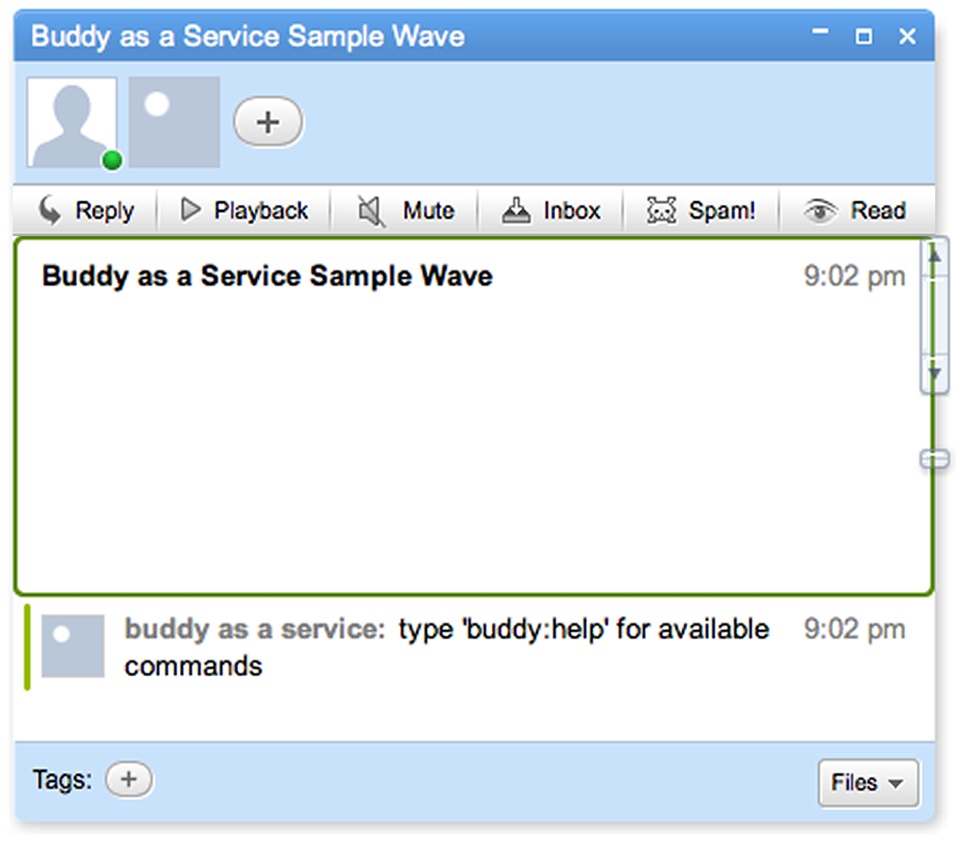
Buddy as a Service (buddyasaservice@appspot.com) is a Python robot that leverages several third party web services to provide responses to a variety of queries. Buddy as a Service is a good example of a robot that taps into other APIs, including the Yahoo! Boss API and Google’s Search API, to easily extend the information in a conversation in an automated manner.
After you add the Buddy as a Service Robot, it will add an initial blip with some basic instructions (Figure 4-13).
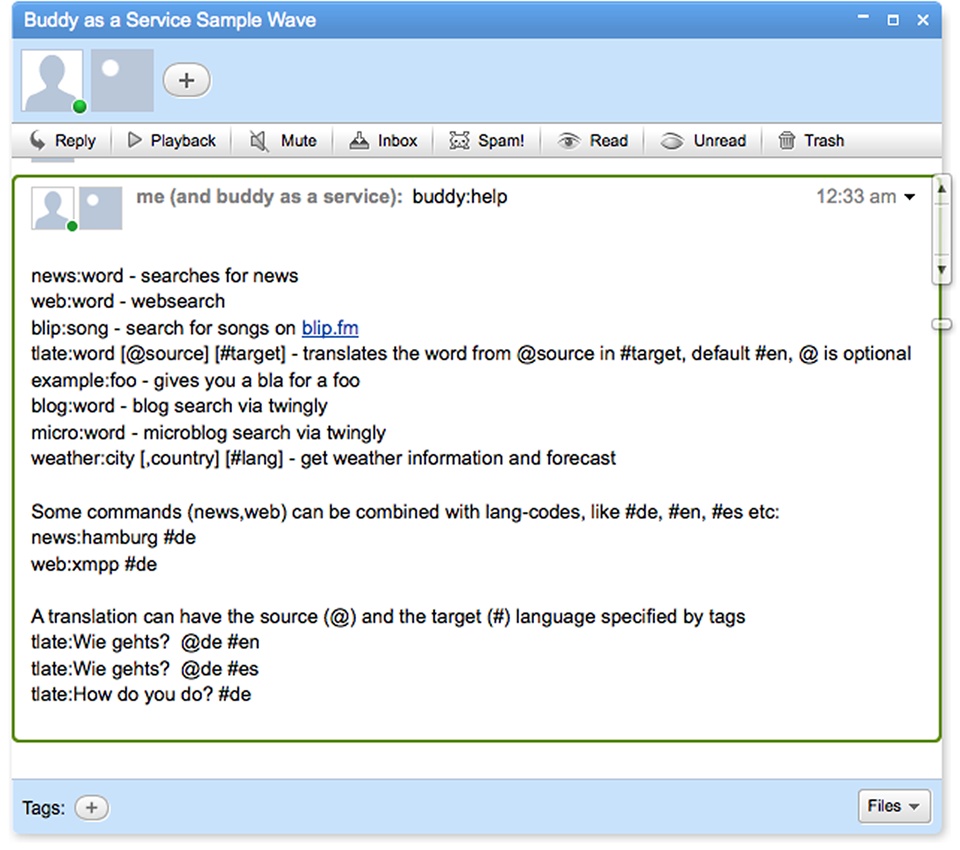
So typing in “buddy:help” yields a new blip with a set of instructions (Figure 4-14).
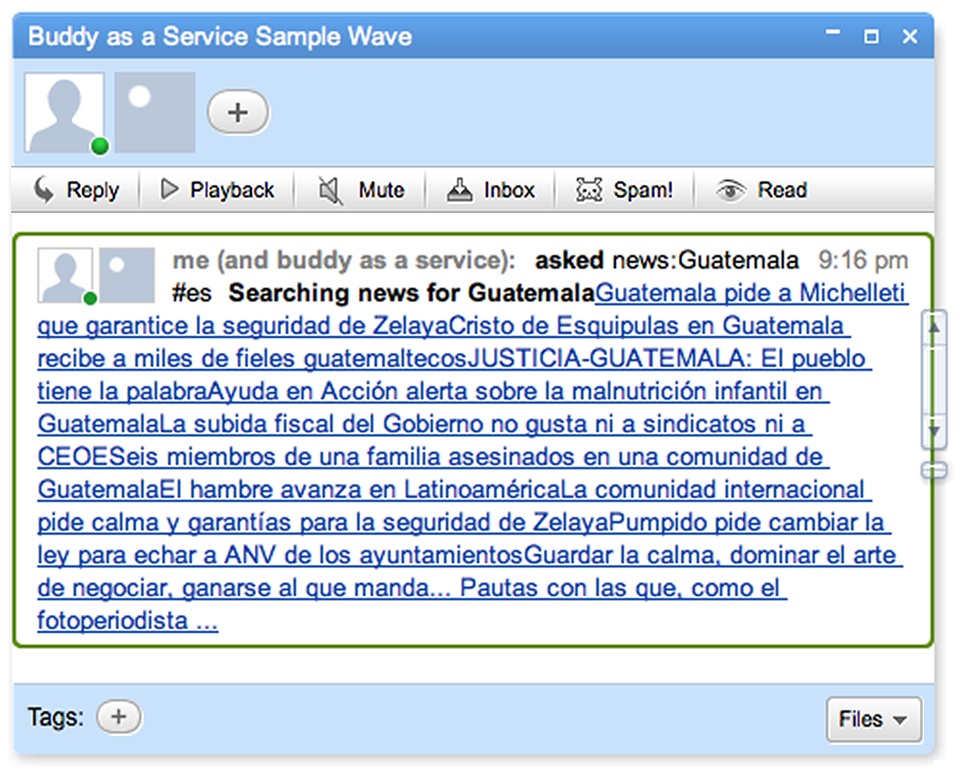
Using the query operators listed, I can perform a search for the weather in Chicago using weather:Chicago and Buddy as a Service edits my blip to add the weather results (Figure 4-15). Adding news:Guatemala #es to a new blip returns search results for news about Guatemala in Spanish (Figure 4-16).

As you can see, there are various types of robots that can be used with waves, and the examples above barely scratch the surface of what is currently available (in fact, you could probably fill a whole book with examples of robots). We can only guess that there will be an ever increasing number of robots available to fulfill a diverse set of needs as the Google Wave platform matures. In the next chapter we’ll discuss the Google Wave API in more technical detail, including some of the fundamentals of developing robots.
Just as with robots, developers are enthusiastically embracing the Google Wave API to develop a variety of client-side tools, games, and mini applications that integrate with third party services. As with robots, there are numerous gadgets listed in the Google Wave samples gallery.
Let’s take a look at a few gadgets that are representative of some of the features and functionality that can easily be added to a wave.
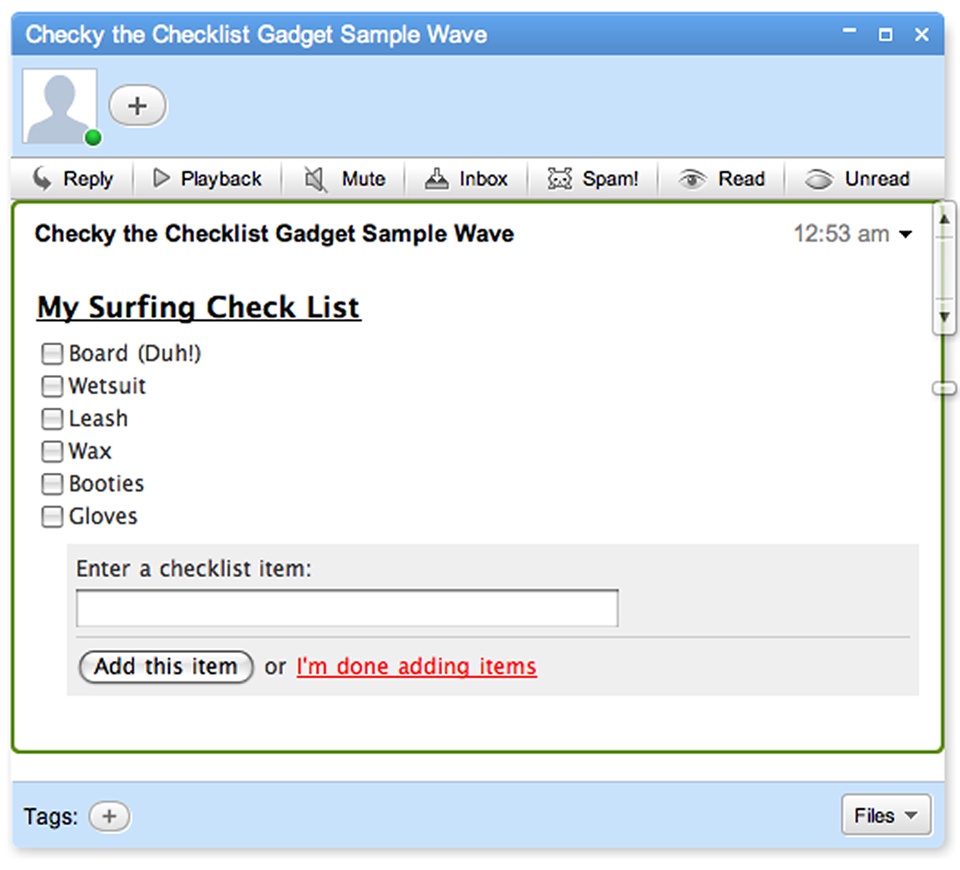
Checky is an interesting proof of concept that allows participants to add a simple checklist to a wave. Some creative use of AJAX allows participants can add items and reorder list items using drag and drop.
Gadget XML URL: http://wave-gadgets.appspot.com/checky.xml
Let’s test out the gadget by copying and pasting the gadget XML URL and then using the gadget button (it looks like a puzzle piece) in the conversation pane toolbar (at the top). Notice that after you add Checky, your editable blip can be populated with a dynamic checklist (Figure 4-17).
After you add and configure Checky, other participants can modify the checklist and check off items as needed. I updated the checklist on my wave in Figure 4-18 below.
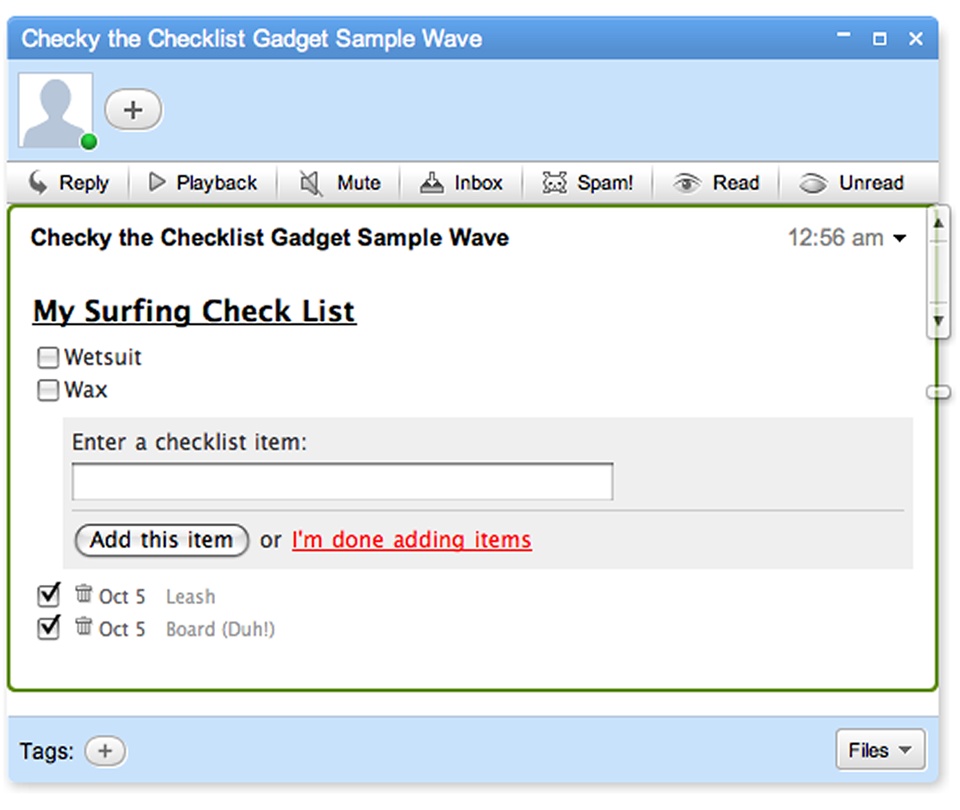
Checky should give you a good idea of how gadgets add a greater level of utility to a wave. Note that this gadget also shows information (state) can be stored on the server (more on that in the next chapters).
The Napkin gadget is a visual tool that allows participants to collaborate on a canvas as if they were drawing on a napkin. After the gadget is added to a blip, it loads a simple interface that allows participants to add freeformed lines of varying width and colors, complete with undo and clear buttons.
Gadget XML URL: http://my-wave-gadgets.appspot.com/wave/NapkinGadget.xml
As you can see in my sample wave in Figure 4-19, I have added a basic flowchart to my wave using the gadget. Assuming that I added other participants, they could go in and add their ideas on the “napkin” or add their own Napkin gadget in a separate blip.
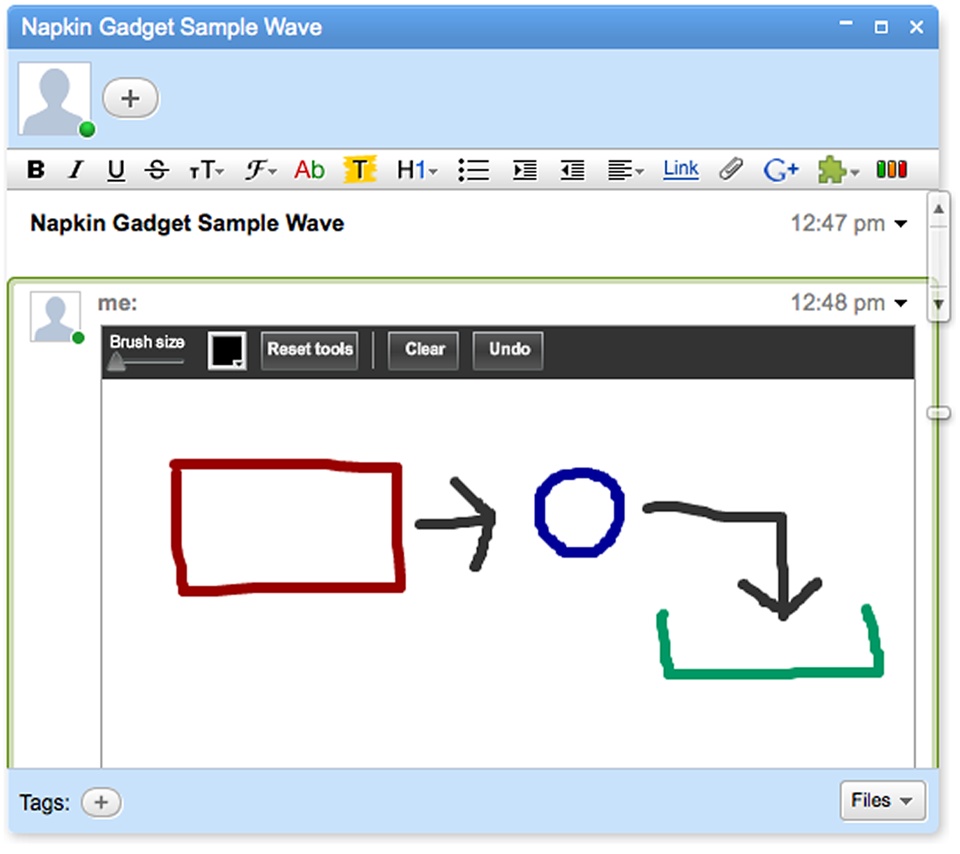
This gadget is built on Adobe’s Flex framework for Flash, so it serves as good example of how Flash-based gadgets are supported in the Google Wave Client. For all of you Flash enthusiasts out there, it also serves as a nice example of Flash integration with an HTML 5 application.
Raffly gadget demonstrates how gadgets can access a list of all participants (and their respective attributes) in a wave. Raffly can be used to select a “winner” from the participants included in a wave by clicking on a “Pick a Winner” button. In Figure 4-20 I have a wave with several participants, and I used Raffly to select a random participant to be the winner of a virtual raffle for a free lunch.
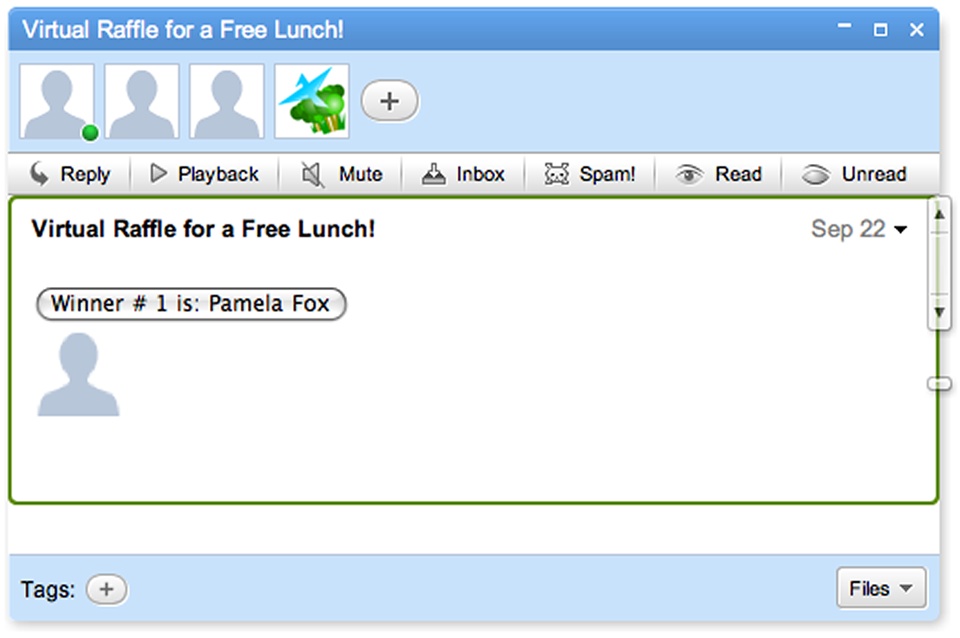
You can click on the button multiple times to select additional winners as well. Although it may seem simple, imagine the possibilities for extending this gadget to not only select a participant, but to also to automate several processes, including communicating the results to other web services or processing instructions based on a participant’s profile (e.g., automatically adding the participant’s photo to a social network).
By now you I expect that you feel fairly comfortable with both types of extensions and understand how they are utilized in waves. In Google Wave: Up and Running, we take a more technical look at extensions as we discuss the Google Wave Platform, and use of its APIs.
Two avid soccer fans, Jake and Sophie, volunteer as managers for a local co-ed soccer league in their hometown. In previous years, they have coordinated a league of sixteen teams via a static informational web site and emails manually sent out to team captains a week before each match.
This year the two of them have decided to use Google Wave to manage the league and its associated logistics. Their goal is to utilize the wiki-like capabilities and multi-participant nature of waves to improve their communication with member teams. They also hope that the players will use waves to provide feedback about the games and to share photos/videos that they may have for each game.
Prior to the start of the season, Jake and Sophie create several reference waves, including a preliminary “schedule wave” that is updated on a weekly basis with scores of each game. For each game listed on the schedule wave they include links to other placeholder waves that they have set up to provide reference information for each game. Each one of these “game waves” includes the match time, teams, a Google Maps gadget with the soccer field location, and a third party weather gadget that dynamically displays the weather forecast for the match day.
Each team captain is provided with a link to the schedule wave, which they use to navigate to individual waves for particular matches in which their teams will play. Jake and Sophie create another wave with instructions for team captains, and this wave also serves as a public wave for feedback from the team captains about soccer fields, referees, and other logistical issues.
Based on the instructions, team captains invite their teammates to view the schedule wave and game waves. As the season progresses, team captains update the schedule wave and game waves with scores, and each game wave is updated with additional information, including photos and movies for respective matches. Some team members create private conversations for their teams to discuss the outcome of the game and to share constructive feedback among teammates.
To their surprise, Jake and Sophie also find that team members from opposing teams are using the game waves for friendly banter with each other about upcoming waves (many of the players are friends with players on other teams). Several players also start a new wave that serves as an informal marketplace for players to swap gear. Additionally, other players realize that they can use game waves to coordinate car pooling for each game, without the need to send out multiple emails back and forth.
Overall, the first season turns out to be a logistical success for Jake and Sophie. Information is more readily available and up-to-date, and teams find that planning for each game has become considerably easier. The use of game waves as centralized media repositories also offer an improved means for players (and their fans) to share and enjoy photos and movies of the games.
[25] As of the writing of this book, Google Gears is supported by the following browsers: FireFox 1.5+ (Windows XP/Vista and Linux), Safari 3.1.1+ (Mac OS X Tiger/Leopard), Internet Explorer 6.0+.
[26] This list of shortcuts may be subject to revision and expansion as the Google Wave team incorporates additional features to the Google Wave client.
[27] Based on the Search Cheat Sheet wave created by Google Wave Team member Gregory Dalesandre during the developer preview release of Google Wave.
[28] It would probably take an entire book to cover all of the robots already available for Google Wave (yes, even at its early stages). For the sake of brevity, I have included several examples that highlight some of the current features and capabilities of the Google Wave platform.
Get Getting Started with Google Wave now with the O’Reilly learning platform.
O’Reilly members experience books, live events, courses curated by job role, and more from O’Reilly and nearly 200 top publishers.

