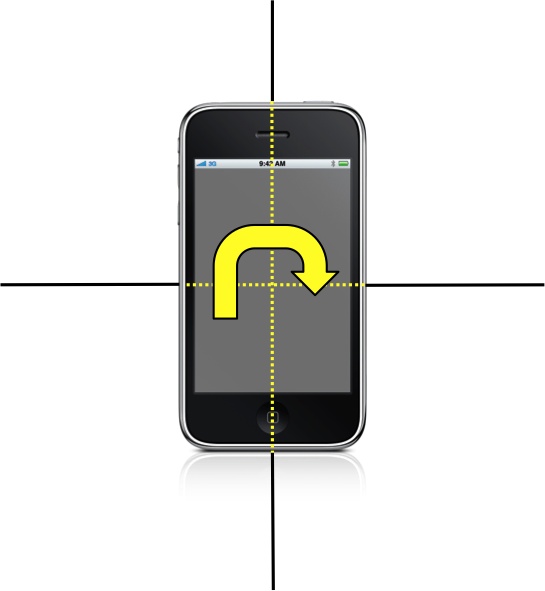
The digital compass functionality on the iPhone and iPad is provided by a magnetometer. The magnetometer measures the strength of the magnetic field surrounding the device. However, in the absence of any strong local fields, these measurements will be of the ambient magnetic field of the Earth, allowing the device to determine its “heading” with respect to the geomagnetic North Pole and act as a digital compass. The geomagnetic heading and true heading, relative to the geographical North Pole, can vary widely (by several tens of degrees depending on your location).
The magnetometer will return the heading (or yaw) of the device (see Figure 4-1).
Along with reporting the current location, the CLLocationManager class can report the current
heading of the device, in the case where the device’s hardware supports
it. If location updates are also enabled, the location manager returns
both true heading and magnetic heading values. If location updates are not
enabled, the location manager returns only the magnetic heading
value.
Note
Magnetic heading updates are available even if the user has switched off location updates in the Settings application. Additionally, users are not prompted to give permission to use heading data, as it is assumed that magnetic heading information cannot compromise user privacy. On an enabled device, the magnetic heading data should therefore always be available to your application.
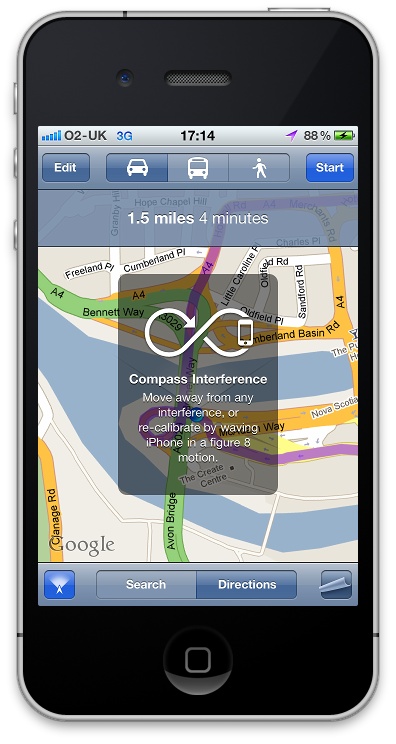
As I mentioned previously, the magnetometer readings will be
affected by local magnetic fields, so the CLLocationManager may attempt to calibrate its
heading readings by displaying a heading calibration panel before it
starts to issue update messages (see Figure 4-2).
However, before it does so, it will call the locationManagerShouldDisplayHeadingCalibration:
delegate method:
-(BOOL)locationManagerShouldDisplayHeadingCalibration:(CLLocationManager*)manager{returnYES;}
If you return YES from this
method, the CLLocationManager will
display the device calibration panel on top of the current window. The
calibration panel prompts the user to move the device in a figure-eight
pattern so that Core Location can distinguish between the Earth’s magnetic
field and any local magnetic fields. The panel will remain visible until
calibration is complete or until you dismiss it by calling the dismissHeadingCalibrationDisplay: method in the
CLLocationManager class.
Let’s go ahead and implement a simple view-based application to illustrate how to use the magnetometer. Open Xcode and start a new iPhone project, select a View-based Application template, and name the project “Compass” when prompted for a filename.
Since you’ll be making use of the Core Location framework, the first thing you need to do is add it to your new project. Click the Compass project file in the Project navigator window on the right in Xcode, select the Target, and click the Build Phases tab. Then, click the Link with Libraries drop-down, and click the + button to open the file popup window. Select CoreLocation.framework from the list of available frameworks and click the Add button.
You’re going to build an application that will act as a compass, so you’re going to need an image of an arrow to act as the compass needle. Download (or draw in the graphics package of your choice) an image of an arrow pointing upwards on a transparent background. Save it as, or convert it to, a PNG format file. Drag and drop this PNG into your Xcode Project; remember to tick the “Copy items into destination group’s folder (if needed)” check box in the popup dialog that appears when you drop the files into Xcode.
Click CompassViewController.xib
to open it in Interface Builder. Drag and drop a UIImageView from the Object Library into the
View, positioning it roughly in the center of your window and resizing the
bounding box to be a square (as in Figure 4-3). In the Attributes
inspector of the Utilities pane set the View mode to be Aspect Fit,
uncheck the Opaque checkbox in the Drawing section, and select the arrow
image that you added to your project in the Image drop-down.
Next, drag and drop four UILabel
elements from the Object Library into the View, position the four labels
as in Figure 4-3, and
change the text in the left most two to read Magnetic Heading: and True
Heading:.
Close the Utility pane and switch from the Standard to the Assistant
Editor. Control-click and drag from the two right most UILabel elements to the assistant editor to
create a magneticHeadingLabel and
trueHeadingLabel outlet, and then again
for the UIImageView to create an
arrowImage outlet (see Figure 4-3).

Then click the CompassViewController.h interface file and
declare the class as a CLLocationManagerDelegate, remembering to import
the CoreLocation.h header file. After
doing so, the interface should look like this:
#import <UIKit/UIKit.h>#import <CoreLocation/CoreLocation.h> @interface CompassViewController : UIViewController <CLLocationManagerDelegate> {IBOutletUIImageView*arrowImage;IBOutletUILabel*magneticHeadingLabel;IBOutletUILabel*trueHeadingLabel;}@end
Save your changes, and click the corresponding CompassViewController.m implementation file.
Uncomment the viewDidLoad method and
the following code to the implementation. This will create an instance of
the CLLocationManager class, and will
send both location and heading update messages to the designated delegate
class:
-(void)viewDidLoad{[superviewDidLoad];CLLocationManager*locationManager=[[CLLocationManageralloc]init];locationManager.delegate=self;if([CLLocationManagerlocationServicesEnabled]&&[CLLocationManagerheadingAvailable]){
[locationManagerstartUpdatingLocation];[locationManagerstartUpdatingHeading];}else{NSLog(@"Can't report heading");}}
You can (optionally) filter the heading update messages based on an angular filter. Changes in heading of less than this amount will not generate an update message to the delegate. For example:
locationManager.headingFilter=5;// 5 degrees
The default value of this property is kCLHeadingFilterNone. You should use this value
if you want to be notified of all heading updates. I’m going to leave the
filter set to the default value. However, if you want to filter messages
from Core Location this way, add the above line to your viewDidLoad method inside the if-block:
if([CLLocationManagerlocationServicesEnabled]&&[CLLocationManagerheadingAvailable]){[locationManagerstartUpdatingLocation];[locationManagerstartUpdatingHeading];locationManager.headingFilter = 5; // 5 degrees}else{... code ...}
The CLLocationManagerDelegate
protocol calls the locationManager:didUpdateHeading: delegate
method when the heading is updated. You’re going to use this method to
update your user interface, so add the following code to your view
controller:
-(void)locationManager:(CLLocationManager*)managerdidUpdateHeading:(CLHeading*)newHeading{if(newHeading.headingAccuracy>0){floatmagneticHeading=newHeading.magneticHeading;floattrueHeading=newHeading.trueHeading;magneticHeadingLabel.text=[NSStringstringWithFormat:@"%f",magneticHeading];trueHeadingLabel.text=[NSStringstringWithFormat:@"%f",trueHeading];floatheading=−1.0f*M_PI*newHeading.magneticHeading/180.0f;arrowImage.transform=CGAffineTransformMakeRotation(heading);}}
-
If location updates are also enabled, the location manager returns both true heading and magnetic heading values. If location updates are not enabled, or the location of the device is not yet known, the location manager returns only the magnetic heading value and the value returned by this call will be −1.
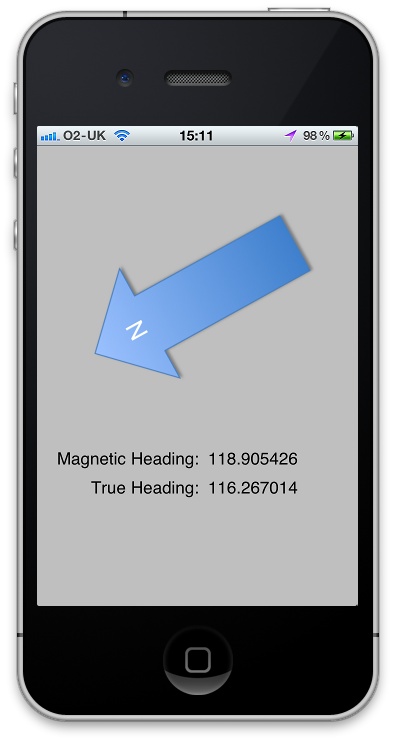
You’re done: save your changes, and then click the Run button in the Xcode toolbar to deploy your new application onto your device. If you hold your device in Face Up or Portrait mode, you should see something very similar to Figure 4-4.
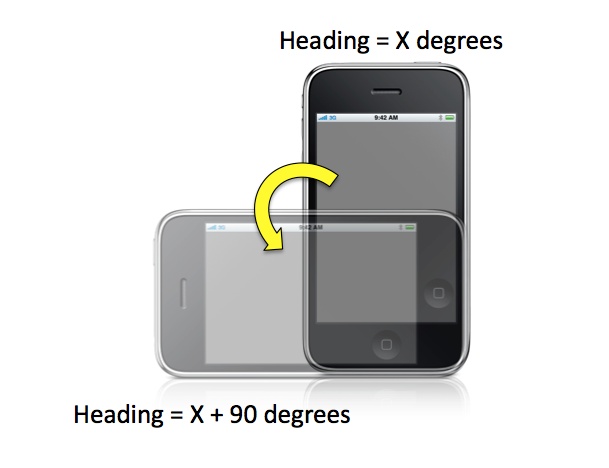
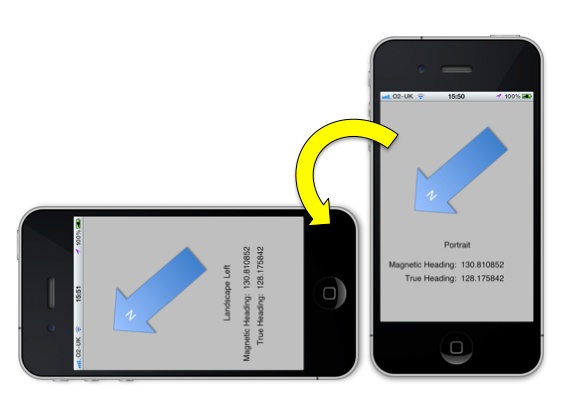
Unfortunately, as it stands your application has a critical flaw. If the user orientates the device into Landscape Mode, the reported headings will be incorrect, or at least look incorrect to the user. This will become especially important when you look at augmented reality interfaces later in the book; such interfaces are generally viewed in Landscape Left mode.
The magnetic and true headings are correct when the iPhone device is held like a traditional compass. In portrait mode, if the user rotates the device, then the heading readings will still be in this frame of reference. Even though the user has not changed the direction he is facing, the heading values reported by the device will have changed. You’re going to have to correct for orientation before reporting headings back to the user (see Figure 4-5).
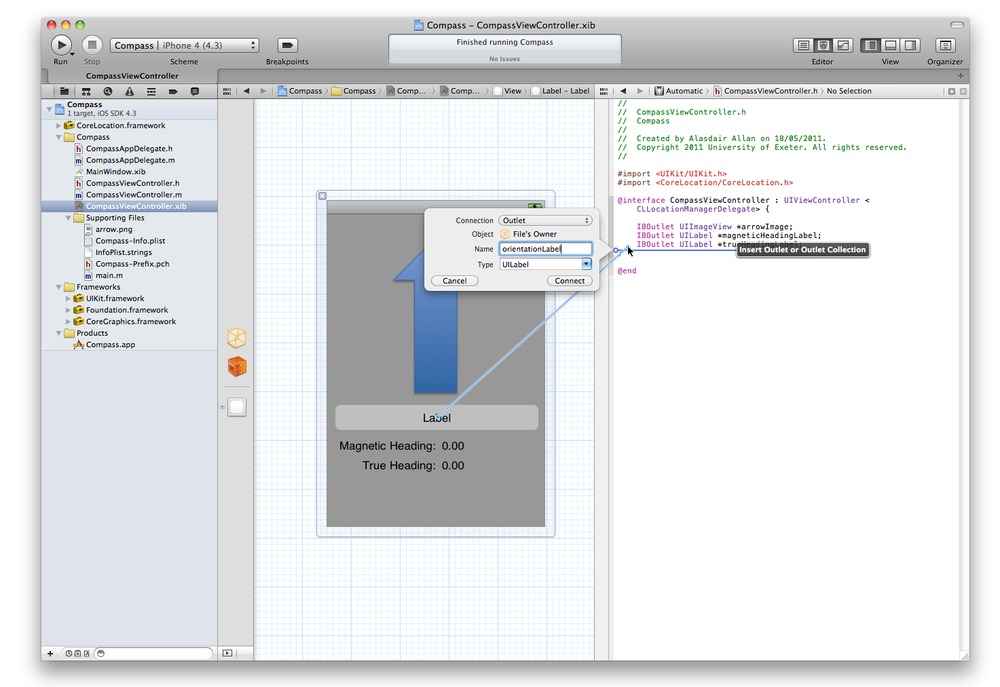
In the Project navigator, click the CompassViewController.xib file to open it in
Interface Builder, then drag and drop another UILabel from the Object Library in the Utility
pane into the View window. While using the Assistant Editor, connect the
label to a new outlet in the CompassViewController.h interface file, as in
Figure 4-6.
After doing so, the interface file should look like the following:
@interfaceCompassViewController:UIViewController<CLLocationManagerDelegate>{IBOutletUILabel*trueHeadingLabel;IBOutletUILabel*magneticHeadingLabel;IBOutlet UILabel *orientationLabel;IBOutletUIImageView*arrowImage;}
Just as you did for the Accelerometer application in Chapter 3, you’re going to use this to report the current device orientation.
Close the Assistant Editor and reopen the CompassViewController.h interface file in the Standard Editor. Then, add the following convenience methods to the class definition:
-(float)magneticHeading:(float)headingfromOrientation:(UIDeviceOrientation)orientation;-(float)trueHeading:(float)headingfromOrientation:(UIDeviceOrientation)orientation;-(NSString*)stringFromOrientation:(UIDeviceOrientation)orientation;
Save your changes, and open the corresponding CompassViewController.m implementation file.
Unfortunately, since the CLHeading
object is read only, you can’t modify it directly. Therefore, you’re
going to add the following method that will correct the magnetic heading
for the device orientation:
-(float)magneticHeading:(float)headingfromOrientation:(UIDeviceOrientation)orientation{floatrealHeading=heading;switch(orientation){caseUIDeviceOrientationPortrait:break;caseUIDeviceOrientationPortraitUpsideDown:realHeading=realHeading+180.0f;break;caseUIDeviceOrientationLandscapeLeft:realHeading=realHeading+90.0f;break;caseUIDeviceOrientationLandscapeRight:realHeading=realHeading-90.0f;break;default:break;}while(realHeading>360.0f){realHeading=realHeading-360;}returnrealHeading;}
However, you will also need to add a corresponding method to correct the true heading.
-(float)trueHeading:(float)headingfromOrientation:(UIDeviceOrientation)orientation{floatrealHeading=heading;switch(orientation){caseUIDeviceOrientationPortrait:break;caseUIDeviceOrientationPortraitUpsideDown:realHeading=realHeading+180.0f;break;caseUIDeviceOrientationLandscapeLeft:realHeading=realHeading+90.0f;break;caseUIDeviceOrientationLandscapeRight:realHeading=realHeading-90.0f;break;default:break;}while(realHeading>360.0f){realHeading=realHeading-360;}returnrealHeading;}
Finally, add the stringFromOrientation: method from Chapter 5. You’ll use this to update the orientationLabel outlet.
-(NSString*)stringFromOrientation:(UIDeviceOrientation)orientation{NSString*orientationString;switch(orientation){caseUIDeviceOrientationPortrait:orientationString=@"Portrait";break;caseUIDeviceOrientationPortraitUpsideDown:orientationString=@"Portrait Upside Down";break;caseUIDeviceOrientationLandscapeLeft:orientationString=@"Landscape Left";break;caseUIDeviceOrientationLandscapeRight:orientationString=@"Landscape Right";break;caseUIDeviceOrientationFaceUp:orientationString=@"Face Up";break;caseUIDeviceOrientationFaceDown:orientationString=@"Face Down";break;caseUIDeviceOrientationUnknown:orientationString=@"Unknown";break;default:orientationString=@"Not Known";break;}returnorientationString;}
When that’s done, return to the locationManager:didUpdateHeading: delegate
method and modify the lines highlighted below to use the new methods and
update your headings depending on the device orientation.
-(void)locationManager:(CLLocationManager*)managerdidUpdateHeading:(CLHeading*)newHeading{UIDevice *device = [UIDevice currentDevice]; orientationLabel.text = [self stringFromOrientation:device.orientation];if(newHeading.headingAccuracy>0){float magneticHeading = [self magneticHeading:newHeading.magneticHeading fromOrientation:device.orientation]; float trueHeading = [self trueHeading:newHeading.trueHeading fromOrientation:device.orientation];magneticHeadingLabel.text=[NSStringstringWithFormat:@"%f",magneticHeading];trueHeadingLabel.text=[NSStringstringWithFormat:@"%f",trueHeading];floatheading=−1.0f*M_PI*newHeading.magneticHeading/180.0f;arrowImage.transform=CGAffineTransformMakeRotation(heading);}}
Make sure you’ve saved all the changes to the implementation file and click the Run button in the Xcode toolbar to deploy the application onto the device. If all goes well, you should see the same compass display as before. However, if you rotate the display this time, the heading values should be the same, irrespective of the device orientation (see Figure 4-7).
Although you have not implemented it here, if the CLLocationManager object encounters an error,
it will call the locationManager:didFailWithError: delegate
method.
-(void)locationManager:(CLLocationManager*)managerdidFailWithError:(NSError*)error{if([errorcode]==kCLErrorDenied){// User has denied the application's request to use location services.[managerstopUpdatingHeading];}elseif([errorcode]==kCLErrorHeadingFailure){// Heading could not be determined}}
Get Geolocation in iOS now with the O’Reilly learning platform.
O’Reilly members experience books, live events, courses curated by job role, and more from O’Reilly and nearly 200 top publishers.

