To work with text in a Flex application, use these components: mx.text.Text,
mx.text.RichTextEditor, mx.text.Label, mx.text.TextArea, mx.text.TextInput, and flash.text.TextField. Each of these components performs different functions in the
context of a Flex application. The TextInput, TextArea, and RichTextEditor controls all allow for user
interaction and editing. The TextArea,
RichTextEditor, and Text controls all handle display of multiline
text. Finally, the flash.text.TextField
class is a low-level class that gives you fine-grained control over the
layout and manipulation of the text in the TextField but requires a UIComponent instance containing it to be used in
a Flex application. In fact, each of the Flex controls in the mx.text package utilizes the flash.text.TextField, adding different
functionality to this component.
Flex allows for the display of plain text and a subset of HTML, and
the use of both text formatting and CSS styles to control the appearance
of text. When using the subset of HTML that is supported by the Flash
Player, images and other SWF files can be used to load content into the
player. Text formatting, that is, controlling the font size and color, is
done by setting properties on the mx.text components, through CSS, or for the
flash.text.TextField component by using
the flash.text.TextFormat object. Text
can be selected by the user or set programmatically by using the setSelection method. The recipes in this chapter
cover uses of all six of these components.
Use the htmlText
and text properties,
depending on the input type, to render the text appropriately and
analyze the string being passed to the Text object through the use of a regular expression.
The Text and TextArea components do not display HTML
correctly unless the HTML is passed to the htmlText property of the Text or TextArea component. Usually there is no
problem with passing non-HTML text to Text or TextArea, unless there is a possibility that
the text may contain HTML characters.
Regular expressions are powerful tools that let you parse text
and text patterns quickly and efficiently without tedious string
manipulation. The expression looks for a < followed by any number of alphabetic
characters, followed by a >:
var regexp:RegExp = /<.+\w.>/;
This example uses a regular expression to determine whether the
string being passed to the Text
component contains HTML or XML:
<mx:VBox xmlns:mx="http://www.adobe.com/2006/mxml" width="400" height="300">
    <mx:Script>
        <![CDATA[

            private var htmlStr1:String = '<b>Header</b><br/>Hello.<i>Hello.</i>
<font color="#ff0000" size="15">RED</font>';
            private var htmlStr2:String = "<ul><li>Item 1</li><li>Item 2</li><li>
Item3</li></ul>";
            private var textStr1:String = "It is a long established fact that a reader
will be distracted by the readable content of a page when looking at its layout, if
say the amount of text > 100.";
            private var textStr2:String = " We can use <<String>> to indicate in
Erlang that the values being passed are Strings";

            private function setNewText():void
            {
                determineTextType(changeText.selectedItem.value.toString());
            }

            private function determineTextType(str:String):void
            {
Here the regular expression is used to determine whether any
HTML tags are found in the text by testing for the pattern of a
< symbol, followed by any
letters, followed by another >:
                var regexp:RegExp = /<.+\w.>/;
                if(regexp.test(str))
                {
                    textArea.htmlText = str;
                }
                else
                {
                    textArea.text = str;
                }
            }

        ]]>
    </mx:Script>
    <mx:ComboBox id="changeText" dataProvider="{[{label:'HTML1', value:htmlStr1},
{label:'HTML2', value:htmlStr2}, {label:'Text1', value:textStr1}, {label:'Text2',
value:textStr2}]}" change="setNewText()"/>
    <mx:TextArea id="textArea" height="100%"/>
</mx:VBox>Use binding tags to bind the text of the TextInput component to the Text component that will display the
input.
The TextInput control here is
used to provide the text that will be displayed in the TextArea control. As the amount of text is
increased, the width of the TextArea is increased by using the binding
mechanism of the Flex Framework:
<mx:VBox xmlns:mx="http://www.adobe.com/2006/mxml" width="400" height="300">
    <mx:TextInput id="input" width="200"/>
    <mx:TextArea text="{input.text}" width="200" id="area" backgroundAlpha="0"
height="{(Math.round(input.text.length/40)+1) * 20}" wordWrap="true"/>
</mx:VBox>
TextInput can be bound to a
variable and have its value bound as well. This will not set the
variable that the TextInput text
property is bound to when the user inputs any text, but it will change
the text property of any component
that is bound to the TextInput. For example:
    <mx:Script>
        <![CDATA[

            [Bindable]
            private var bindableText:String = "Zero Text";

            private function setText():void
            {
                bindableText = String(cb.selectedItem);
            }

        ]]>
    </mx:Script>
    <mx:ComboBox id="cb" dataProvider="{['First Text', 'Second Text', 'Third Text',
'Fourth Text']}" change="setText()"/>
    <mx:TextInput id="inputFromCB" width="200" text="{bindableText}"/>
<mx:Text id="textFromCB" width="200" text="{inputFromCB.text}"/>You want to create a predictive TextInput that will read from a dictionary
of words and suggest choices to the user.
Use the change event
of the TextInput
component to listen for user input and use a regular expression to
test the dictionary for matches to the input.
The TextInput component
defines a change event that is
dispatched every time that the component’s value changes. You can use
this event to check the input and test it against all the words in the
short dictionary. For example:
<mx:Canvas xmlns:mx="http://www.adobe.com/2006/mxml" width="400" height="300">
    <mx:Script>
        <![CDATA[

            private var allWords:Array = ["apple", "boy", "cat", "milk", "orange",
"pepper", "recipe", "truck"];
            private var regexp:RegExp;

            private function checkInput():void
            {
                var i:int = 0;
                var temp:Array = allWords.filter(filter);
                input.text = temp[0];
            }

            private function filter(element:*, index:int, arr:Array):Boolean
            {
                regexp = new RegExp(input.text);
                return (regexp.test(element as String));
            }

        ]]>
    </mx:Script>
    <mx:TextInput id="input" change="checkInput()"/>
</mx:Canvas>
The filter function
used here is a part of the Array class and lets you create a method
that will take any object and, after performing any calculation,
return a true or false that indicates whether the item should be
included in the filtered array. The temp array created in the checkInput method includes all items that
match the regular expression.
You want to create an in-place editor component that will become editable when the user clicks on the text.
Use the click listener
on a Text component
to change the state of the component to display a TextInput. Use the enter and focusOut events on the TextInput to
determine when the user has finished editing the component and revert
to the Text component by using states.
States are a powerful and convenient way to
add multiple views to a single component. This recipe’s example uses
two states: a display and an
edit state. The display state holds the Label that will display the value of the
text, and the edit state holds the
TextInput component that will
enable the user to edit the value.
You change a state by setting the currentState property to the string value of
the name of the state you wish to display. For example:
currentState = "display";
To ensure that you store the value of the user’s input after the
Enter button is clicked or after the user clicks away from the
TextInput, the TextInput component sets focus on itself
when it is created and listens both for the enter event and focusOut event to call the changeState method.
<mx:Canvas xmlns:mx="http://www.adobe.com/2006/mxml" width="250" height="40" top="10"
currentState="display">
    <mx:Script>
        <![CDATA[


            [Bindable]
            private var value:String;

            private function changeState(event:Event = null):void
            {
                if(this.currentState == "display")
                {
                    currentState = "edit";
                }
                else
                {
                    value = editInput.text;
                    currentState = "display";
                }
            }

        ]]>
    </mx:Script>
    <mx:states>
        <mx:State id="display" name="display">
            <mx:AddChild>
                <mx:Label text="{value}" id="text" x="{editorValue.x +
editorValue.width}" click="changeState()" minWidth="100" minHeight="20"/>
            </mx:AddChild>
        </mx:State>
When the edit state is set as
the currentState of the component,
the TextInput text property will be
set to the value of the Label in
the display state. After the user
presses the Enter key, the state of the component returns to the
display state and the value from
the TextInput is used to set the
Label of the display state. The enter event of the TextInput indicates that the user has
pressed the Enter or Return key while the component has focus.
        <mx:State id="edit" name="edit">
            <mx:AddChild>
                <mx:TextInput creationComplete="editInput.setFocus()" focusOut=
"changeState()" id="editInput" x="{editorValue.x + editorValue.width}" text="{value}"
minWidth="100" minHeight="20" enter="changeState()"/>
            </mx:AddChild>
        </mx:State>
    </mx:states>
    <mx:Label text="Value: " id="editorValue"/>
</mx:Canvas>You want to determine all the fonts installed on a user’s computer and let the user set the font from
that list for the Text component to
display.
Use the enumerateFonts
method defined in the Font
class and set the fontFamily style
of a Text component with the
fontName property of a selected
font.
The Font class
defines a static method called enumateFonts to return an array with all the
system fonts on a user’s computer. This method returns an array of
flash.text.Font objects, which define three properties:
fontNameThis is the name of the font as reported by the system. In some cases, such as Japanese, Korean, or Arabic characters, the Flash Player may not render the font correctly.
fontStyleThis is the style of the font: Regular, Bold, Italic, or BoldItalic.
fontTypeThis will be either
Device, meaning that the font is installed on the user’s computer, orEmbedded, meaning the font is embedded in the SWF file.
In the following example, the fonts are passed to a ComboBox, from which the user can select the
font type for the Text area. The
call to setStyle
text.setStyle("fontFamily", (cb.selectedItem as Font).fontName);sets the actual font in the Text component, using the fontName property of the Font object selected in the ComboBox.
Here is the complete code you need:
<mx:VBox xmlns:mx="http://www.adobe.com/2006/mxml" width="400" height="300"
creationComplete="findAllFonts()">
    <mx:Script>
        <![CDATA[

            private var style:StyleSheet;

            [Bindable]
            private var arr:Array;

            private function findAllFonts():void
            {
                arr = Font.enumerateFonts(true);
                arr.sortOn("fontName", Array.CASEINSENSITIVE);
            }

            private function setFont():void
            {
                text.setStyle("fontFamily", (cb.selectedItem as Font).fontName);
            }

        ]]>
    </mx:Script>
    <mx:ComboBox id="cb" dataProvider="{arr}" change="setFont()" labelField="fontName"
/>
    <mx:Text text="Sample Text" id="text" fontSize="16"/>
</mx:VBox>You need to create a custom TextInput component with a multiline field for entering text and to bind
the output of that component to a Text display.
Use UIComponent and add a flash.text.TextField to the component. Then
set a bindable text property and
bind the Text component’s htmlText property to the text of the new
component.
The mx.controls.TextInput
component limits access to the inner flash.text.TextField
component. To have more-complete access and control over the TextField, simply add a TextField to a UIComponent.
Any methods that you need to provide for access to the TextField should be defined in the
component. If complete access to the TextField is needed, it might be easier to
define the TextField as a public
property. However, it may be convenient for the component to be
notified whenever the properties of the TextField are accessed or altered. Take a
look at this in practice:
package oreilly.cookbook
{
    import flash.events.Event;
    import flash.events.TextEvent;
    import flash.text.TextField;
    import flash.text.TextFieldType;

    import mx.core.UIComponent;

    public class SpecialTextInput extends UIComponent
    {

        private var textInput:TextField;
        public static var TEXT_CHANGED:String = "textChanged";

        public function SpecialTextInput()
        {
            textInput = new TextField();
            textInput.multiline = true;
            textInput.wordWrap = true;
            textInput.type = flash.text.TextFieldType.INPUT;
            textInput.addEventListener(TextEvent.TEXT_INPUT, checkInput);
            addChild(textInput);
            super();
        }

        private function checkInput(textEvent:TextEvent):void
        {
            text = textInput.text;
        }

        override public function set height(value:Number):void
        {
            textInput.height = this.height;
            super.height = value;
        }

        override public function set width(value:Number):void
        {
            textInput.width = this.width;
            super.width = value;
        }

        [Bindable(event="textChanged")]
        public function get text():String
        {
            return textInput.text;
        }

        public function set text(value:String):void
        {
            dispatchEvent(new Event("textChanged"));
        }
    }
}
To use the new component, bind the htmlText property of the Text to the new component’s text property:
<mx:VBox xmlns:mx="http://www.adobe.com/2006/mxml" width="400" height="300"
xmlns:cookbook="oreilly.cookbook.*">
    <cookbook:SpecialTextInput id="htmlInput" height="200" width="300"/>
    <mx:TextArea htmlText="{htmlInput.text}"/>
</mx:VBox>The TextRange class accepts a
component that has a TextField
within it, a parameter to indicate whether the component will be
modified by the properties set in the TextRange object, and then two
integers to determine the beginning and end of the range of characters
in the TextField. The TextRange object is constructed as
follows:
var textRange:TextRange = new TextRange(component:UIComponent, modify:Boolean,
startIndex:int, endIndex:int);
The properties of the TextRange object affect the component that
is passed in. In the following example, the color and the letter
spacing of the user-selected area are set when the check box is
selected:
<mx:VBox xmlns:mx="http://www.adobe.com/2006/mxml" width="400" height="300">
    <mx:Script>
        <![CDATA[
            import mx.controls.textClasses.TextRange;

            private function alterTextSnapshot():void
            {
                var textRange:TextRange = new TextRange(area, true,
area.selectionBeginIndex, area.selectionEndIndex);
                textRange.color = 0xff0000;
                textRange.letterSpacing = 3;
            }

        ]]>
    </mx:Script>
    <mx:CheckBox change="alterTextSnapshot()"/>
    <mx:TextArea id="area" text="Lorem ipsum dolor sit amet, consectetuer adipiscing
elit." width="200" height="50"/>
</mx:VBox>You need to use images and external SWF files in HTML text that is displayed in your Flex component.
Use the <img> tag that
is supported by the Flash Player’s HTML rendering engine
and set the src attribute to the
URL of the SWF or image you’re loading.
The <img> tag enables
you to indicate the location of an image or SWF file that will be
loaded into the Text component and
displayed. The <img> tag
supports the following properties:
srcSpecifies the URL to a GIF, JPEG, PNG, or SWF file. This is the only required attribute. All the others simply control the layout of the image in relation to the text around it.
alignSpecifies the horizontal alignment of the embedded image within the text field. Valid values are left and right. The default value is left.
heighthspaceSpecifies the amount of horizontal space (containing no text) that surrounds the image. The default value is 8.
vspaceSpecifies the amount of vertical space that surrounds the image. The default vspace value is 8.
width
In the following code snippet, a SWF file is loaded into the
application by using the <src> HTML tag, and the vspace property of that <src> tag is set to 10, indicating
that 10 pixels of white space will be on both the top and the bottom
of the image:
<mx:Canvas xmlns:mx="http://www.adobe.com/2006/mxml" width="400" height="300">
    <mx:TextArea width="300" height="300" backgroundAlpha="0">
        <mx:htmlText>
            <![CDATA[
                <img src='../assets/fries.jpg' width='100' height='100' align='left'
hspace='10' vspace='10'>
                <p>This  is the text that is going to appear above the swf.</p><p>
<img src='../assets/test_swf.swf' width='100' height='100' align='left' hspace='10'
vspace='10'>
                Here is text that is going to be below the image.</p>
            ]]>
        </mx:htmlText>
    </mx:TextArea>
</mx:Canvas>You want to create a TextArea
in which a user can search and to highlight text the user enters into
a TextInput.
Use the flash.text.TextField
object and set the alwaysShowSelection property to true. Then use the setSelection
method to set the index and length of the selected text.
The mx.controls.TextArea
component needs to have its focus set in order to display text
selections. To work around this, you can create a subclass of the
TextArea component so you can
access the flash.text.TextField
that the TextArea contains:
public function createComp():void{
        textField.alwaysShowSelection = true;
}
Setting the alwayShowSelection property to true means
that the TextField will show a
selection whether or not it has focus. Now when the setSelection method is called, the TextField within the TextArea component will display and the
TextArea will automatically scroll
correctly to show the selection.
<mx:Canvas xmlns:mx="http://www.adobe.com/2006/mxml" width="1000" height="800"
xmlns:cookbook="oreilly.cookbook.*">
    <mx:Script>
        <![CDATA[

            [Bindable]
            private var text_string:String = "Aenean quis nunc id purus pharetra
pharetra. Cras a felis sit amet ipsum ornare luctus. Nullam scelerisque" +
                    " placerat velit. Pellentesque ut arcu congue risus facilisis
pellentesque. Duis in enim. Mauris eget est. Quisque tortor. ";
            private function searchText():void
            {
                var index:int = masterText.text.indexOf(input.text);
                masterText.verticalScrollPosition = 0;
                if(index != −1)
                {
                    masterText.setSelection(index, index+input.text.length);
                }
            }

        ]]>
    </mx:Script>
    <mx:TextInput id="input" change="searchText()"/>
    <cookbook:SpecialTextArea editable="false" id="masterText" text="{text_string}"
fontSize="20" width="600" height="200" x="200"/>
</mx:Canvas>Use the getCharBoundaries
method to return the actual height, width, and x, y position of
the character in the TextField.
Then create a bitmap from the TextField that contains the desired
character.
The getCharBoundaries method
returns a rectangle that describes the x and y position as well as the
height and width of the character index within a TextField. You can use this information to
create a bitmap of the character, preserving all of its visual
information, and animate those bitmaps. The key to the process is this
code snippet:
char_bounds = addCharacters.getTextField().getCharBoundaries(i);
bitmapData=new BitmapData(char_bounds.width, char_bounds.height, true, 0);
matrix = new Matrix(1, 0, 0, 1, -char_bounds.x, char_bounds.y);
bitmapData.draw(addCharacters.getTextField(), matrix, null, null, null, true);
bitmap = new Bitmap(bitmapData);
The char_bounds object is a
rectangle that will store all of the information about the character.
This information is used to create the flash.display.BitmapData object that will
appear in the bitmap object when it is created. The BitmapData object accepts four parameters in
its constructor:
BitmapData(width:Number, height:Number, transparency:boolean, fillColor:Number);
Now that you have the bitmap object, create the Matrix object to store information about the
particular part of the TextField
that you want to capture, namely, the area of the TextField bounded by the rectangle returned
by the getCharBoundaries method.
This Matrix is passed to the
BitmapData draw method, which grabs
the actual pixel data from the DisplayObject passed in. After you’ve drawn
the actual bitmap data, you can create a Bitmap object, which is a DisplayObject and can be added to the
display list, by using the newly populated BitmapData object.
The rest of the example takes care of looping through the
characters in the TextField,
performing the preceding operation for each character, and then
animating each new bitmap object created:
<mx:Canvas xmlns:mx="http://www.adobe.com/2006/mxml" width="600" height="300"
xmlns:cookbook="oreilly.cookbook.*">
    <mx:Script>
        <![CDATA[
            import flash.display.Sprite;

            import mx.core.UIComponent;
            import flash.text.TextField;
            import flash.text.TextFormat;

            private var characterArray:Array = new Array();
            //set up our master character index we're going to use when animating the
characters
            private var charIndex:int = 0;
            //keep track of the final position we're going to place all the
characters in
            private var finalX:Number = 0;

            private function addNewCharacters():void
            {
                render();
                invalidateDisplayList();
                invalidateProperties();
            }

            public function render():void
            {
                //define all the variables that we'll need
                var bitmapData:BitmapData;
                var bitmap:Bitmap;
                var char_bounds:Rectangle;
                var matrix:Matrix;
                var component:UIComponent;
                //get the text format and set the
                //tf.defaultTextFormat = addCharacters.getTextField().
defaultTextFormat;
                //tf.text = addCharacters.text;
                for each(component in characterArray)
                {
                    holder.removeChild(component);
                }
                characterArray.length = 0;
                for(var i:int=0; i<addCharacters.text.length; i++)
                {
                    char_bounds = addCharacters.getTextField().getCharBoundaries(i);
                    bitmapData=new BitmapData(char_bounds.width,char_bounds.height,
true,0);
                    matrix = new Matrix(1,0,0,1,-char_bounds.x,char_bounds.y);
                    bitmapData.draw(addCharacters.getTextField(), matrix, null, null,
null, true);
                    bitmap = new Bitmap(bitmapData);
                    component = new UIComponent();
                    component.width = bitmapData.width;
                    component.height = bitmapData.height;
                    component.addChild(bitmap);
                    holder.addChild(component);
                    component.x=char_bounds.x;
                    characterArray[i] = component;
                }
                holder.invalidateDisplayList();
                startEffect();
            }

            private function startEffect():void
            {
                addEventListener(Event.ENTER_FRAME, moveCharacter);
            }

            private function moveCharacter(event:Event):void
            {
                var comp:UIComponent = (characterArray[charIndex] as UIComponent);
                if(comp)
                {
                    if(comp.x < 200 - finalX)
                    {
                        (characterArray[charIndex] as Sprite).x+=2;
                    }
                    else
                    {
                        if(charIndex == characterArray.length - 1)
                        {
                            removeEventListener(Event.ENTER_FRAME, moveCharacter);
                            return;
                        }
                        finalX += comp.width+2;
                        charIndex++;
                    }
                }
            }

        ]]>
    </mx:Script>
    <mx:HBox>
        <cookbook:AccessibleTextInput id="addCharacters" fontSize="18"/>
        <mx:Button label="add characters" click="addNewCharacters()"/>
    </mx:HBox>
    <mx:Canvas id="holder" y="200"/>
</mx:Canvas>
The example uses an AccessibleTextInput control, a simple
extension of the TextInput control that gives access
to the TextField control within the
TextInput:
<mx:TextInput xmlns:mx="http://www.adobe.com/2006/mxml">
    <mx:Script>
        <![CDATA[

            public function getTextField():IUITextField
            {
                return this.textField;
            }

        ]]>
    </mx:Script>
</mx:TextInput>
This lets you simply pass the TextFormat object to the TextField you create to use in your bitmap
manipulation and read directly from the TextField for the getCharBoundaries method.
You
want to use CSS styles for the HTML displayed in TextField by using either a CSS file loaded
externally or a CSS style written into the application.
Use the StyleSheet parseStyle
method to parse the string and assign the style sheet to the TextArea.
The StyleSheet object can
parse any valid CSS as a string, process all that
information, and assign it to a component or use it in HTML text. To
set this up, you need to either load the file by using a URLLoader object, passing the loaded data to
the parseCSS method as a string, or
write the string out and pass it directly to the StyleSheet object. The following example
writes the style in a string that is parsed when the creationComplete event is
dispatched.
The htmlText
property of the TextArea is set
after the style is applied to ensure that the styles are properly
applied to the HTML. The style of the <span> is set by using the style attribute:
"<span class='largered'>
This style is specified in the string that will be passed to
the StyleSheet.parseStyle method:
.largered { font-family:Arial, Helvetica; font-size:16; color: #ff0000; }Here is the full example:
<mx:Application xmlns:mx="http://www.adobe.com/2006/mxml" width="1000" height="800"
creationComplete="createStyle()">
    <mx:Script>
        <![CDATA[
            //note even though names are camel cased here when used, all lowercase
            private var styleText:String = '.largered {  font-family:Arial, Helvetica;
font-size:16; color: #ff0000; }' +
                    '.smallblue { font-size: 11; color: #0000ff; font-family:Times New
Roman, Times; }' +
                    'li { color:#00ff00; font-size:14; }' +
                    'ul {margin-left:50px;}';

            [Bindable]
            private var lipsum:String = "<span class='largered'>Nulla metus.</span>
Nam ut dolor vitae risus condimentum auctor."+
                " <span class='smallblue'>Cras sem quam,</span> malesuada eu, faucibus
aliquam, dictum ac, dui. Nullam blandit"+
                " ligula sed arcu. Fusce nec est.<ul><li> Etiam</li><li> aliquet,</li>
<li>nunc</li></ul> eget pharetra dictum, magna"+
                " leo suscipit pede, in tempus erat arcu et velit. Aenean condimentum.
Nunc auctor"+
                " nulla vitae velit imperdiet gravida";

            [Bindable]
            private var style:StyleSheet;

            private function createStyle():void
            {
                style = new StyleSheet();
                style.parseCSS(styleText);
                 text.styleSheet = style;
                text.htmlText = lipsum;
            }

        ]]>
    </mx:Script>
    <mx:TextArea id="text" width="200" height="300"/>
</mx:Application>You want to create a component that will let the user input rich text by using all the fonts on the user’s computer and then use the HTML created in the rich text.
Create a RichTextEditor and
read the htmlText property
from the control. Set the dataProvider of the fontFamilyCombo defined in the RichTextEditor to add all the results
returned from Font.enumerateFonts.
The RichTextEditor is a great
convenience, enabling users to create HTML text that can then be read
from the editor by using the htmlText property. The RichTextEditor contains several buttons to
set the text style to bold, italicized, or underlined, a ComboBox to set the font, and a ColorPicker that sets the color of the
selected text, all of which can be accessed from the RichTextEditor. The following example
accesses the fontFamilyCombo ComboBox to add all
the fonts that the user has installed so that the user can select any
one of these for use.
To access the text with all the attributes that the user has
created, use the htmlText property
of the RichTextEditor. This
property is both gettable and settable, so if you want to prepopulate
the editor with HTML, simply set the htmlText property to a string of valid
HTML.
<mx:Canvas xmlns:mx="http://www.adobe.com/2006/mxml" width="900" height="500"
creationComplete="addFonts()">
    <mx:Script>
        <![CDATA[
            import mx.collections.ArrayCollection;

            private function addFonts():void
            {
                var arr:Array = Font.enumerateFonts(true);
                richText.fontFamilyCombo.labelField = 'fontName';
                richText.fontFamilyCombo.dataProvider = Font.enumerateFonts(true);
            }

        ]]>
    </mx:Script>
    <mx:RichTextEditor id="richText" width="400" height="400" change="trace(richText.
htmlText+' '+richText.text)"/>
    <mx:TextArea height="100%" width="400" htmlText="{richText.htmlText}" x="410"/>
</mx:Canvas>Use the @font-face tag
within a style to embed the font and then use the <font> tag
to set the family attribute for the tag.
Applying an embedded font to HTML text is much more difficult
than using system fonts. The standard method of applying a font is
simply to set the font in a font-family property within a style and then apply the style to a span.
However, embedded fonts require that the font tag is used in the HTML to apply the
embedded font.
<font size="20" family="DIN">Using the new font</font>
The font tag uses the
fontFamily property set in the
font-face declaration
within the <mx:Style>
tag:
@font-face{
            src:url("../assets/DIN-BLAC.ttf");
            fontFamily:DIN;
            advancedAntiAliasing: true;
        }
Here is the full example:
<mx:Application xmlns:mx="http://www.adobe.com/2006/mxml" layout="absolute">
    <mx:Style>
        @font-face{
            src:url("../assets/DIN-BLAC.ttf");
            fontFamily:DIN;
            advancedAntiAliasing: true;
        }
        .embeddedFontStyle{
            fontFamily:DIN;
            fontSize:18px;
            color:#CCCCFF;
        }
        .white{
            color:#ffffff;
        }
    </mx:Style>
    <mx:VBox backgroundColor="#000000">
        <mx:Label text="This is some test text" styleName="embeddedFontStyle"/>
        <mx:TextArea id="ta" backgroundAlpha="0" width="250" height="150" styleName=
"white">
            <mx:htmlText>
                <![CDATA[
                    Not Using the New Font.<font size="20" family="DIN">Using the new
font</font>
                ]]>
            </mx:htmlText>
        </mx:TextArea>
    </mx:VBox>
</mx:Application>Use a BitmapData object
to get a copy of a TextField and add that bitmap to the parent
component with an offset to simulate a shadow.
When trying to show a shadow image of the actual contents of a
TextArea or Text component, you simply need to get a
bitmap representation of all the information in the text field and
then add that bitmap to the parent component. Moving the image
slightly off-center and dimming it by lowering the alpha value
provides the correct look. Building a custom component by using the
UIComponent class eases the
development process in this case, letting you directly read and add
the lower-level base ActionScript display components from the flash.display package.
The method for getting the bitmapData into a bitmap is described in
Recipe 4.10.
package oreilly.cookbook
{
    import flash.display.Bitmap;
    import flash.display.BitmapData;
    import flash.events.TextEvent;
    import flash.text.TextField;

    import mx.core.UIComponent;

    public class TextDropShadow extends UIComponent
    {

        private var _useShadow:Boolean = false;
        private var _shadowHolder:Bitmap;
        private var _bitmapData:BitmapData;
        private var _textField:TextField;
Here the Bitmap is created
and placed in the parent component at a slight offset, to simulate a
shadow:
        public function TextDropShadow()
        {
            super();
            _shadowHolder = new Bitmap();
            addChild(_shadowHolder);
            _shadowHolder.x = 5;
            _shadowHolder.y = 5;
            _textField = new TextField();
            _textField.type = "input";
            _textField.addEventListener(TextEvent.TEXT_INPUT, inputListener);
            addChild(_textField);
        }
The updateDisplayList method
is overridden to draw the TextField and all its visual information,
including the text, into the Bitmap.
        override protected function updateDisplayList(unscaledWidth:Number,
unscaledHeight:Number):void
        {
            super.updateDisplayList(unscaledWidth, unscaledHeight);
            if(_useShadow)
            {
                _bitmapData = new BitmapData(_textField.width, _textField.height,
true);
                _bitmapData.draw(_textField);
                _shadowHolder.bitmapData = _bitmapData;
                _shadowHolder.alpha = 0.7;
            }
        }

        private function inputListener(event:TextEvent):void
        {
            invalidateDisplayList();
        }

        public function set useShadow(value:Boolean):void
        {
            _useShadow = value;
        }

        public function get useShadow():Boolean
        {
            return _useShadow;
        }
    }
}Use the bounds method of the
TextField to return the size of the
TextArea and use the getLineMetrics
method to determine the actual heights of the lines. After determining
the last visible line, use the getLineOffset and
getLineLength methods to find the
last visible character in the last visible line.
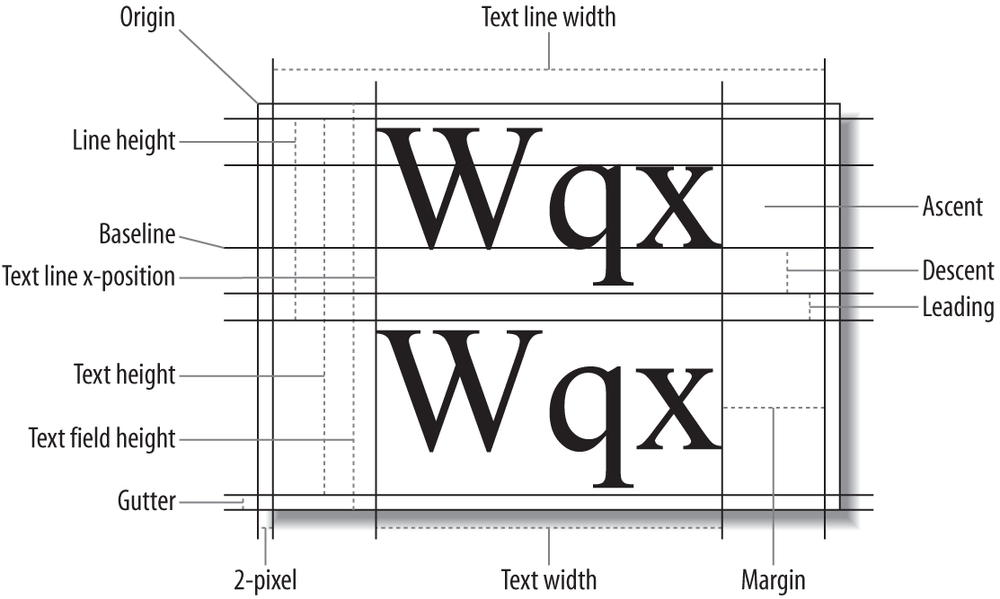
Each line within a TextField
can have its specific properties accessed by using the getLineMetrics method and using the TextLineMetrics object that is returned. The
TextLineMetrics object defines
multiple properties about a line of text: the height, width, baseline,
and spacing between lines.
Figure 4-1 shows
the properties of the line that the TextLineMetrics object defines.
The following example uses the height property to find the last displayed
line in the TextArea. First, a
rectangle that represents the height, width, and x, y information
about the visible (unmasked) TextArea is retrieved by using the getBounds method. Then the height of the
lines is added until the last visible line is found by using the
TextLineMetrics objects. Finally,
the last character in the line is found by using the getLineOffset method, which finds the index
of the first character in a line, added to the length of the
line:
changeArea.text.charAt(changeArea.getLineOffset(i-1)+changeArea.getLineLength(i-1))
Here is the code for the full example:
<mx:Canvas xmlns:mx="http://www.adobe.com/2006/mxml" width="400" height="300"
xmlns:cookbook="oreilly.cookbook.*">
    <mx:Script>
        <![CDATA[

            private function findLineMetrics():void
            {
                if(changeField.text.length > 1)
                {
                    var rect:Rectangle = changeArea.getBounds(this);
                    var visibleTextHeight:Number = 0;
                    var i:int = 0;
                    while(visibleTextHeight < rect.height && i < changeArea.numLines)
                    {
                        var metrics:TextLineMetrics = changeArea.getLineMetrics(i);
                        visibleTextHeight+=metrics.ascent+metrics.height;
                        i++;
                    }
                    trace(changeArea.text.charAt(changeArea.getLineOffset(i-1)+
changeArea.getLineLength(i-1)));
                }
            }

        ]]>
    </mx:Script>
    <mx:TextInput id="changeField" width="200" textInput="findLineMetrics()"/>
    <cookbook:SpecialTextArea id="changeArea" text="{changeField.text}" wordWrap=
"true" width="150" height="30" y="100"/>
</mx:Canvas>
Get Flex 3 Cookbook now with the O’Reilly learning platform.
O’Reilly members experience books, live events, courses curated by job role, and more from O’Reilly and nearly 200 top publishers.

