Part 1 of this book gets you started launching Flash, creating your own drawings, and transforming them into moving animations. Most animation work, though, takes place after you’ve got all the frames and layers in place. Like a film director slaving away in the cutting room, as an animator you spend most of your time testing, editing, and retesting your movie.
This chapter is your crash course in Flash animation editing. Here you’ll learn how to reorganize your animation horizontally (over time) by cutting, pasting, and rearranging frames in the timeline. You’ll also see how to reorganize your animation vertically by shuffling and restacking the layers you’ve added to it.
When you create an animation, you build it from frames and keyframes. Editing your document is a simple matter of moving, cutting, and pasting those frames until they look good and work well. You can perform these operations on individual frames or on multiple frames by combining them into groups, as you’ll see at the end of this section.
Copy and Paste are the world’s favorite computer commands for good reason. These functions let you create a piece of work once (a word, line, shape, drawing, or what have you) and then quickly recreate it to build something even more complex with a minimum of effort. Well, Flash lets you cut, copy, and paste not just the content of your frames but also your frames themselves from one part of your timeline to another.
Copying and pasting frames is a great way to cut down on your development time. Here’s how it works. Say you have a series of frames showing a weasel unwrapping a stick of chewing gum. It’s a gag scene, one you want to repeat throughout your animation for comic effect. Instead of having to insert all the keyframes and regular frames every time you want to slip in the weasel gag, all you need to do is copy the weasel frames once and then paste them into your timeline wherever you want them to go.
Furthermore, copying and pasting isn’t just useful for those times when you want a carbon copy of a scene. If you want to change something in each pasted scene—the brand of chewing gum the weasel is unwrapping, for example—you can do that, too, after you’ve pasted the frames. Copying and pasting frames works almost exactly like copying and pasting words or drawn objects—with a few twists. Here are some points to keep in mind:
As usual, you have to select what you’re going to copy before you set off the command. See Editing Your Frame-by-Frame Animation for a refresher on selecting frames in the timeline.
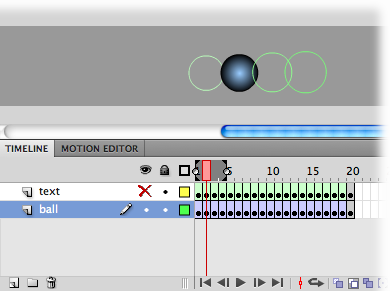
If the frames you’re selecting span more than one layer, then make sure you select all the layers for each frame, as shown in Figure 4-1. (If the frames you’re selecting are part of a motion tween, then you need to use a different technique, as explained on Changing Dimensions with the Transform Tool. Ctrl-click [⌘-click] to select the first frame, and then drag to select adjacent frames.)
Figure 4-1. To select multiple frames, click the first frame of the series you want to select, and then Shift-click the last frame. Flash automatically selects the beginning and ending frames and all the frames in between. To copy and paste frames in the same document, press the Alt key (Windows) or the Option key (Mac) while you drag a copy of the selected frames to a new spot.
Copying and pasting tweened frames varies depending on the type of tween—motion or shape. While tweened frames are displayed as separate, distinct images, they’re not; only keyframes contain distinct images. If you want to copy and paste an entire shape tween, then you have to select the beginning and end keyframes. The motion tween is much easier-going when it comes to copying and pasting frames. You can select any frames from the middle of a motion tween and paste them (as a tween) into another layer.
Note
Classic tweens (Classic Tween) work more like shape tweens. You have to select the beginning and ending keyframes of what you want to copy and paste. You can’t take a chunk of frames from the middle.
Flash doesn’t limit you to pasting within the same document. After you copy, you can open any other Flash animation and paste the frames right in.

Note
Although Cut, Copy, and Paste usually travel as a threesome, things work a little differently in Flash. The Cut Frames command on the Edit→Timeline submenu doesn’t actually cut frames; instead, it cuts the contents of the selected frame. To get rid of the frame itself, you need to use Edit→Timeline→Remove Frames, as described in the box on Remove vs. Cut vs. Clear.
The process of copying and pasting frames follows the same basic steps every time:
In the timeline, select the frames you want to copy.
You probably want to make sure that the set of frames you choose begins with a keyframe, as described in the third bullet point above. Either way, Flash highlights the selected frames and moves the playhead to the last selected frame. You can select frames on more than one layer, as long as the layers are adjacent to each other.
Press Ctrl+Alt+C (Option-⌘-C).
Flash stores the frames so you can paste them at another spot on the timeline or even to a different Flash document. Keep in mind, the timeline copy and paste commands are different from the standard Copy (Ctrl+C or ⌘-C) and paste (Ctrl+V or ⌘-V).
Tip
There are three ways to use the Copy Frames and Paste Frames commands. For most Flash folk, the shortcut keys shown in these steps are the fastest method. You’ll use the commands often enough that they’ll become second nature. As an alternative, you can right-click (Control-click) the timeline to see a shortcut menu with the commands. Probably the least convenient method is the main menu (Edit→Timeline→Copy Frames).
Select the keyframe where you want to begin pasting the copied frames.
In other words, select the frame after which you want to add the copied frames.
Press Ctrl+Alt+V (Option-⌘-V on the Mac).
Flash pastes the copied frames, replacing the currently selected keyframe with the first copied frame. If you pasted frames into the middle of a timeline, Flash repositions your existing frames after the last pasted frame. If your selection in step 1 included more than one layer, then Flash adds extra layers as needed.
The timeline is serial: When you run your animation, Flash displays the content in Frame 1, followed by the content in Frame 2, followed by the content in Frame 3, and so on. If you change your mind about the order in which you want frames to appear, all you need to do is move them.
Simple in theory—but moving frames in Flash isn’t quite as cut and dried as you might think. As you may recall if you’ve had a chance to read through Chapter 3, only keyframes can contain actual images; regular frames, technically called static frames, contain either tweened or “held over” copies of the images placed in the previous keyframe. So whether you move a frame or a keyframe, you end up with a keyframe. Here’s how it works:
Moving a keyframe. When you move a keyframe, what Flash actually moves is the keyframe’s content and keyframe designation; Flash leaves behind a static frame in the original keyframe’s place. (And that static frame may or may not be empty, depending on what precedes it.)
Moving a static frame. Flash moves the static frame but turns the moved frame into a keyframe. (If you move a series of regular frames, then Flash turns just the first moved frame into a keyframe.)
Tip
There’s another way to change the order in which Flash plays frames: by creating an ActionScript action, as described in Chapter 15. Creating an action lets you tell Flash how to play your frames: backward, for example, or by rerunning the first 10 frames three times and then moving on. You want to use ActionScript (as opposed to moving frames) to give your audience the choice of viewing your animation in different ways.
Here are the steps in detail:
In the timeline, select the frame(s) you want to move.
Flash highlights the selected frame (or frames) and moves the playhead to the last selected frame.
Drag the selected frame(s) to the frame after which you want to place the selected frames.
As you drag the selected frames, Flash highlights the frames you’re moving to help you position them (Figure 4-2). If your selection includes a keyframe, then Flash clears the selected frames from their original position and then inserts them in their new location. If your selection doesn’t include a keyframe, then Flash copies the content and creates a new keyframe at the point of insertion.
Tip
To select multiple frames, drag in the timeline. You have to release the mouse button to complete the selection. Then you can drag the selected frames to move the whole bunch of highlighted frames to a new location. If dragging your frames isn’t working, you can always copy and paste the frames you want to move (Copying and Pasting Properties). Then use Edit→Timeline→Remove Frames to delete them from their original location (see the box on Remove vs. Cut vs. Clear).
Tip
It’s worth remembering that the magic Undo command (Ctrl+Z or ⌘-Z) will reverse any of the remove, cut, or clear commands. Helpful when something unexpected happens.
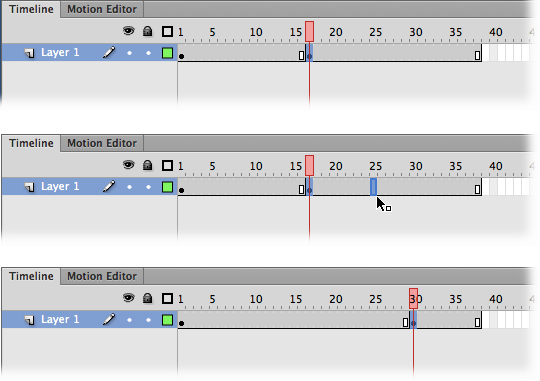
Figure 4-2. Top: Click to select the frame you want to move, and then let go of your mouse. Then drag to move the frame. Middle: As you make the move, Flash displays a highlighted frame, or a group of frames if you selected more than one. Bottom: Here you can tell the frame moved to Frame 30 because the keyframe and end frame indicators have disappeared from their original locations (Frames 16 and 17) and reappeared in their new locations (Frames 29 and 30).
Imagine you’ve just completed a 250-frame animation showing a character in a red T-shirt demonstrating your company’s latest product, an electronic egg slicer. Suddenly, your boss comes in and declares that red is out. (Red is the color your competitor is using for its egg slicer launch.) You have, your boss declares, until the end of the day to change all 250 frames.
Now, if you had to change all 250 frames one at a time, you’d never be able to meet your deadline, and even if you did, you’d probably make a few mistakes along the way, like accidentally repositioning the T-shirt in a couple of frames or missing a few frames altogether. But it’s precisely this kind of en masse editing job that Flash’s multiple-frame editing capability was designed to handle. (By the way, you can also edit multiple frames using Flash’s Find and Replace commands. See the box below for more.)
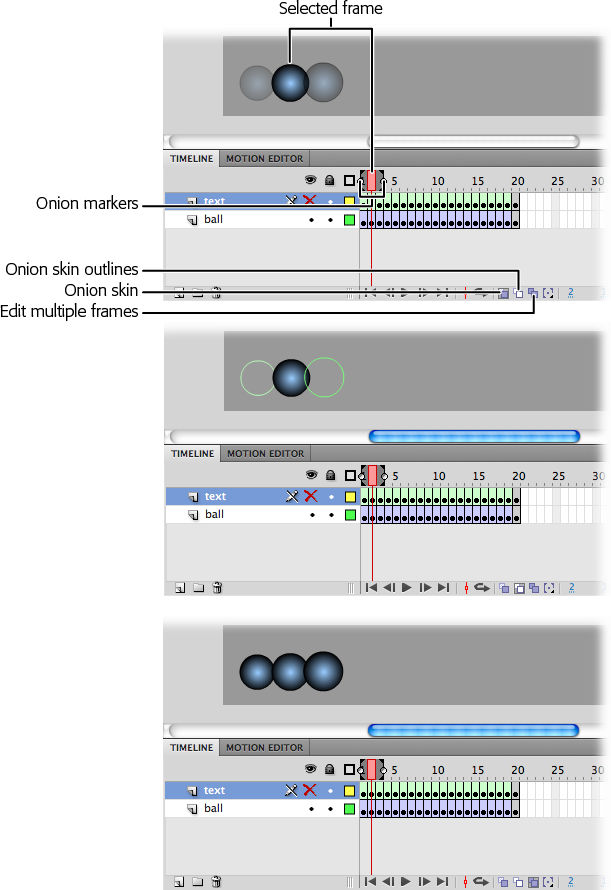
Using a technique called onion skinning, you can see the contents of several frames at once. There are three modes for onion skinning: Onion Skin, Onion Skin Outlines, and Edit Multiple Frames. Each is helpful for a different type of task. Use the buttons at the bottom of the timeline to choose an onion skin mode, as shown in Figure 4-3; use the onion markers in the timeline to choose which frames are displayed.
The Edit Multiple Frames mode makes it easy to deal with that red T-shirt issue, because you can quickly identify (and change) the frames containing red T-shirts. Onion skinning is also useful for those times when you want to hand-draw an “in-between” frame, because you can see both the preceding and succeeding frames on the stage at the same time.
Note
Technically speaking, when you edit multiple frames in Flash, you’re actually editing multiple keyframes. Keyframes are the only frames that contain unique, editable art. (Regular frames just “hold over” the contents of the previous keyframe, and Flash stores tweened frames not as editable images, but as a bunch of calculations.)
To edit multiple frames using onion skinning:
In the timeline, click the Edit Multiple Frames icon.
Flash displays multiple frames on the stage and adds onion markers to the frame display (Figure 4-3, bottom). These beginning and ending onion markers tell Flash which frames you want it to display on the stage.
Figure 4-3. Top: Click the Onion Skin button, and the image for the selected frame appears bold. The images on the adjacent frames appear faded out. Middle: Click Onion Skin Outlines, and images on the unselected frames appear as outlines. Bottom: Click the Edit Multiple Frames button, and all the images within the onion markers appear 100 percent opaque.
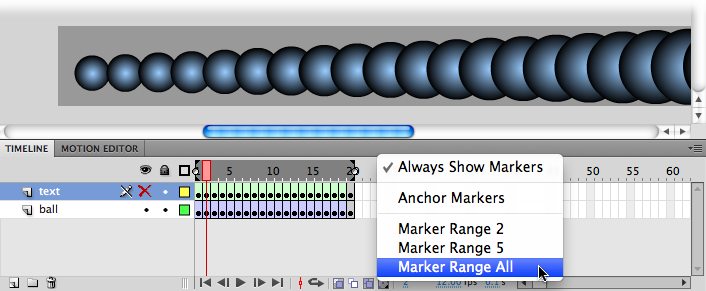
Click the Modify Markers icon.
Flash displays a pop-up menu.
From the pop-up menu, select Marker Range All (Figure 4-4).
Figure 4-4. Here you see the result of selecting Marker Range All. The onion markers surround the entire frame span (Frame 1 through Frame 20), and all 20 images appear on the same stage, ready for you to edit en masse.
Flash displays onion markers from the beginning of your timeline’s frame span to the end and shows the contents of each of your frames on the stage. (If you don’t want to edit all the frames in your animation, you can drag the onion markers independently to surround whatever subset frames you want.)
Edit the frames.
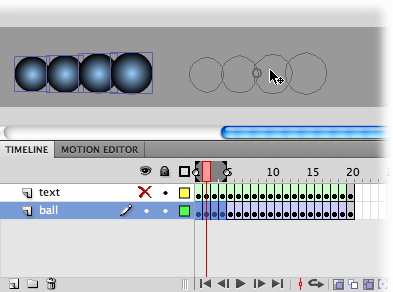
Because you can see and select all the content on a single stage, you can make your edits more easily than having to hunt and peck individually through every frame in your animation. In Figure 4-5, four frames are selected with the onion markers.
Figure 4-5. You can work with multiple images just as easily as single images. For example, you can select several (or all of them) and apply whatever edits you like—moving them, coloring them, reshaping them, and so on.
The contents are first recolored and then moved in one fell swoop. When the move is complete, your stage looks like Figure 4-6.
Click Edit Multiple Frames again.
Flash returns to regular one-frame-at-a-time editing mode and displays only the contents of the current frame on the stage.
Note
You can’t edit multiple frames on a locked layer (Locking and Unlocking Layers). In fact, when you click Edit Multiple Frames on a locked layer, Flash doesn’t even show you the content of the frames in the locked layer (not even in onion skin form).
A layer is a named sequence of frames in the timeline. When you work with a single layer, adding content to frames is easy: You just click a keyframe and use Flash’s drawing, painting, and text tools to create an image on the stage. But when you work with multiple layers, you need to keep track of the layers’ order and what objects are on each layer. For example, suppose you’re creating a composite drawing with mountains in the background, a car driving by in the foreground, and a separate layer for your sound clips. You may find adding content a bit trickier, because you have to be aware of the layer to which you’re adding your content. Fortunately, as you’ll see in the steps below, the timeline’s Show/Hide icon helps you keep track of which content you’ve placed on which layer.
To add content to multiple layers:
Open the file 04-1_Multiple_Layers.fla.
You can find this file (and all the other example files) on this book’s Missing CD page at www.missingmanuals.com/cds/flashcs6mm.
Click the first keyframe in Layer 1.
Flash highlights the selected frame, as well as the layer name. You also see a little pencil icon that lets you know this frame is now ready for editing.
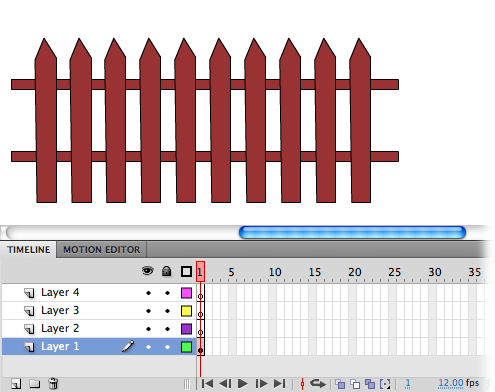
Use Flash’s drawing and painting tools to draw a fence on the stage.
Your fence doesn’t have to be fancy; a quick “wooden” fence like the one in Figure 4-7 is fine.
Hide Layer 1 by clicking the Show/Hide button next to Layer 1.
The content on the stage temporarily disappears. Flash replaces the Show/Hide icon with an X and draws a slash through the pencil icon next to Layer 1 to let you know this layer is no longer editable.
Note
Technically, you don’t have to hide the contents of one layer while you’re working with another; in fact, in some cases, you want to see the contents of both layers on the stage at the same time (Showing and Hiding Layers). But for this example, hiding is the best way to go.
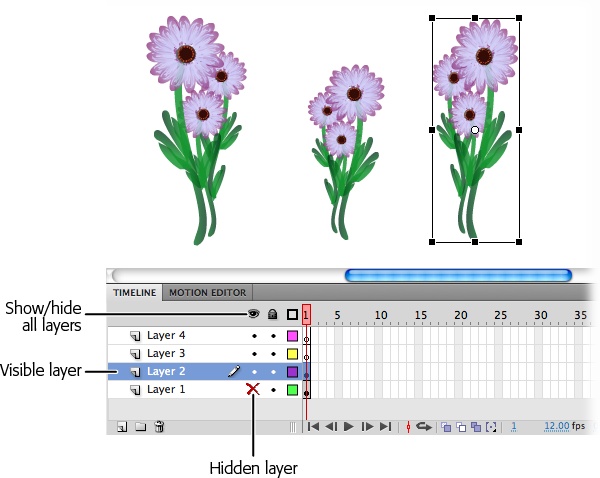
Click the first keyframe in Layer 2.
Flash highlights the selected frame, as well as the layer name (Layer 2). Now the pencil icon is next to Layer 2.
Use Flash’s drawing and painting tools to draw a few flowers on the stage.
Your workspace should now look like the one in Figure 4-8. You can make multiple flowers by copying and pasting a single flower.
Figure 4-8. Sometimes you want to see the frame contents of two or more layers at the same time, like when you’re trying to line up objects in multiple layers. But sometimes seeing all those different objects on the same stage is just plain confusing—partly because Flash lets you edit only one layer at a time. Here, the fence in the first frame of Layer 1 is hidden (you can tell by the big X in the Show/Hide column) so you can focus on the contents of Layer 2 (the flowers).
Hide Layer 2 by clicking the Show/Hide icon next to Layer 2.
The content on the stage temporarily disappears. Flash replaces the Show/Hide icon with an X and draws a slash through the pencil icon next to Layer 2 to let you know that this layer is no longer editable.
Repeat steps 4–6 for Layers 3 and 4, adding some gray clouds to Layer 3 (Figure 4-9) and some flying birds to Layer 4 (Figure 4-10).
To see the content for all four layers, click to remove the Show/Hide X icon next to Layer 3, Layer 2, and Layer 1, as shown in Figure 4-11.
Flash displays the content for all four layers on the same stage.
This section shows you how to use Flash’s layer tools (including locking/unlocking and hiding/showing) to keep from going crazy when you’re editing content in multiple layers (Figure 4-12). Two layers aren’t so bad, but if you need to add 6, 8, 10, or even more layers, it’s pretty easy to lose track of which layer you’re working in. Then in the following section you’ll see how to edit the content in your layers.
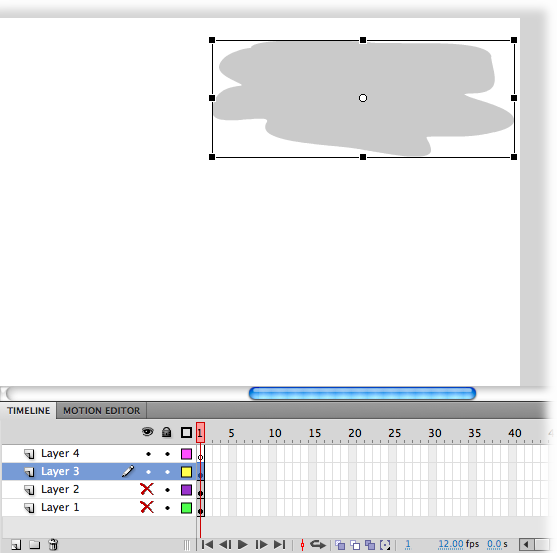
Figure 4-9. Creating separate layers for different graphic elements gives you more control over how each element appears in your finished animation.
Whether or not you want Flash to show the contents of your layered frames on the stage depends on the situation. Typically, when you’re creating the content for a new layer, you want to hide all the other layers so you can focus on what you’re drawing without any distractions. But after you’ve created a bunch of layers, you want to see them all at once so you have an idea of what your finished animation looks like and make adjustments as necessary.
Flash shows all layers until you tell it otherwise.
Tip
You can tell Flash to show (or hide) all your layers by clicking the Show/Hide All Layers icon you see in Figure 4-8. Click the icon again to turn off showing (or hiding).
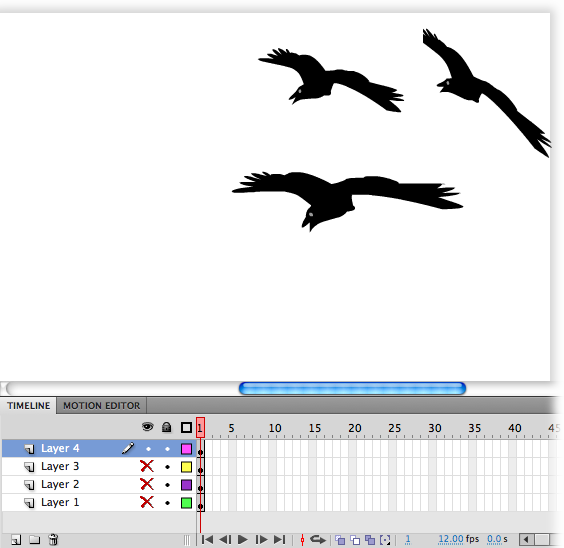
Figure 4-10. In this example, the images are static, but you can place everything from motion and shape tweens to movie clips, backgrounds, actions, and sounds on their own layers. Hiding layers affects only what you see on the stage; when you select Control→Test Movie to test your animation, Flash displays all the layers, whether or not you’ve checked them as Hidden.
The eyeball in the timeline is the Show or Hide All Layers button. It works like a toggle. Beneath that eye are buttons to show or hide layers individually. So to hide a single layer, click the dot in that layer. When you do, Flash replaces the dot with a red X and temporarily hides the contents of the layer (Figure 4-13).
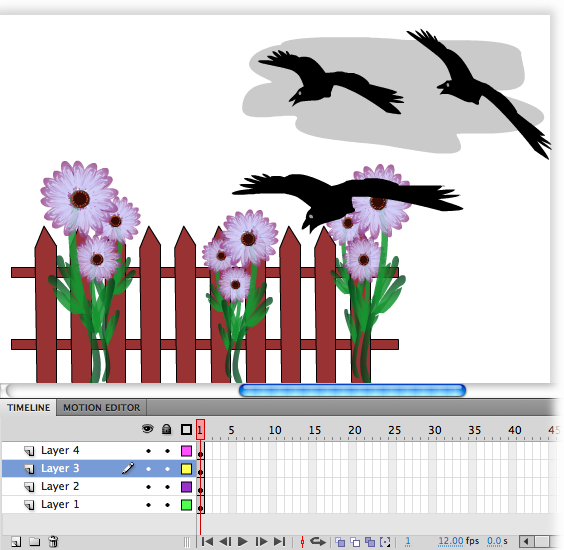
Figure 4-11. Here’s what the composite drawing for Frame 1 looks like: the fence, the flowers, the cloud, and the birds, all together on one stage. Notice the display order: The flowers (Layer 2) appear in front of the fence (Layer 1), and the birds (Layer 4) in front of the cloud (Layer 3). You can change the way these images overlap by rearranging the layers, as you’ll see on page 146.
In the timeline, click the X in the layer you want to show. When you do, Flash replaces the X with a dot and displays the contents of the layer on the stage.
In the timeline, Alt-click (Option-click) the Show/Hide button next to the layer you’re editing. Flash immediately hides (or shows) all the layers, except the one you’re editing.
Tip
If you try to edit a hidden layer by drawing on the stage, Flash displays a warning dialog box that gives you the opportunity to show (and then edit) the layer. Not so if you try to drag a symbol onto the stage—Flash just refuses to let you drop the symbol on the stage. Oddly enough, however, Flash does let you add and remove frames and keyframes in a locked layer.
The more layers you have, the more important it is to keep them organized. In this section, you’ll see how to give your layers meaningful names so you’ll know which images, sounds, or actions they hold. You’ll learn how to arrange your layers so that your images and objects overlap the way you want. And you’ll learn how to copy and paste layers, an important skill that saves time and cuts down on repetitive tasks.
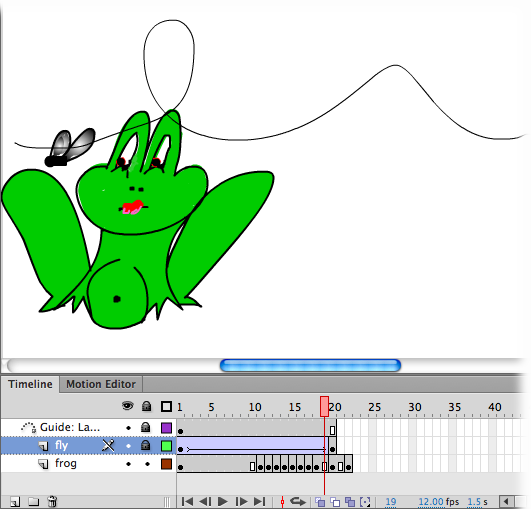
Figure 4-12. This animation contains three layers: one containing a motion tween of a buzzing fly, one containing the path the fly takes as it buzzes around the frog’s head, and one containing the highly interested frog. In some situations, showing all layers is fine, but here it’s confusing to see all those images on the stage at the same time.
The names Flash gives the layers you create—Layer 1, Layer 2, Layer 3, and so on—aren’t particularly useful when you’ve created 20 layers and can’t remember which layer contains the ocean background you spent 10 hours drawing. Get into the habit of renaming your layers as soon as you create them, and you’ll have an easier time locating the specific elements you need when you need them.
This section builds on the example you created earlier in this chapter. If you haven’t had a chance to work through that section, you can download 04_2_Flowers.fla from this book’s Missing CD page (www.missingmanuals.com/cds/flashcs6mm) and use it instead.
To rename a layer:
Open the file 04_2_Flowers.fla.
If you created your own Flash document when you worked through Working with Multiple Layers (page 135), you can use that document instead.
Double-click the name Layer 4.
Flash displays the layer name in an editable text box (Figure 4-15). On the stage, you see the content for this layer (the birds) selected.
Note
Instead of double-clicking the layer name, you can use the Layer Properties dialog box to rename your layer. Check out the box on Layer Properties for details.
Click inside the text box, type birds, and then click anywhere else in the workspace.
Flash displays the new name for your layer.
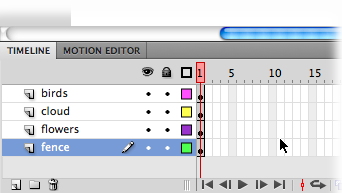
Repeat steps 1 and 2 for Layers 3, 2, and 1, renaming them cloud, flowers ,and fence, respectively.
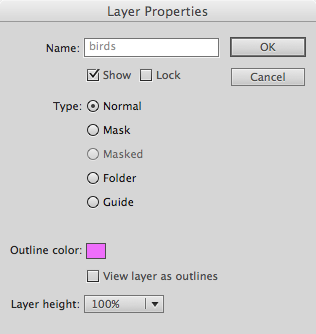
Figure 4-15. If you can’t remember what a particular layer contains, then check the stage: When you double-click a layer name to rename it, Flash automatically highlights the content associated with that layer.
When you’re done, your renamed layers should look like Figure 4-16.
Earlier in this chapter, you saw how to copy and paste individual series of frames. But Flash also lets you copy and paste entire layers—useful when you want to create a backup layer for safekeeping or when you want to create a duplicate layer you’ll later change slightly from the original.
For example, if you want your animation to show an actor being pelted with tomatoes from different angles, you can create a layer that shows a tomato coming in from stage right—perhaps using a motion or shape tween (Chapter 3). Then you can copy that layer, paste it back into the Layers window, rename it, and tweak it so that the tomato comes from stage left. Maximum effect for minimum effort—that’s what copying and pasting gives you.
To copy and paste a layer:
In the timeline, click the name of the layer you want to select.
Flash highlights the layer name, as well as all the frames in the layer.
Select Edit→Timeline→Copy Frames.
If you don’t have a layer waiting to accept the copied frames, then create a new layer now before going on to the next step.
In the Layers window, select the name of the destination layer. Then choose Edit→Timeline→Paste Frames.
Flash pastes the copied frames into the new layer, beginning with the first frame. It also pastes the name of the copied layer into the new layer.
Tip
It’s also possible to copy and paste layers between Flash documents. That’s a process used on one of the last exercises in the book (Building Apps for Both iOS and Android), where layers from an iPhone app are pasted into an Android project.
You can change the way images, text fields, and other objects overlap on the stage by rearranging the layers in the timeline. For example, in Figure 4-17, the fence seems to be behind the flowers because, in the timeline, the fence layer is below the flowers layer. If you’d rather have the flowers behind the fence, just drag the flowers layer below the fence. Figure 4-18 shows you an example.
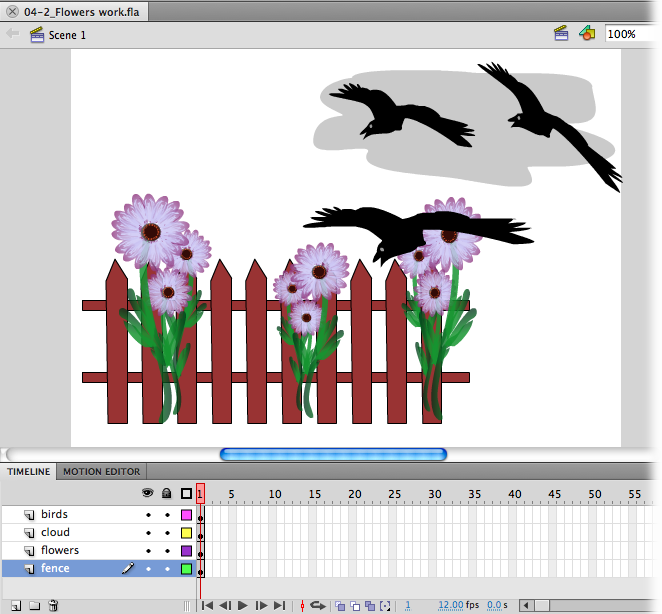
Figure 4-17. Flash treats layers the same way you treat a stack of transparencies: The image on the bottom gets covered by the image above it, which gets covered by the image above it, and so on. Stacking isn’t an issue if none of your images overlap. But when they do, you need to decide which layers you want in front and which behind.
Flash gives you three ways to delete a layer:
In the timeline, right-click (Control-click) the layer you want to delete and then, from the shortcut menu that appears, choose Delete Layers.
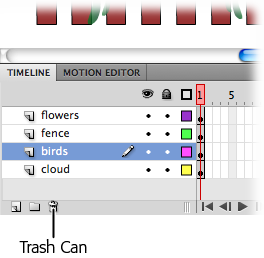
Drag the layer you want to delete to the trash can (see Figure 4-19).
Click the layer you want to delete to select it (or Shift-click to select several layers), and then click the trash can.
Whichever method you choose, Flash immediately deletes the layer or layers (including all the frames associated with that layer or layers) from the Layers window.
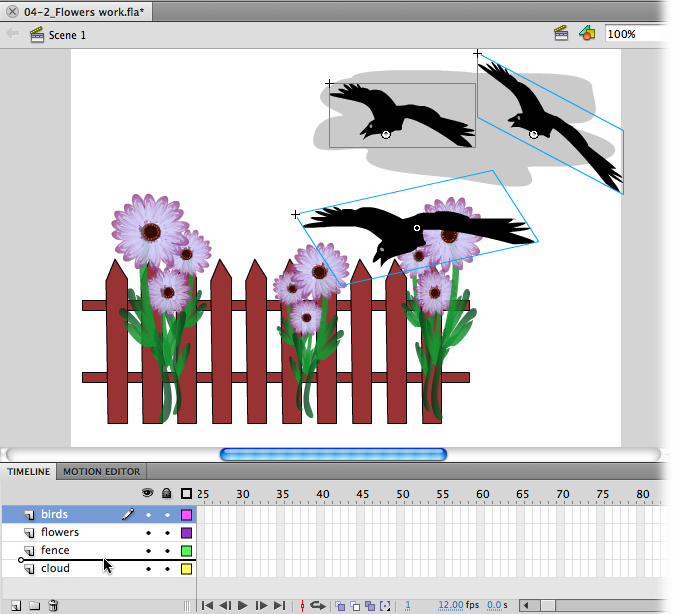
Figure 4-18. Moving a layer is easy: Just click to select a layer, and then drag it to reposition it (and change the order in which Flash displays the content of your frames). Here the cloud layer has been moved to the bottom of the list, so it now appears behind the other images. The birds layer is in the process of being moved; you can tell by the thick gray line you see beneath the cursor.
Working with layers can be confusing, especially at first. So Flash lets you lock individual layers as a kind of safeguard, to keep yourself from accidentally changing content you didn’t mean to change:
To lock a layer, click the dot under the padlock, as shown in Figure 4-20. When you do, the dot turns into a little padlock icon and deselects any objects that you’d selected on the stage in that layer. If you locked the active layer, Flash draws a slash through the pencil icon next to the layer’s name as a visual reminder that you can’t edit it.
To unlock a layer, click the padlock (Figure 4-20). Instantly, the padlock turns into a dot, Flash reselects your objects, and you can edit them once again on the stage.
To lock (or unlock) all your layers all at once, click the Lock or Unlock All Layers icon (padlock at the top). Click the icon again to return to unlocked (or locked) layers. Ctrl-clicking (⌘-clicking) on any Show/Hide button also locks or unlocks all layers.
To lock (or unlock) all layers except one, Alt-click (Option-click) the dot or padlock in the layer you want to edit.

Flash gives you a couple of options that help you organize your layers while you’re working. The Outline view removes the fill from drawings, showing only a wireframe outline. Outline view is helpful when you want to simplify the artwork on a cluttered screen. Layer folders help you organize your layers into a hierarchy, which is helpful when you’re working with dozens of layers. The ability to put several layers in a single folder makes it easier to lock and hide related materials.
Flash lets you display the contents of your layers in outline form. Instead of seeing solid pictures on the stage, you see wireframe images, as in Figure 4-21. Looking at your layer content in outline form is useful in a variety of situations—for example, when you want to align the content of one layer with respect to the content of another.
To display the content of all your layers as outlines, click the Show All Layers As Outlines icon (next to the padlock). Clicking it again displays your layers normally.
Figure 4-21. Depending on the visual effect you’re going for, you might want to align the centers of your flowers with the crosspieces of your fence. But when you look at the content normally, it’s hard to see the alignment, because both your flowers and your fence are opaque. Here Flash displays the flowers and fence layers in outline form so you can concentrate on shape and placement without being distracted by extraneous details.
Tip
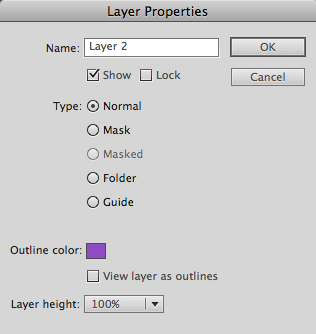
You can change the color Flash uses to sketch your outlined content. For example, you can change the color from light to dark so that you can more easily see the outline against a light background or so that there’s more contrast between two overlapping outlines. To change the outline color for a layer, first select the layer, and then select Modify→Timeline→Layer Properties. From the Layer Properties dialog box (Figure 4-21) that appears, click the Outline Color swatch and then select a color from the color picker that appears.
To show a single layer’s content in outline form, click the filled square, as shown in Figure 4-20. When you do, Flash changes the filled square to a hollow square (the Outline icon) and displays your layer content in outline form on the stage. To return your layer to normal, click the square again.
To outline the contents of every layer except one, Alt-click (Option-click) the outline icon for that layer.

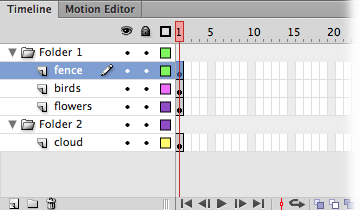
When your animation has only a handful of layers, organization isn’t such a big deal. But if you find yourself creating 10, 20, or even more layers, you’ll want to use layer folders to keep your layers tidy (and yourself from going nuts).
A layer folder is simply a folder you can add to the Layers window. Layer folders aren’t associated with frames; you can’t place images directly into them. (If you try, you’ll see the error message shown in Figure 4-22.)
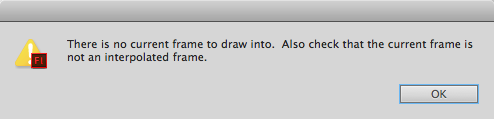
Figure 4-22. If you try to draw on the stage when you’ve selected a folder instead of a layer, Flash lets you know in no uncertain terms. (An interpolated frame is a tweened frame; as you learned in Chapter 3, you can’t place images in a tweened frame, either.)
Instead, layer folders act as containers to organize your layers. For example, you might want to put all the layers pertaining to a certain drawing (like a logo or a character) into a single layer folder and name the folder logo or Ralph. That way you don’t have to scroll through a bunch of layers to find the one image you’re looking for.
Note
As you might expect, showing, hiding, locking, unlocking, and outlining a layer folder affects every layer inside that folder.
Each folder you add takes up a line in the timeline, and eventually there’s not enough room to display all the layers and folders in the panel. You can use the scroll bar on the right side of the timeline to find your layers, or you can increase the height of the timeline panel by dragging the panel’s top edge.
To create a layer folder:
Click the name of a layer to select it.
When you create a folder, it appears above the selected layer; but you’ll be able to drag your folder and its contents to a new location.
Click the Insert Layer Folder icon. (If you prefer, you can choose Insert→Timeline→Layer Folder or right-click the layer, and then, from the shortcut menu that appears, choose Insert Folder.)
Flash creates a new layer folder named Folder 1, as shown in Figure 4-23.
Figure 4-23. Newly created layer folders appear expanded, like Folder 1 here (note the down arrow). Clicking the down arrow collapses the folder and changes the down arrow to a right arrow. When you drag layers into an open folder (or expand a collapsed folder), the layers appear beneath the folder. You rename a layer folder the same way you rename a layer: by double-clicking the existing name and then typing in one of your own. You can move layer folders around the same way you move layers around, too: by dragging.
Drag layers onto the layer folder.
If the folder is already expanded, you see the layers appear beneath it. If the folder is closed, then click the triangle button to view the layers inside.
To delete a layer folder, and all the layers and folders inside, right-click the layer folder, and then, from the shortcut menu that appears, select Delete Folder. Flash pops up a warning message informing you that you’re about to delete not just the folder, but also everything in it. If that’s what you want, then click Yes; otherwise, click No.
Imagine placing a sheet of red construction paper containing a cutout of a star over a piece of green construction paper. The result you see, when you look at the two sheets stacked on top of each other, is a green star on a red background. That’s the concept behind mask layers, a special type of layer that lets you create shaped “portholes” through which an underlying (masked) layer appears.
At a masquerade ball, masks hide the important stuff—your face. It’s a little different in Flash and other graphic arts endeavors. Masks hide part of a picture in order to reveal the important stuff—the subject. You use masks to direct the eye of your audience. And when you apply a classic tween to the porthole, you can create an effect that looks like a spotlight playing over an image—mighty cool, indeed.
Here’s how you go about it:
Open the file 04-3_Mask_Layer.fla.
You can download this file, a working example of the file (04-4_Mask_Layer_done.fla), and all the other examples shown in this chapter from the Missing CD page at www.missingmanuals.com/cds/flashcs6mm.
Click Layer 1 to select it.
In the example file for this section (04-3_Mask_Layer.fla), Layer 1 contains a bitmap image.
Click the Insert Layer button. (The Insert Layer button is on the bar below the layer names and looks like a folded-over page.)
Flash creates a new layer named Layer 2 and places it above Layer 1.
Double-click the layer icon next to Layer 2.
The Layer Properties window appears (Figure 4-24).
In the Layer Properties window, turn on the Mask checkbox, and then click OK.
Flash displays the mask icon next to Layer 2.
Double-click the layer icon next to Layer 1.
The Layer Properties window appears again.
This time, turn on the checkbox next to Masked, and then click OK.
Flash displays the masked icon next to Layer 1.
Select Frame 20 in both Layer 1 and Layer 2, and then select Insert→Timeline→Frame.
Flash extends both layers to Frame 20.
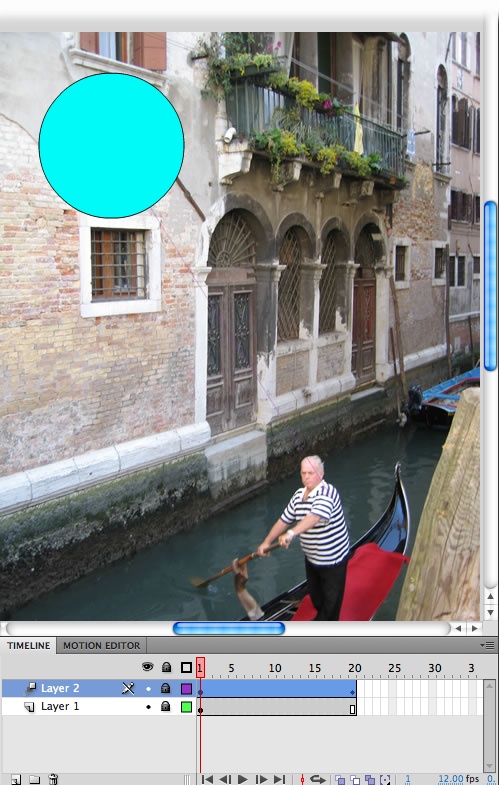
Click to select the first frame in Layer 2 (the mask layer). On the stage, click the Oval tool, and then draw a circle in the upper-right corner of the stage (Figure 4-25).
Figure 4-25. The shape you use as a portal has to be either a fill (like the circle shown here) or a symbol. Because the Brush tool creates fills, you can use the Brush to draw a freehand portal. (Strokes on the mask layer have no effect.)
The oval can be any color you choose, since it won’t appear in the finished effect; instead, it’ll act as a see-through portal.
Tip
Flash gives you a bunch of ways to create masks and masked layers (by right-clicking an existing layer, and then choosing Mask or Masked, for example), but one thing doesn’t change: Masked layers have to appear directly below mask layers in the Layers window for the effect to work. If you create a mask layer and a masked layer in the wrong order, just drag the mask layer above the masked layer.
With the circle still selected, choose Modify→Convert to Symbol or press F8.
A Convert to Symbol box appears. If you want to animate a mask with a motion tween, you need to use a symbol.
In the Name box, type Circle Mask. Choose Movie Clip for type and then press OK.
Now, the circle symbol on the stage is an instance of the Circle Mask movie clip symbol.
Right-click Layer 2 and choose Create Motion Tween.
Layer 2 shows the blue motion tween highlight.
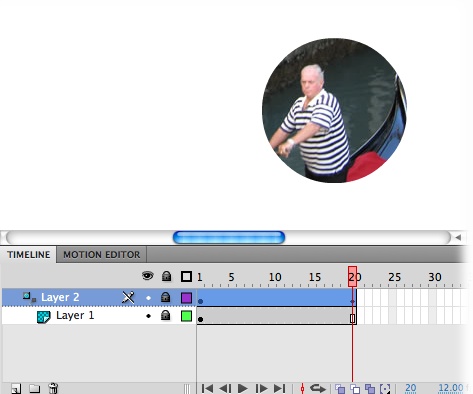
Move the playhead to Frame 20. Then, with the Select tool (V), drag the circle to the lower-right corner of the stage (Figure 4-26).
Figure 4-26. In this example, you’re creating a simple tween in Layer 2 so that the portal moves across the bitmap image showing only a circle’s worth of image at any one time (a spotlight effect). But you can create static portals (masks), too. The simplest is a circle or a square, but nice thick letters also make a compelling effect.
Right-click the layer name (Layer 2) and then choose Show Masking from the shortcut menu.
With the mask in effect, everything in the photo is hidden except the portion covered by the circle. Flash automatically locks both layers when you choose Show Masking.
Press Return to test your animation.
The circle mask moves across the photo, revealing different portions of the image, as shown in Figure 4-26.
You can animate your mask using the standard motion tween tricks described in Chapter 3 and Chapter 8. For example, filmmakers sometimes use an iris effect, where the visible part of an image shrinks down to a small circle. You can use the X/Y properties to change the size of the mask symbol as it moves. Keep in mind that before you can make changes to the mask’s properties, you need to unlock the mask layer. When you click the padlock button to unlock the layer, Show Masking is turned off, so you see the entire photo as well as the circle mask.
Get Flash CS6: The Missing Manual now with the O’Reilly learning platform.
O’Reilly members experience books, live events, courses curated by job role, and more from O’Reilly and nearly 200 top publishers.

