A layout is made up of layout parts—sections that each behave a little differently when displaying or printing multiple records. Even the simplest layout has at least one part, and each part has objects on it. One kind of object is a field, which you’ve seen plenty of so far in this book. Each field in your database has a little label beside it that tells you which field it is. These labels are another kind of object: They’re text objects. It just so happens those objects all belong to a part called the body, and if you need to talk about your layout, you’d say they are on the body.
Parts tell FileMaker how to treat the objects inside them when it displays or prints the layout. One part might show just once at the top of the window, while another shows over and over again for each record. This section tells you exactly what each part type does and when to use it. Finally, you’ll learn how they work together and how they behave in each mode.
FileMaker has eight different kinds of parts in all. Every layout uses at least one of these parts, and often several—although not all databases need all eight kinds of parts. Most types can occur only once on each layout (like a header), while others can appear several times.
Title Header. The title header part holds things you want to appear only at the top of the very first printed page. Use it for a descriptive title, larger column labels, a company logo, or you can even make it the height of your paper, and it acts as a cover page.
Header. The header part prints at the top of every page—unless you also use a title header, in which case the title header is on page one and the regular header is at the top of all other pages. In Browse mode, the header shows up at the top of the window. This part is where you might put a date and time, small title, smaller column labels, and anything else that you want on every page of the printout.
Leading Grand Summary. This part prints below the header but above the records themselves. It’s meant to contain totals and similar fields that add up, average, or in some way round up the results of your records, which FileMaker calls summarizing.
Note
Leading grand summary and all the other “summary” parts are how FileMaker creates reports. Reports, which help you compile and analyze your data, are nothing more than layouts designed for the job, as you’ll learn in Chapter 6.
Body. The body shows the actual record information. In list view, or when printed, it repeats once for every record.
Sub-Summary. These parts help you add things like subtotals to complex reports. You’ll learn all about this in Chapter 6.
Trailing Grand Summary. If you prefer totals and overall summary information at the bottom of a report, they would go in this part.
Footer. The footer prints at the bottom of every page—unless you also use a title footer, in which case, the title footer appears on page one and the regular footer appears on all other pages. The footer also appears at the bottom of the window in Browse mode. The footer’s a perfect place for page numbers, copyright notices, and anything that ought to appear at the bottom of every page of your printout.
Title Footer. The Title Footer part shows at the bottom of just the first page. Use it for special footer info that only needs to show once.
Figure 4-4 shows a layout with seven parts—one of each type except Sub-Summary.
When in Browse mode, and viewing the layout as a form, you see every part except Sub-Summary parts. As Figure 4-4 shows, the parts go in the same order as in the list above. In practice, you’ll probably never use all these parts on a layout you plan on viewing this way. In fact, if you only ever want to view a layout as a form in Browse mode, you really need only a Body part.
If the window isn’t big enough to show every part, you get scroll bars as usual. In form view, the entire layout scrolls up and down, as shown in Figure 4-5.
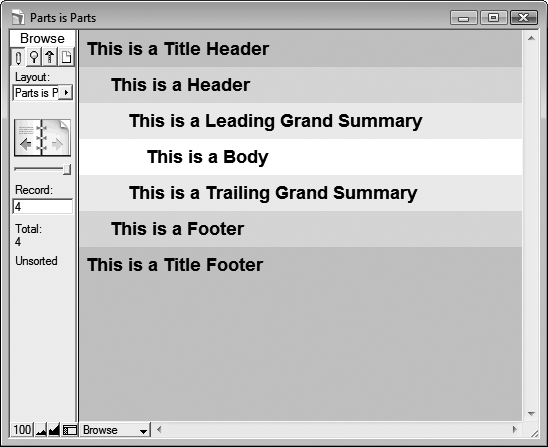
Figure 4-4. This layout has a lot of parts: one of every type except Sub-Summary. In form view, as shown here, you can see every one of those parts. You’ll see this same layout in various views (Form, List, or Table) and modes (Browse or Preview) over the next several pages.
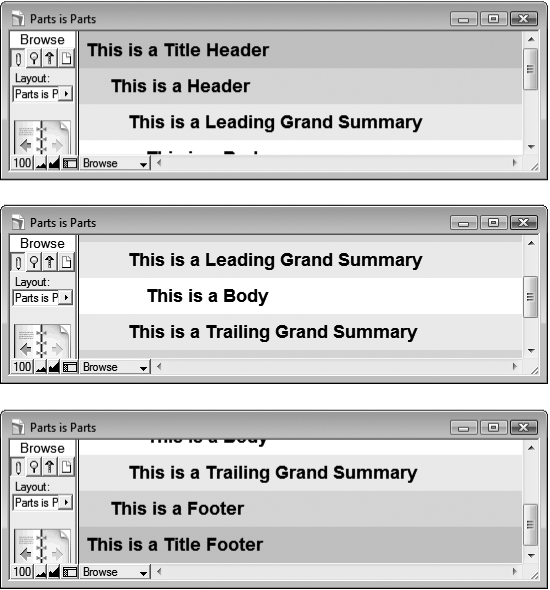
Figure 4-5. This series of images shows the same layout in form view as you scroll. In the top image, the window is scrolled all the way to the top. Middle: It’s scrolled halfway down the layout. Bottom: Finally, you can see the layout scrolled all the way to the bottom. In form view, the entire layout, including all parts, scrolls as one unit.
In list view, the header is anchored to the top of the page and the footer to the bottom. When you use the scroll bars, the header and footer stay in place and the Body part scrolls. If you resize the window, the footer moves with it so that it’s always the same height, and always at the very bottom.
List view is a list because it shows several records at once. FileMaker accomplishes this magic by repeating the Body part once for each record. The database in Figure 4-6 has three records, so in effect, the Body part repeats three times. The leading grand summary appears directly below the header, and before the Body part’s first appearance. The trailing grand summary, on the other hand, appears right after the last record’s Body part. Scrolling in list view is altogether different from form view, as shown in Figure 4-7.
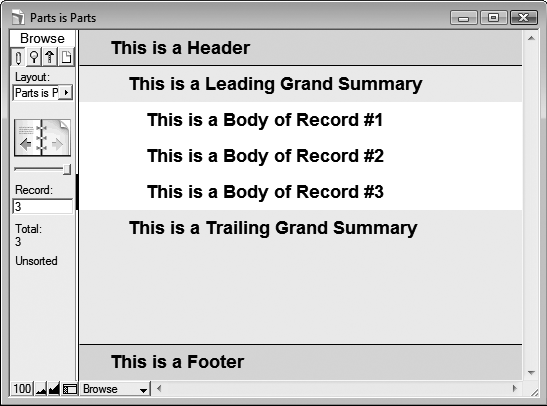
Figure 4-6. Here’s the same layout from Figure 4-4 in list view. Although this layout has all the same parts, list view doesn’t show the title header and the title footer. The Body part repeats three times—once for each record in the table—and the trailing grand summary is bigger. FileMaker has increased its size so it fills up all the remaining space between the last record’s body and the footer.
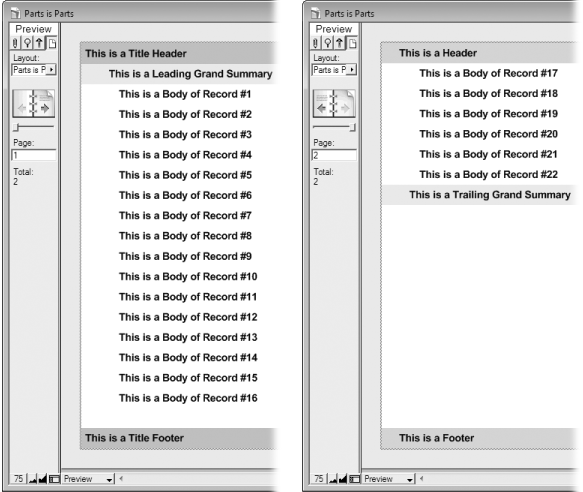
A quick glance at Preview mode might lead you to believe that it shows only the title header and the title footer (exactly the opposite of list view), but that’s not entirely true. Turn your eyes to Figure 4-8 for the whole story.
Just like list view, the grand summary parts place themselves before the first record and after the last record. Finally, scrolling in Preview mode just scrolls the current page. If you need to see other pages of your report while you’re in Preview mode, use the Book icon to move around.
While it’s perfectly legal to put any parts on any layout, you can probably tell from the discussion above that some arrangements are more common than others:
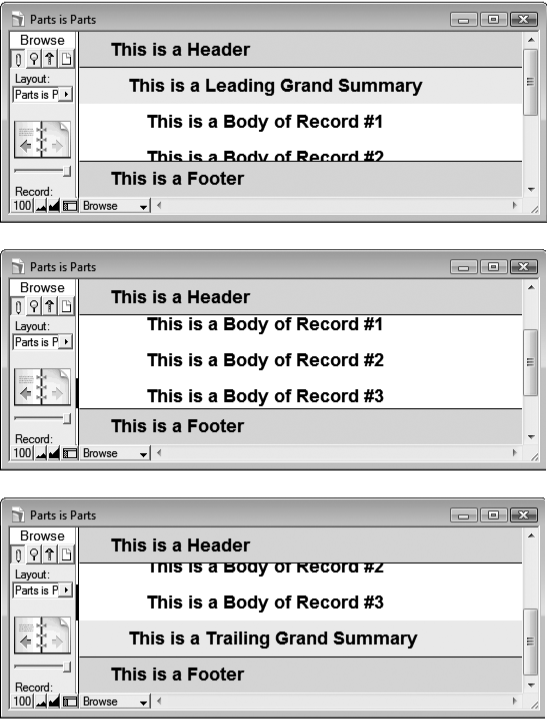
Figure 4-7. Top: This sequence shows the same layout as Figure 4-5 scrolled to various places. In this case, since you’re viewing the layout as a list, the header and footer stay put even when scrolling: They’re always at the top and bottom of the window. Middle: With the window scrolled halfway, the header and footer have not moved, but the leading grand summary has scrolled out of view. Each Body part is moving as well. Bottom: When you reach the bottom of the list of records, the trailing grand summary comes into view.
Detail layouts usually have just a Body part, or some combination of header, body, and footer. These layouts may show only a single record, so there isn’t much point to Summary parts since there’s no list of data to summarize.
List layouts usually have a header and a body, and sometimes a footer. Occasionally, you want a trailing grand summary on your list layout as well, since it can show summary information after all the records without taking up precious space like a footer.
Printed reports come in many forms. People often use all the parts shown above on a report: a large title header for the first page, and a smaller header for each additional page; a leading grand summary that shows below the title header and before the first record; a Body part for each record; a trailing grand summary to show totals from all records, and a footer to show page numbers and the like.
Figure 4-8. Left: In Preview mode, the title header and footer are at the top and bottom of the first page. The leading grand summary appears right before the first record, and FileMaker adds a copy of the body for every record until it fills up the page. Right: Every page thereafter shows the header and footer instead of the title header and footer. If you don’t have a title header, you’ll get the regular header on the first page, too (and the same goes for the title footer). Also notice that the trailing grand summary appears after the last record. This time it does not fill all the remaining space. Instead, its height matches the height you gave it on the layout.
Envelope and label layouts often need headers and/or footers just to get the record data to align properly on the printed page. These parts are generally empty.
You may have a list layout that you use to browse your records, but you often print it as well. Make the layout do double duty by adding a title header or title footer. They’ll show only when you print, and you can save valuable screen real estate.
Parts aren’t so useful by themselves. They control how the items in your layout arrange themselves on the screen or on the page, but they need to have things in them to be really useful. You call those things layout objects. Layout objects come in seven flavors: Text objects, lines and shapes, images, fields, portals, tab controls, and Web viewers.
Note
Portals are all about relationships, and you won’t learn about relationships—or portals—until Part 4. You’ll take up tab controls and Web viewers a little sooner. Look for them in Chapter 6.
Almost every layout ever created has included text objects: little blocks of text that are the same on every record displayed using that layout. Think about what happens when you move from record to record. The text labels for each field stay the same, even though the data inside each field changes with every record. Text objects give you one form of stability in the ever-changing world of database records.
When you design a layout, you can control every aspect of a text object, from the words in it to the font, size, style, color, line spacing, tab stops, and so on. (In fact, everything you learned in Chapter 2 related to formatting text in fields applies to text objects on layouts as well.)
Note
FileMaker’s spell checker works in Layout mode too. Just choose Spelling → Check Layout. It looks and works just as it does in Browse mode—except that it checks text objects on the current layout. Also, the visual spell-checking feature (see Spell Checking as You Type) works in Layout mode as well, so watch for dotted red underlines if you’re a chronic misspeller.
If you need simple graphic embellishments in your layouts, FileMaker has built-in tools. For example, you might want to put a box around a person’s address information, and another around the Notes field, so they are visually separated. You can draw lines, rectangles, ovals, and round-cornered rectangles right on your layout. You can also control the line color, thickness, and pattern for lines and shapes; and the fill color and pattern for shapes.
If simple shapes can’t properly convey your artistic vision for your layout, you have recourse: You can paste any picture right onto the layout. You can also insert a picture from a file on your hard drive. Database developers often add icons, logos, and other decorations this way. For example, you might add your company logo to the top-right corner of your layout, or put a cute little envelope icon by the Email Address field. Just remember a little of this “eye candy” goes a long way. If you get carried away, you can actually create so much visual clutter that people using the program are confused, instead of enlightened. Also, large images can make your layouts slow to load, especially when you share the database over a network (which you’ll learn how to do in Chapter 18).
A layout without fields is just a picture. Perhaps it’s a very complex picture that changes as you switch from list view to form view, and has an entirely different effect when printed (thank you, parts!), but it’s a picture nonetheless.
To get data into your layout, you add field objects. For instance, if you make a new layout in the People database, and you want to show the person’s address, you can add the Street Address, City, State, and Zip Code fields to the Body part of the layout. If the field is in the Body part (the most common place), then it shows data from the current record (or each record when you view the layout as a list). In list view, fields in Header, Footer, or Grand Summary parts show the values from the first or last record in the found set. In Preview mode (or when printing), headers and footers show data from the first or last record on each page.
Note
You won’t usually put ordinary fields in Header, Footer, and Grand Summary parts. These parts usually contain global fields, summary fields (see Formatting a tab control), page numbering, dates, or just text and pictures.
With a firm understanding of layouts, views, parts, and objects, you’re ready to get down to business. The next section shows you how to put all these ideas to work in your own databases.
Get FileMaker Pro 9: The Missing Manual now with the O’Reilly learning platform.
O’Reilly members experience books, live events, courses curated by job role, and more from O’Reilly and nearly 200 top publishers.

