So far, you’ve spent all your time in the same Contact Management window. If you’re feeling a little claustrophobic, fear not. At any time, you can get yourself another window by choosing Window → New Window. You’ll get an exact copy of the window you were just looking at. What’s the big deal, you ask? The big deal is that you can switch to another record or do almost anything else in the new window, without affecting what’s displayed in the first one.
When you have multiple windows open, you can change most of the settings you’ve seen so far for each window. For example, if you want to compare two contacts side by side, you can show one contact in each window.
You can even zoom one window in and another one out, or show the status area in one window but not the other (if that’s your idea of fun). Another time multiple windows are useful is when you’re working with one set of found records (see FastMatch) but need to do another search. You can perform a find in a new window without disrupting your work in the original window. Say you’ve been fiddling with the Find command to come up with all your contacts with superpowers, and then suddenly get the paperwork you need to edit the detail on another record. Although you could enter data on the list layout, all the fields you need may not be available. Just create a new window and look up the record you want to edit (see Figure 1-20). Your super-power group is safe and sound in the first window. See the box about Record Locking on Closing hidden windows to see what problems could occur with this kind of data entry.
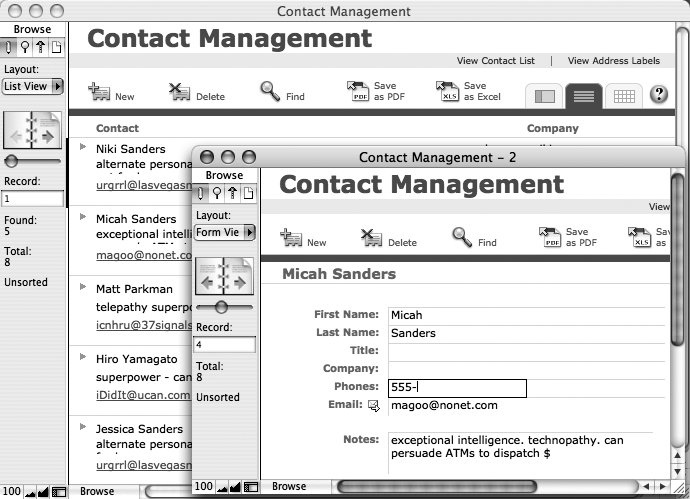
Figure 1-20. In this example, the window in the back shows several records in the database on the List View layout. But the window in the front shows one record in detail. You can flip through records in the front window in their detailed glory and leave your list intact in the background.
Note
If you have two windows open, both of them are connected in one way. If you edit the data in one window, the changes show up in the other window (or every window you have open, if you’re working with multiple windows). Since FileMaker’s windows display only the records in your database, a second window doesn’t mean you have a second database—instead, both windows share the same data
If you have a lot of windows on your screen and don’t feel like rearranging them yourself, you can use one of several commands that arrange the windows for you—or at least try to. Using FileMaker’s Window menu, you can choose one of three commands: Tile Vertically, Tile Horizontally, or Cascade. Each command rearranges the windows in a different manner, as shown in Figure 1-21.
The Window menu commands are a great place to start when you have so many windows open, you don’t even know which one you’re looking for! However, 99 times out of 100, these automatic rearrangements somehow seem to make every window the wrong size, and put each window in the wrong place. So use these commands with the understanding that you may still have to do some rearranging yourself.
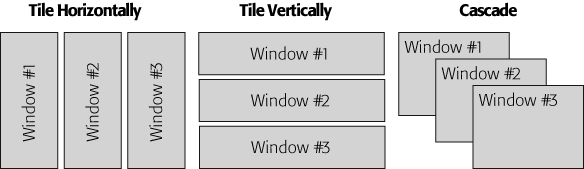
Figure 1-21. FileMaker offers three automatic window arrangements: Tile Horizontally, Tile Vertically, and Cascade. Choose Tile Horizontally or Tile Vertically to shrink every window small enough that they all fit onscreen with no overlapping. (The difference between these two is subtle: The Horizontal option prefers wide windows while the Vertical option tries to make windows taller.) If you choose Cascade, FileMaker makes every window the same size and puts each a little below and to the right of the one above. The window that was active when you chose Cascade lands in front.
If you have a window just the way you want it (for example, showing a list of customers Assistant Manager Dwight Schrute left behind when he went to work for Staples), but it’s in your way onscreen, you can hide it instead of closing it. (When you close a window after using the Find command, your results disappear.) Hiding a window makes it disappear from your screen, but keeps the information stashed in a handy place in your computer so you can get it back if you want it. It’s a neat timesaver when your screen is crowded—or when you want to keep prying eyes away from your information.
To hide the window displayed on the front of your screen, choose Window → Hide Window. To bring it back again, choose Window → Show Window, and pick the window you want back from the list. In order for this to work, you have to remember the name of the window you hid (its name appears in the title bar, across the top of the window).
Warning
You may be in the habit of using your operating system’s built-in features for dealing with windows, like minimizing them to the Mac OS X Dock. These techniques work just fine in FileMaker, but they can play havoc when a FileMaker script needs to control the same window. If you’re using any of these little software robots to automate tasks, as you’ll learn in Chapter 13, it’s best to stick to FileMaker’s own window commands.
Closing hidden windows
On Closing a Database, you learned that the way to close a database is to simply close its windows. As with most rules, there’s an exception: Even if you close all visible windows, the database itself may still be open—in a hidden window.
The easiest way to close all FileMaker’s open windows, hidden ones included, is to press the Alt (Option) key and choose File → Close (File → Close All on Mac OS X). The ordinary Close command closes every window, hidden or not, when this key is held down.
Get FileMaker Pro 9: The Missing Manual now with the O’Reilly learning platform.
O’Reilly members experience books, live events, courses curated by job role, and more from O’Reilly and nearly 200 top publishers.

