Modifying an Image
After you insert a graphic, you can manipulate it several ways: You can attach a link to it, apply a CSS class style to it, and even create an “image map” so that different areas on the image link to different web pages. You can also use some of Dreamweaver’s basic editing tools to crop, resize, optimize, sharpen, and adjust the image’s contrast and brightness.
As with most objects on a web page, you set image properties using the Property Inspector (see Figure 5-9).
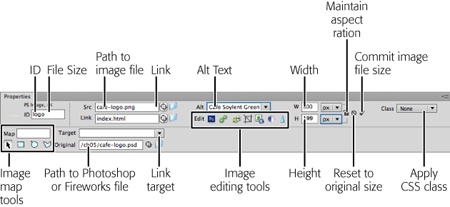
Figure 5-9. The Property Inspector displays the selected graphic’s dimensions, source, alt text, and more. To the left of the file size (8K), you see either Image (meaning a regular GIF, JPEG, or PNG file) or PS Image (meaning the image comes from Photoshop).
Adding an ID to an Image
In the Property Inspector, just to the right of an image’s thumbnail, you’ll see a small field where you can type in an ID. Most of the time, you’ll leave this field blank. But if you plan to add interactive effects to the image, like the rollover effect discussed on Rollover Images using Dreamweaver behaviors (see Chapter 13) or your own JavaScript programming, you’ll need to add an ID. Use only letters and numbers in the name—no spaces or other punctuation. Furthermore, since this adds an ID to the image, the name must be unique to the page. Following this rule lets JavaScript “talk” to a specific image.
When you add an ID, ...
Get Dreamweaver CS6: The Missing Manual now with the O’Reilly learning platform.
O’Reilly members experience books, live events, courses curated by job role, and more from O’Reilly and nearly 200 top publishers.

