In this tutorial, you’ll put what you learned in this chapter to use. You’ll see how to link to other pages on your own site, link to another site on the Web, and use Dreamweaver’s Spry menu bar to create a great-looking navigation bar—complete with fancy JavaScript-driven drop-down menus. (To see the completed page, skip ahead to Figure 4-28.)
Tip
You’ll need to download files from www.sawmac.com/dwcs6 to complete this tutorial. See the Note on Note for details.
Once you downloaded the tutorial files and open Dreamweaver, set up a new site as described on Setting Up a Site. In a nutshell, Choose Site→New Site. In the Site Setup window, type Links Tutorial into the Site Name field, click the folder icon next to the Local Site Folder field, navigate to and select the Chapter04 folder inside the MM_DWCS6 folder, and then click Choose or Select. Finally, click OK.
Once again, you’ll be working on a page from Cafe Soylent Green.
In the files panel, double-click the file named index.html.
You can also open the file by choosing File→Open, selecting its name, and then clicking OK (Select on Macs). You’re looking at a basic web page, with a banner, some text, and a footer. It’s all contained inside a <div> tag that’s 800 pixels wide and centered in the screen (you learned how to do this trick in the tutorial from Chapter 1 on Phase 6: Finishing the Page).
If your screen is wide enough to show both the code and design view side-by-side, click the Split button in the top-left of the document window. If you can’t fit both comfortably, then click the Design button to display Design view.
At the end of the last paragraph, in the section that begins with the headline “All Natural Ingredients,” you’ll see the text “Read more about our natural ingredients.” This should link to another page.
Select the text “Read more about our natural ingredients.” In the Property Inspector, to the right of the Link box, click the “Browse for File” button.
The Select File window opens.
Click the Site Root button (at the top of the dialog box in Windows, the bottom-right on Macs) to go to the site’s main, or root, folder. Double-click the file named ingredients.html.
The Select File window closes. That’s it? Yup. You just created a link. Now, you’ll learn an even faster way to do that.
In the last paragraph before the footer of the page, select the text “Read more about our nutritional principles.”
Make sure the Files panel is open (Window→Files).
In the Property Inspector, drag the small Point-to-File icon (see Figure 4-6) beside the Link box into the Files panel; move your mouse over the file nutrition.html, and then release the mouse button.
Dreamweaver adds the link to your page. (If you have the double-monitors configuration discussed in the Note on Note, this point-to-file technique won’t work. In that case, use the method in steps 3 and 4 to link to nutrition.html.)
Note that if you wanted to link the text in the examples above to a page on another website, you couldn’t use either of the methods outlined here. Instead, you’d need to type an absolute URL into the Link box, as you’ll see in the next two steps.
Scroll to the bottom of the page. In the footer, you see small gray type that reads “in collaboration with Cosmopolitan Farmer.” Select the text “Cosmopolitan Farmer.”
You want this text to link to this site’s parent company.
In the Property Inspector’s Link box, type http://www.cosmofarmer.com/, and then press Enter (Return).
Now the text links to the CosmoFarmer website. Unfortunately, the blue links don’t fit in with the cafe’s color palette. You’ll remedy that next.
You can change the look of links using a little CSS.
Make sure the CSS Styles panel is open (Window→CSS Styles); at the bottom of the panel, click the + button.
The New CSS Rule window opens. (For a refresher on creating CSS styles, see Creating Styles.)
From the top menu, select Tag; in the Selector Name box, type a (or choose it from the drop-down menu); and, at the bottom of the window, select styles.css from the Rule Definition menu. Click OK to create the style.
Now you’ll pick a font and font color for links.
In the Type category’s Font-family drop-down menu, choose PTSansBold.
You just selected one of the web fonts you added in the last tutorial (if you don’t see PTSansBold at the bottom of the Font-family menu, repeat the steps on Adding Web Fonts to add the PTSansBold web font to Dreamweaver).
In the color box, type #417F2C, and then click OK.
The links on the page change to green. You won’t see the font change because Dreamweaver’s Design view doesn’t display web fonts. However, you can click the Live button in the Document toolbar to see what the font looks like. Make sure to click Live again to exit Live view so you can go back to editing the page.
You’ll now change what the links look like when a guest hovers over them.
In the CSS Styles panel, click the + button; in the New CSS Rule window’s Selector Type drop-down menu, select Compound, and then, from the Selector Name pull-down menu, select a:hover. Click OK.
Again, the CSS Rule Definition window appears.
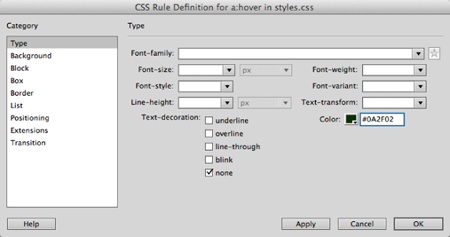
From the CSS Rule Definition window’s Type category, type #0A2F02 in the Color field, and then, in the Text-decoration list, turn on the “none” checkbox (see Figure 4-19). Click OK to finish the style and return to the document window.
To see how this rollover style works, you’ll use Dreamweaver’s Live view.
Figure 4-19. To completely remove an underline from a link, set the CSS Text-decoration property to “none.” You can create a look similar to an underline (but with a lot more design choices) by turning underlining off here, and then using the CSS Border property to create a dotted, dashed, or different-color underline.
At the top of the Document window, click the Live button (or choose View→Live View).
Live view lets you preview the look (and functionality) of a web page directly in Dreamweaver. Dreamweaver includes an embedded version of the WebKit browser (which is pretty much the Chrome and Safari browser). With Live view, you can interact with JavaScript as well as view CSS hover effects. Move your mouse over the various links on the page, and you see the link change to dark green and the underline disappear. (Of course, Safari and Chrome aren’t Internet Explorer or Firefox, so you need to preview the page in those browsers, too, to make sure it looks good.
Click the Live button (or choose View→Live View) a second time to leave Live view.
You can’t edit a page in Live view, so you always need to click out of it when you’re ready to work on your page again. Now you’ll add a Spry menu bar.
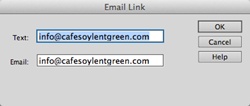
You’ll find an email address—info@cafesoylentgreen.com–at the bottom of the page. Clicking it, however, doesn’t do anything. Here’s how you turn that address into an email link that opens an email program when a visitor clicks the link:
Select the text “info@cafesoylentgreen.com.”
The text you select doesn’t have to be an email address. It could simply say “Email us.” Likewise, if you haven’t yet added any text, just click where you’d like to insert the email link and move on to step 2.
Choose Insert→Email Link (or click the Email link button under the common category of the Insert panel shown in Figure 4-7).
The Email Link window appears (Figure 4-20). Dreamweaver’s already filled out the text and email boxes.
Click OK.
Dreamweaver adds the email link (pretty easy, huh?).
One of Dreamweaver’s most exciting tools is the Spry Menu Bar. This sophisticated combination of HTML, CSS, and JavaScript lets you easily create slick-looking navigation bars with rollover effects and drop-down menus. Since the Dreamweaver engineers have done all the complex programming for you, you just have to insert, modify, and format the menu to make it fit perfectly into your website design.
Return to Dreamweaver and make sure you have the file index.html open; at the top of the page click just to the right of the word “Green” in the banner.
You’ll insert a horizontal menu bar that spans most of the page’s width. Placing it near the top of the page, as part of the banner, lets site visitors easily find and use it.
Choose Insert→Spry→Spry Menu Bar.
Alternatively, you could click the Spry Menu Bar button on the Layout tab of the Insert toolbar (Figure 4-14). Either way, the Spry Menu Bar window appears.
Choose the Horizontal option, and then click OK.
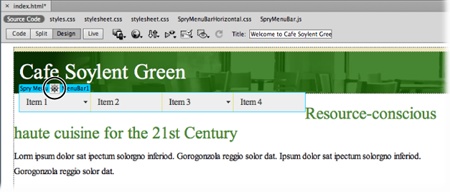
A gray menu appears at the top of the page with four buttons: Item 1, Item 2, Item 3, and Item 4 (see Figure 4-21).
Figure 4-21. What’s that strange ship’s steering wheel (circled), you ask? It’s called the Code Navigator. You use it to navigate to the CSS code that formats the current selection—it’s useful mostly to people of the “I love to edit raw CSS code” type. You’ll learn about it on page 397. (You can make the steering wheel go away: Click it to open the Code Navigator, and then turn on the “Disable navigator” checkbox. To bring the steering wheel back, aye captain, choose View→Code Navigator and turn off that same box.)
A window appears letting you know that Dreamweaver just added six new files to your site. Click OK to dismiss this window. Dreamweaver places these files inside a new folder named SpryAssets. You can see the folder listed in the Files panel, although you may need to press the “Refresh” button (the circle with an arrow tip) first.
You’ve probably noticed the menu bar pops out of the bottom of the green banner box; what’s worse is part of the second headline on the page, beginning with “Resource-conscious haute cuisine,” has moved to the right of the navigation bar. The CSS that positions the menu bar buttons side-by-side causes this effect (described in the box on Stopping Content From Wrapping Around a Menu). If you preview the page in a web browser (or click the Live button) you’ll see that, indeed, this is how the browser displays the page. What a mess. Fortunately there’s an easy solution.
In the CSS Styles panel, click the All button and locate SpryMenuBarHorizontal.css. Click the + button (flippy triangle on Macs) to display all the styles in the style sheet.
This is the external style sheet that Dreamweaver attached to the page, and that formats the Spry menu bar. While you’re at it, you should temporarily hide the styles in the styles.css—there’s no need to look at those styles now, since you’ll only be working on the menu bar for the rest of this tutorial. Click the minus icon (flippy triangle on Macs) next to the styles.css to collapse the list.
Double-click the first style in the SpryMenuBarHorizontal.css style sheet, ul.MenuBarHorizontal.
The CSS Rule Definition window appears. You need to set the display property for this element.
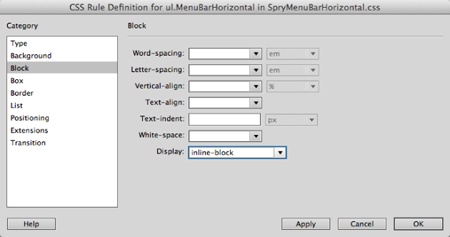
Select Block from the list of categories on the left. From the Display menu, choose “inline-block” (see Figure 4-22). Click OK to finish editing the style and close the CSS Rule Definition window.
Huh? Nothing’s changed. Unfortunately, Dreamweaver’s Design view doesn’t always display a page the same way that a web browser does. This is especially true when you use some CSS tricks of the trade, like this one. Click the Live button to see what a browser does with this new instruction—the banner expands to contain the menu, and the headline drops down. Click Live again to exit Live view.
The next step is to change the menu bar buttons’ labels, add new buttons, and create links.
Figure 4-22. The CSS Display property’s inline-block value is strange but useful. It takes any element and treats it like a block—that is, you can give it a height, set margins around it, and add padding to it, but inline-block doesn’t place the element on its own line. You can use inline-block in many creative ways; visit www.impressivewebs.com/inline-block/ and http://tinyurl.com/ycxwyq5 to see some examples.
In the document window, click the blue Spry Menu Bar tab, which appears just above the new menu.
If you don’t see that tab, move your mouse over the menu until it appears. (If you still can’t see it, see Figure 4-14 for a solution.) The Property Inspector displays the menu bar’s properties.
In the Property Inspector, select Item 1 from the left column of button labels; in the Text box, type Home (see Figure 4-23), and then press Enter (Return).
Notice that the first button now says “Home.” Now you’ll add a link.
To the right of the Link box, click the “Browse for File” button (the folder icon).
This is the same process you followed earlier to add a link to one of the sidebar paragraphs.
In the Select File window, click the Site Root button (top of the window in Windows, bottom right on Macs); double-click the index.html file.
You’ve labeled your first button and created the first link on this menu bar. Unfortunately, Dreamweaver has added a drop-down menu to this button with three additional buttons. Since the Home button isn’t really a “section” of the site with additional pages, you don’t need the submenu.
In the middle column in the Property Inspector, select item 1.1 and press the - (minus) button at the top of that column (circled in Figure 4-23).
Dreamweaver removes the top button from the list. If you look in the document window, you’ll see the drop-down menu. When you select an item in one of the submenu columns in the Property Inspector, Dreamweaver temporarily displays the drop-down menu. This is a great way to preview what the drop-down menu will look like.
If the Property Inspector no longer shows the properties for the Spry Menu Bar, just click the bar’s blue tab in the document window.
Repeat step 12 for Item 1.2 and Item 1.3.
After removing Item 1.3, notice that the down-pointing arrow on the Home button disappears. Because there’s no longer a drop-down menu associated with this link, Dreamweaver removes the arrow graphic. Now you’ll add another button.
Repeat steps 9–11 for Item 2: Change its label to Menu, and then link to the menu.html file located in the root folder.
The button’s text on the page changes. Next you’ll add a drop-down menu to this button.
Make sure you still have the Spry Menu bar selected (if not, click its blue tab) and that Menu is selected in the left column in the Property Inspector. Click the + button in the middle column to add a new button for the drop-down menu.
This adds a new menu item label, too, labeled “Untitled Item.” You just need to re-label and link it.
In the Text field, type Breakfast, and add a link to the file breakfast.html.
Now you’ll add one more button to this drop-down menu.
Click the + button in the middle column to add another button to the Menu drop-down menu. Label it Lunch, and then link it to lunch.html.
You’ll now add one last button for this menu.
Click the + button in the middle column to add another button. Label it Dinner, and then link it to dinner.html.
Now you’ll return to the main menu and change Item 3.
Repeat steps 9–11 for Item 3: Change its label to About Us, and then link it to about.html.
This button also has a drop-down menu, but instead of deleting it, you’ll just change the button labels to match the site.
In the middle column in the Property Inspector, select Item 3.1; change its label to Directions, and then link it to directions.html.
This button has its own drop-down menu (a sub-submenu), but you don’t need it here.
From the far right column in the Property Inspector, select and delete Item 3.1.1 and Item 3.1.2.
Use the same technique described in Step 12 (select the item, and then click the - button at the top of its column).
Repeat step 20 for Item 3.2. Label it Hours, and then link it to hours.html.
This drop-down menu has one extra button, but there’s no page on the site for this, so you’ll delete it.
Select Item 3.3 in the middle column and click the - button to delete it.
This site’s pretty simple, so that third button in the menu bar isn’t needed.
In the Property Inspector, select Item 4 from the left column and click the - button.
The fourth button disappears. You’re done! Thankfully, once you craft a navigation bar, you can reuse it throughout your site, so you don’t have to go through this laborious procedure for each page of your site. (Dreamweaver’s Template feature can make the process even easier, as described in Chapter 19.)
You can press the Live button to test the menu bar without leaving Dreamweaver. Make sure to click the Live button again when you’re done.
Choose File→Save All. Choose File→“Preview in Browser” and select your favorite browser from the list.
The browser opens with the index.html page displayed. Mouse over the buttons in the Spry menu bar and try the links. Unfortunately, only index.html actually has a menu.

You’ve built a menu that links to other pages in the site. The problem is that those pages don’t have the same navigation bar. Fortunately, Dreamweaver lets you copy and paste a Spry menu bar to another page.
Back on the index.html page, click the blue tab for the Spry menu bar, and choose Edit→Copy.
When you click the blue tab, Dreamweaver selects the HTML for the menu—a basic HTML unordered list.
Open the file about.html.
You can do this either by double-clicking the file name in Dreamweaver’s Files panel, or by choosing File→Open and navigating to about.html in the site’s root folder.
Click to the right of “Cafe Soylent Green” in the green banner and choose Edit→Paste.
Dreamweaver not only pastes the HTML for the menu bar, but also links to the external style sheet and JavaScript file that Spry requires, and adds some JavaScript code near the bottom of the page.
As discussed on Removing a Spry Menu, pasting a menu bar like this won’t always work. If the page you’re pasting into is in another directory of the site, any document-relative links (Absolute Links) you used in the menu probably won’t work.
Paste the menu bar into the other pages in the Files panel.
There are quite a few files, but make sure you paste the menu into enough files that you’re comfortable with the process.
Tip
What do you do if you need to change one of the links in the menu bar? Now that you’ve added the same HTML to many different pages, any changes you need to make, like adding or removing links, need to be reflected in every page. You have a couple of options: you could use Dreamweaver’s Templates feature discussed in Chapter 19. That lets you maintain one copy of the menu, and when you change it, Dreamweaver automatically updates all the pages on your site.
Second, you could use Dreamweaver’s powerful Find and Replace command (Chapter 20) to find the HTML for the old menu and replace it with the HTML for the new menu across your site; that lets you update all your pages in a matter of moments. Lastly, you could use the more technical “server-side includes” approach discussed on Extension Manager.
If you simply want to change the appearance of the menu bar, no problem. Since a single external style sheet controls the menu’s look, any changes you make to it will automatically apply to all your pages.
The basic look of a Spry menu probably doesn’t fit the design of your site, so learning to edit the CSS that Dreamweaver supplies is an important skill. In this part of the tutorial, you’ll edit the look of the buttons and drop-down menus, and replace the pre-made arrow graphics with custom images.
Start with the basic look of the buttons.
Make sure you have the CSS Styles panel open (Window→CSS Styles) with the All button at the top of that panel highlighted.
When you inserted the menu bar, Dreamweaver attached an external style sheet named SpryMenuBarHorizontal.css to the page. This style sheet contains all the styles you need to modify the look of the menu.
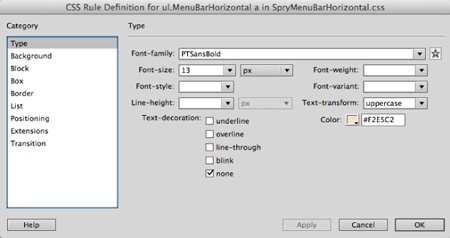
In the CSS Styles panel, double-click the style ul.MenuBarHorizontal a (it’s about halfway down the list of styles).
The CSS Rule Definition window opens, displaying the current settings for this style. This particular style is a descendent selector. You’ll learn about descendent selectors on Descendent Selectors, but in a nutshell, you read the style from right to left, with the rightmost element being the object of this style. In this case, the style applies to an <a> tag (a link), but only when the link is inside an unordered list (ul) that has the class MenuBarHorizontal applied to it. In other words, this style applies to every link inside the Spry menu bar. You’ll make some type changes first.
From the Font-family menu, select PTSansBold; in the Font-size menu, type 13; from the Text-transform menu, choose “uppercase;” and change the color to #F2E5C2.
The window should look like Figure 4-24. Next, you’ll change the background color of the buttons to green.
Click the Background category, and type #468531 for the background color.
The buttons will look better with thick, distinctive borderlines around them.
Click the Border category; for the top border, select “solid” from the Style menu, type 1 in the Width menu, and set the color to #F2E5C2.
Next, you’ll give the text inside a little breathing room.
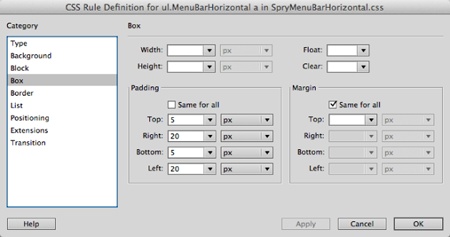
Click the Box category; change the Padding settings so that the top and bottom padding are 5px and the left and right padding are 20px each.
The window should now look like Figure 4-25. You can quickly set these values by typing in 5px (20px for the left and right padding), instead of typing 5 (or 20) in the first box, and then choosing px from the menu to the right.
Click OK to finish editing the style.
The text on the buttons looks pretty good, but the labels inside the main menu are short, so the buttons look too wide. They’d also look better if the buttons were spread out a bit.
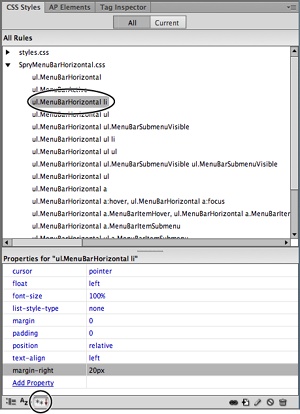
In the CSS Styles panel, select the ul.MenuBarHorizontal li style (circled in Figure 4-26).
Don’t double-click the style name or that’ll open the Style Definition window—you’ll use a quicker method to edit this style. Here’s another descendent selector style; it applies to every <li> tag (list item) inside the menu bar. For a quick edit to an already defined property, in the CSS Styles panel, you can use the Properties pane (it’s at the bottom of the CSS Styles window; you may have to extend it by hovering over it until your cursor changes to a double line, and then drag the border up). Notice that the style currently has a fixed width of “8em.” You’ll change that.
Click “8em” to the right of “width” in the Properties pane, and delete it.
This removes a set width for the buttons, and makes each button vary in width, just wide enough to hold its label and the left and right padding you set in step 6. You can also add a CSS property using the Properties pane.
At the bottom of the Properties pane, click the Add Property link; either type margin-right in the box or click the menu button and select “margin-right” from the list of CSS properties; press the Tab key, and then type 20px. Hit Enter (Return) to make your edits take effect.
The CSS Properties pane should look like Figure 4-26. You just added 20 pixels of space to the right side of each list item. This effectively spreads out the buttons, adding a bit of space between each. If you save and preview the page now (or press the Live button at the top of the document window), you see that the drop-down menus look a bit weird—there’s a strange border that doesn’t fit the buttons.
Figure 4-26. When you select a style name in the CSS Styles panel, all its properties appear in the Properties pane in the bottom half of the panel. To see only the properties currently set for the style, make sure you have the “set properties” button (bottom circle) pressed. Click any value (for example, “20px,” in the margin-right field here) to edit the CSS property.
Note
When setting a measurement (like width or height) in the Properties pane, you don’t have to type a value in the first field, and then use the measurements menu to select a value like px, em, or %. It’s faster to type the measurement value along with the number—for example, type 125px—and then hit Enter (or Return) to make the change stick.
In the CSS Styles panel, select the second ul.MenuBarHorizontal ul (about half way down the list of styles), and click the trashcan icon in the lower-right of the CSS Styles panel to delete it.
You can also delete this style by selecting it and pressing Delete. Make sure you select the second instance of the ul.MenuBarHorizontal ul style (yes, it appears twice in the style sheet). You can verify that this is the correct style by looking in the Properties pane of the CSS Styles pane: if you see just a single property, the Border property, you’ve selected the correct style.
If you preview the page now, you’ll see that the drop down menu’s top border appears below the bottom border of the main menu buttons. This double border doesn’t look great, so you’ll move the drop-down menu up 1 pixel.
Double click the remaining ul.MenuBarHorizontal ul style to (the fourth style in the SprymenuBarHorizontal.css stylesheet) open it in the CSS Rule Definition window. Click the Box category and change its width from 8.2em to 125px. Turn off the “same for all” box under the Margin settings and type -1px for the top margin. Click OK to finish editing the style.
Margins are the spaces between one element (or tag) and another. CSS allows negative margin values, so you can actually have one element move over another. In this case, the negative 1-pixel margin moves the drop-down menus up 1 pixel, so that their top border overlaps the bottom border of the main menu buttons. Lastly, you’ll adjust the width of the drop-down menu buttons themselves.
In the CSS Styles panel, select the style ul.MenuBarHorizontal ul li. Using the Properties pane, set the width to 125px. Set the top margin to -1px as you did in the previous step for the drop down menu.
This style, another descendent selector, applies to list items (the <li> tag), but only to list items that appear inside a <ul> tag that is itself inside a <ul> tag with the class MenuBarHorizontal applied to it. In other words, this style affects the buttons inside a drop-down menu.
Overall, the menu bar looks good and works well. There are just a few tweaks left. The rollover buttons don’t look so great—electric purple just doesn’t fit the look of the cafe.
In the CSS Styles panel, select the style that begins with ul.MenuBarHorizontal a.MenuBarItemHover (a little over half of the way down the list of styles).
You may need to expand the width of the Styles panel to see the full name of the styles: Drag the gray bar separating the document window and panel groups to the left. Actually, it’s a much longer group of selectors named “ul.MenuBarHorizontal a.MenuBarItemHover, ul.MenuBarHorizontal a.MenuBarItemSubmenuHover, ul.MenuBarHorizontal a.MenuBarSubmenuVisible,” but you’ll probably only be able to see the first part. Notice that, in the Properties pane, a background color and text color are set; you’ll change these.
In the Properties pane, select the #33C in the field to the right of “background-color,” and then type #F2E5C2; click the #FFF value next to “color,” and then type #333.
Alternatively, you could click the color box to the right of the Background-color property in the Properties pane: that opens Dreamweaver’s color picker and changes the cursor to an eyedropper. Mouse over the tan footer at the bottom of the page and click to select that color for the background. For the Color property, click the color box and select a dark gray color from the color picker. Now you’ll replace Dreamweaver’s default arrow graphics with arrows custom-made to match the Café Soylent Green site.
Open the Files panel (Window→Files) and expand the folder named NEW_NAV_IMAGES so you can see the two files inside it.
To expand the folder, click the + button (flippy triangle on Macs). The two image files in this folder have the same names as the ones Dreamweaver supplies. You can just drag these files into the SpryAssets folder to replace the old ones.
In the NEW_NAV_IMAGES folder, click one of the image files to select it, hold down the control key (⌘ key), and then click the other file. Once selected, drag them into the SpryAssets folder (see Figure 4-27).
Dreamweaver lets you know that you’re about to replace some existing files; that’s what you want to do, so click the “Yes to All” button.
Choose File→Save All Related Files; Press the F12 (Option-F12) key to preview the finished product.
Move your mouse over the buttons. The result should look like Figure 4-28 (you may need to press your browser’s Reload button to make it load the new graphics and revised external style sheet). (You can find a completed version of this tutorial in the Chapter04_complete folder that accompanied the downloaded tutorial files.)
Note
When you preview an unsaved page or a page that uses an external style sheet that’s opened and unsaved, Dreamweaver pops up an annoying “save these files” window. You must click Yes to see the newest version of the page. If you’re getting tired of this window, you can use the “Preview using temporary file” feature described on About This Book.
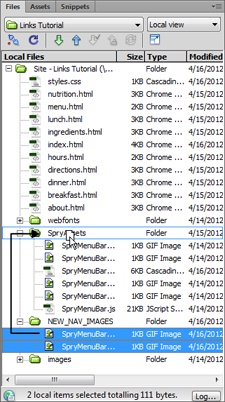
Figure 4-27. The Files panel offers more than just a list of files in a website. It also lets your rearrange, rename, and create web page files. You learned how to use the Files panel to manage your site’s files on page 49.
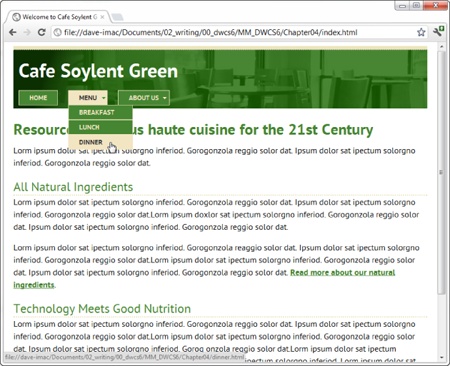
Figure 4-28. Adding a Spry menu may take quite a few steps, but it delivers a high-quality dynamic navigation bar and saves you countless hours of JavaScript programming and browser testing.
Tip
To get a full description of every Dreamweaver menu, see Appendix B.
Get Dreamweaver CS6: The Missing Manual now with the O’Reilly learning platform.
O’Reilly members experience books, live events, courses curated by job role, and more from O’Reilly and nearly 200 top publishers.

