Every website should have navigation links that let visitors quickly jump to the site’s main areas. On a shopping site, those links might point to the categories of products for sale—books, DVDs, CDs, electronics, and so on. For a corporate intranet, links to human resources, office policies, company events, and each department might be important. Whatever the site, a web designer should strive to get visitors where they want to go via the shortest route possible.
Dreamweaver CS6 includes a powerful and easy navigation-building tool—the Spry menu bar. With it, you can put all your site’s most important links into a compact horizontal or vertical menu (see Figure 4-13). Each button supports two levels of drop-down submenus, so a visitor can quickly jump to a page buried deep within your site.
The Spry Menu Bar is just one of the many “Spry” tools in Dreamweaver CS6. You’ll learn a lot more about what Adobe calls the Spry Framework in Chapter 13, but in a nutshell, Spry is a collection of advanced JavaScript programs that let you add lots of dynamic effects to your web pages. (If you’re familiar with the old Dreamweaver Behaviors, Spry is like those—on steroids.)
The first step in inserting a Spry menu is deciding where on the page to put it. A horizontal menu bar, with buttons sitting side by side, works well near the top of a page, either at the very top or below the area dedicated to a logo (often called a “banner”). A vertical menu bar, whose buttons are stacked one on top of the other, usually sits at the left edge of a page, below the banner area.
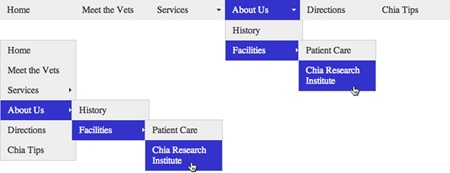
Figure 4-13. Dreamweaver’s Spry Menu Bar object lets you quickly add either a horizontal (top) or vertical (bottom) navigation menu to your website. Drop-down submenus let you cram loads of links into a small space. The menu can hold up to three levels of links. However, navigating the rat’s maze to reach a link in a sub-submenu is sometimes a tiring test of hand-mouse coordination.
In the document window, click the spot where you want to insert the menu.
You can add a Spry menu bar in either Design view or Code view. When you learn more about web page layout in Chapter 9, you’ll discover that most elements on a page—like graphics, paragraphs, and menus—go inside <div> tags, which you use to define the beginning and end of that element.
Click the Spry Menu Bar button in the Layout category of the Insert panel (Figure 4-14).
You’ll also find this button on the Spry tab of the Insert toolbar, or you can choose Insert→Spry→Spry Menu Bar. In any case, the Spry Menu Bar window appears, asking whether you want a horizontal or vertical bar.
Figure 4-14. The Spry Menu Bar button appears on the Insert panel. You can find it under both the Spry category or the Layout category of the Insert toolbar. Here, you can see the Spry category of the Insert panel in both Classic view (left) and the normal view (right). You’ll find information on Classic view in the Note on page 38.
Depending on the type of menu you want, choose either the Horizontal or Vertical radio button and then click OK.
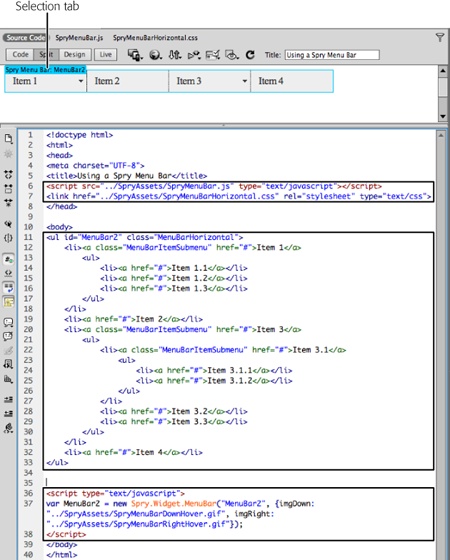
Dreamweaver inserts a “starter” menu containing a few links and drop-down menus (Figure 4-15). The blue tab that appears above the menu is the selection tab: click it to select the menu so you can change and add links using the Property Inspector (discussed next). If you can’t see the blue tab, make sure the “show invisible element” setting is on: Choose View→Visual Aids and make sure you have Invisible Elements checked and Hide All unchecked.
Figure 4-15. Under the hood in Code view, Dreamweaver inserts three chunks of code (outlined) when you add a Spry menu. The first attaches two external files to your page: a JavaScript file with the programming that makes the drop-down menus appear and disappear and an external style sheet with the CSS styles that format the menu buttons. The middle chunk is an HTML unordered list (the <ul> tag) which contains all the links that make up the menu items for the navigation bar; the last chunk is a couple of lines of JavaScript programming that gets the menu bar in shape when the page loads into a web browser.

The starter Spry menu that Dreamweaver inserts into your page isn’t very useful (unless you coincidentally have four sections on your site named Item 1, Item 2, Item 3, and Item 4). To make the menu your own, you need to re-label the buttons and link them to pages on your site; you can also add more buttons and assign links to each of them.
To edit the Spry menu, select it by clicking the blue Spry selection tab. Once selected, the menu’s labels and links appear in the Property Inspector (Figure 4-16).
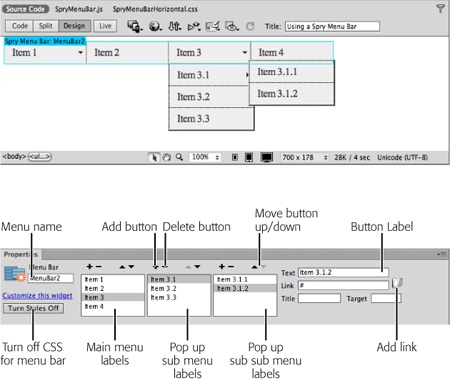
Figure 4-16. Dreamweaver provides a generic name for each Spry menu it inserts, like MenuBar1. There’s no harm in leaving that name (you’ll never see it on the page), but feel free to change it to something more descriptive, like mainNavigation. The only requirement is that you use only letters and numbers, and no spaces or punctuation (the naming rules are the same as those for class styles, as described on page 128).
A Spry menu supports up to three levels of menus. Dreamweaver always displays the main navigation buttons; each can have its own drop-down menu, which only appears when a visitor mouses over the button. And each button on the second level of menus (the first drop-down menu) can have its own drop-down menu (making it the third level of menus). The Property Inspector gives each level its own column (see Figure 4-16), and each column has its own set of controls so you can add, delete, and move menu buttons.
Note
JavaScript powers the Spry drop-down menus. While most people surfing the Web use browsers with JavaScript turned on, some either purposefully turn it off or use a browser that doesn’t understand it. That means that someone visiting your site might never see the options in the drop-down menus. Because of this slightly irksome fact, always make sure that the buttons on the main navigation menu link to a page that, in turn, links to the pages listed in the drop-down menus. If you don’t, some people won’t be able to visit some pages on your site.
To edit one of the main navigation buttons on a Spry menu, select the button’s label (for example, Item 1) in the left-hand column of the Property Inspector; in the Text box, type the label you want to appear on the navigation button (“Home” or “About Us,” for example). Then create the link using the “Browse for File” button or by typing the URL into the Link box (see Link From the Scorpio Page to the Horoscopes Page for more on setting links). You can leave the Title and Target boxes empty (see the box on Targeting and Titling Links for descriptions of these properties).
To add a button to the main menu, click the + button above the left-hand column. Dreamweaver inserts a new “Untitled Item” in the list of links. Change the button’s label in the text box, and then set a link using either method discussed in the previous paragraph.
To delete a button from the main nav bar, click its name in the left-hand column, and then click the minus-sign button (-) at the top of the column. You can also rearrange the order of the buttons by selecting a name from the list and clicking the up or down arrow (on a horizontal menu bar the up arrow moves the button to the left, while the down arrow moves the button to the right).
You add, edit, and arrange submenus the same way. Select the Spry menu (click the blue menu tab) and then, in the Property Inspector, select the menu item to which you want to add a submenu. For example, in Figure 4-16, to add another button to the drop-down menu that appears when a visitor mouses over the “Item 3” button, select Item 3 from the left-hand column, and then click the + button in the middle column. Dreamweaver highlights the new button, and you can delete and rearrange buttons in the submenu using the minus and up and down arrow buttons at the top of that menu’s column. To work with a sub-submenu (the third level of menus), first select an item from the left-hand column, and then click an item in the middle column.
Note
You can also edit a Spry menu’s text and links in the document window. The main nav buttons are always visible, so you can click inside one to edit the text or change the link. To see a drop-down menu in the document window, select the Spry menu (click the blue tab); in the first column of the Property Inspector, select a menu item that has a drop-down menu, and then select any button in the drop-down submenu list. That drop-down menu appears in the document window (as pictured in Figure 4-16). In fact, the menu won’t disappear (potentially covering other content on your page) until you select one of the other main nav buttons from the left-hand column in the Property Inspector.
When Dreamweaver inserts a Spry menu, it adds a bunch of files to your site. Dreamweaver places those files in a folder named SpryAssets in your site’s local root folder (a message listing the names of the files appears as soon as you save a page after inserting a menu). These files control the look and functionality of the menu: Dreamweaver adds one CSS file, one JavaScript file, and some image files (for the arrows used to identify buttons with submenus). When you eventually move your pages to a web server, make sure you upload these ancillary files as well.
Note
If you don’t like the folder name SpryAssets, or if you’d like to store these supporting files in a different folder, choose Site→Manage Sites to open the Manage Sites window, select your site from the list, and then click the Edit button. Doing so opens the Site Setup window (the one you used when you first defined the site).
Click Advanced Settings on the left side of the window. Click the Spry category, and then click the Folder icon to locate another folder on the site. If you select a new folder after you inserted a Spry object into a page, just drag the files from the SpryAssets folder to the new folder in the Files panel (the one you just told Dreamweaver to use for all Spry files). (See Adding Folders for more information on moving files using the Files panel.) You can then safely delete the empty SpryAssets folder.
The “direct from the manufacturer” look of Spry menus leaves something to be desired. The battleship gray buttons and vibrant, “Hey, look at me, I’m purple!” rollovers aren’t the most pleasing combination. Because Dreamweaver formats the menu with a collection of CSS styles, the power to improve the look of Spry menus is within your reach. Unfortunately, decoding Dreamweaver’s tangle of CSS requires a guidebook. Basically, the process involves identifying the name of the CSS style responsible for the format you want to change, and then editing that style using the basic techniques you learned on Manipulating Styles, or using one of the advanced methods discussed on Fast Style Editing with the Properties Pane.
Tip
You can preview the Spry menu bar—complete with interactive drop-down menus—by using Dreamweaver’s Live view. Click the Live button at the top of the document window or choose View→Live View. Now you can mouse over the menu and see its buttons highlight and submenus drop down. In other words, it’s just like viewing the page in a web browser. To leave Live view, click the Live button a second time, or choose View→Live View again.
For example, if you want to change the font that a menu uses, open the CSS Styles panel (Window→CSS Styles) and then click the All button to see all the styles available for a page. Dreamweaver stores the styles for menu bars in their own style sheets (SpryMenuBarVertical.css for vertical menu bars and SpryMenuBarHorizontal.css for horizontal bars). Expand the list of styles (click the + symbol to the left of the style sheet name in the CSS Styles panel), and then double-click ul.MenuBarVertical a (if you’re working on a vertical menu) or ul.MenuBarHorizontal a (for horizontal menus). This opens the Style Definition window for that style. You can then change the menu’s font (see Choosing a Font).
Note
The Spry menu bars are formatted using an external style sheet (Internal vs. External Style Sheets). If you edit the CSS of a Spry menu bar on one page, that change will apply to the Spry menu bar on every other page of your site.
Note
The strange style names Dreamweaver uses for Spry menus (ul.MenuBarVertical a, for example) are called descendent selectors. They’re an advanced type of CSS selector used to pinpoint very specific elements in a page. You can read about them on Descendent Selectors, but for now, here’s the ultra-quick cheat sheet for descendent selectors: Read them from right to left. The element on the far right is the element that Dreamweaver will ultimately style. In this example, it’s a link—the “a” represents the <a> tag used for the links in the navigation bar. The “ul.MenuBarVertical” part specifies an unordered list (<ul>) that has a class MenuBarVertical applied to it. So running that selector through the universal translator produces this instruction: “Format every <a> tag that appears inside a bulleted list with the class MenuBarVertical like this….” In other words, only the links inside the Spry menu bar are affected by this style.
Spry menus offer two types of button: one for a regular menu item, and one for a submenu item (see Figure 4-17). A regular menu item is a button without a drop-down menu attached; a guest clicks the button and goes to a new page. A submenu button is any button that produces a drop-down menu when a visitor mouses over it. In addition, these two button types each have two looks: the button as it sits on the page, and the button as your guest mouses over it (its rollover look).
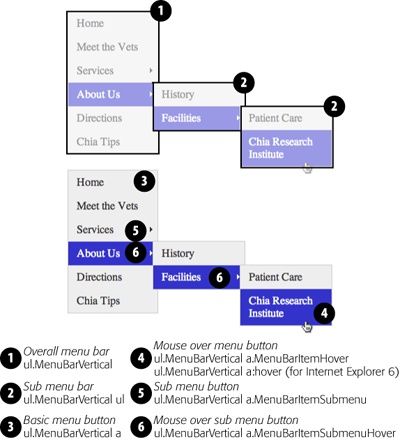
Figure 4-17. It takes quite a few CSS styles to make Dreamweaver’s Spry menu look good. Labeled here are the main styles for formatting the unordered lists that make up the overall menu, the drop-down menus (top), and the individual buttons (bottom). Sometimes you want to change the look of an entire menu and not just a single button. For example, you might want to add a border around all four edges of the main menu. In that case, edit the ul.MenuBarVertical style (or ul.MenuBarHorizontal for a horizontal menu). The ul.MenuBarVertical ul style or ul.MenuBarHorizontal ul style controls a drop-down menu’s overall look and placement.
Note
A submenu button can also be a link. For example, say you had a button labeled Animals; rolling over that button makes another menu appear with three other buttons—Dogs, Cats, Camels. The Animals button can be both a link—leading to a page about animals—and the “trigger” that makes the drop-down menu appear.
You can define the look of a regular menu button, and simultaneously set the basic look for all the menu bar buttons, by editing the ul.MenuBarHorizontal a style (for a horizontal menu) or ul.MenuBarVertical a style (for a vertical menu). Just double-click the style’s name in the CSS Styles panel to edit it.
You can set any of the CSS text properties discussed on Aligning Text, such as font, font size, and font color. All the buttons will share these settings (except font color, because it always changes when a visitor rolls her mouse over any button—if you want to use the same font color in that instance, you need to specify that color in the styles discussed in the next section).
In addition, this style controls the background color of both regular buttons and submenu buttons. To change the background color, edit the appropriate style (for example, ul.MenuBarVertical a for a vertical menu) and change the background color option found under the Background category of the Rule Definition window.
You can also add border lines to the buttons—for example, a line separating each button—by setting the border properties for the style (see Adding Borders for more on CSS borders). Set the padding (Understanding the Box Model) to control the space between the text on a button and the edge of the button. To make the text appear close to the edges of the button, decrease the padding; to place empty space around the text, increase the padding.
Note
If you add a horizontal menu bar, you may run into one particularly frustrating problem: That’s when a column of your page, which should appear right below the menu bar, actually appears much further down the page, usually beneath another column, such as a sidebar. This problem only appears under unusual circumstances—when you use CSS-based layouts with the Float property and when one of the menu buttons is taller than the others (and even then you won’t always see the problem). The dreaded “float drop” (no joke) causes this problem, and you’ll find a solution on “Avoiding ‘Float Drops’” on Avoiding “Float Drops”.
Visitors get instant feedback when they interact with a Spry menu. Moving the mouse over a menu button changes the color of the button and its text, letting visitors know “Hey, I’m a link, click me!” The rollover buttons Dreamweaver creates have a purple background and white text, but you can change those settings by editing either the ul.MenuBarVertical a.MenuBarItemHover or the ul.MenuBarHorizontal a.MenuBarItemHover style (depending on whether you inserted a vertical or horizontal menu).
Note
If you’re worried about Internet Explorer 6, you must edit a separate style—ul.MenuBarVertical a:hover or ul.MenuBarHorizontal a:hover—to achieve a hover effect for menu button. Since IE 6 is quickly disappearing, you might not bother.
Locate a style in the CSS Styles panel, and double-click it to edit it. Dreamweaver-created styles only set text color and background color properties, but you’re free to change any CSS property. For example, if you added border lines between buttons in the menu bar, you could alter the color of those lines for the rollover button. Or you could make text appear bold when a guest hovers over a button.
Note
The name of the style used for rollover menu buttons is actually a combination of three different selectors and is so long that its full name doesn’t even fit in the CSS Styles panel: “ul.MenuBarHorizontal a.MenuBarItemHover, ul.MenuBarHorizontal a.MenuBarItemSubmenuHover, ul.MenuBarHorizontal a.MenuBarSubmenuVisible” (the name will be slightly different for a vertical menu). This peculiar style is called a group selector. It’s an efficient way to apply similar formatting rules to multiple elements on a page (see Styling Groups of Tags for an explanation of group selectors).
Submenu buttons (the buttons that produce a drop-down menu when a guest mouses over them) look nearly identical to other menu buttons. In fact, the two styles mentioned above, which control a menu in its normal and rollover states, define the basic formatting for submenu buttons as well. The only visible difference is the small arrow that appears on the right edge of a submenu button (see Figure 4-17). It visually indicates the presence of a drop-down menu; it’s a kind of “there’s more this way” icon.
You can replace the graphics Dreamweaver uses for submenus: they’re named SpryMenuBarDown.gif, SpryMenuBarDownHover.gif, SpryMenuBarRight.gif, and SpryMenuBarRightHover.gif. (You’ll find the two “down” arrow graphics only in horizontal menus.) Create your own arrow graphics (in GIF format) with the same names and replace the original graphics files, which are located in the SpryAssets folder (unless you changed the name and location as described in the Tip on Tip). The graphics should be small enough to be visible in the menu buttons—the ones that Dreamweaver supplies are 4 x 7 pixels (right arrow) and 7 x 4 pixels (down arrow)—and you should include versions for both the normal and roll-over states of the submenu button.
Tip
You can permanently replace the arrow graphics Dreamweaver uses with your own. First, go into the Dreamweaver configuration folder. In Windows, you’ll find them at C:\Program Files\Adobe\Adobe Dreamweaver CS6\configuration\Shared\Spry\Widgets\MenuBar; on Macs you’ll find them in Applications→Adobe Dreamweaver CS6→Configuration→Shared→Spry→Widgets→MenuBar. Make sure your graphic files have the exact same names as those Dreamweaver uses. (The CSS files that provide the basic styles for the Spry menu bar are also in this folder, so you could even edit these if you wanted a different set of “starter styles” for your menus—just make sure to back up the original CSS files!)
If you want to further customize the submenu buttons’ appearance (for example, to change the font just for submenu buttons), edit either the ul.MenuBarVertical a.MenuBarItemSubmenu or ul.MenuBarHorizontal a.MenuBarItemSubmenu style. The ul.MenuBarVertical a.MenuBarItemSubmenuHover style controls the rollover state for submenu buttons in vertical menus; for horizontal menus, it’s ul.MenuBarHorizontal a.MenuBarItemSubmenuHover.
Spry menu buttons have preset widths. The main navigation buttons are each 8 ems wide, while the buttons on drop-down menus are 8.2 ems wide (see Changing the Font Size for information on ems). If your navigation buttons have a lot of text on them, 8 ems may be too narrow to fit everything in. Or, 8 ems may be too much space if the menu text is small and made up of short words like “Home,” “About,” and “Contact.” You can adjust the width of buttons and menus by opening the appropriate CSS Style (discussed next) and adjusting the style’s width property. For example, double-click the style name in the CSS Styles panel, and then change the width property in either the Box or Positioning categories of the CSS Rule Definition window. (The CSS Properties pane provides an even quicker method, as discussed in Figure 4-18.)
Here are the settings you can edit:
Main menu width. The ul.MenuBarVertical style sets the overall width of a menu. (Setting the width of a horizontal menu has no effect, since the width of a horizontal menu is determined by the number of buttons on the menu.) For a vertical menu bar, use the same width for the menu as you do for the button (discussed next).
Main menu button width. The width of the buttons that appear on the main Spry menu are determined by the ul.MenuBarVertical li style or ul.MenuBarHorizontal li style. You may want the button to be just as wide as the text inside it—in other words, have buttons of different widths based on the amount of text in the button’s label. For this effect, set the width of this style to auto. Variable-width buttons look good for horizontal menus, but not for vertical menus, where the staggered right edges of the column of buttons looks uneven and distracting.
Drop-down menu width. Control the overall width of drop-down menus with the ul.MenuBarVertical ul or ul.MenuBarHorizontal ul style. The width you set for this style should match the width of the drop-down menu buttons, covered next.
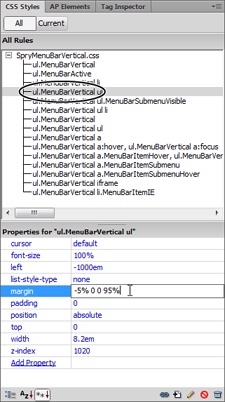
Figure 4-18. Dreamweaver’s CSS style sheet for Spry menus lists the drop-down menu style—ul.MenuBarVertical ul, in this case, ulMenuBarHorizontal ul for horizontal menus—twice. The first one listed (circled) controls the positioning of the drop-down menu. The second one controls the border around it (why two? Great question, for which nobody except Adobe has an answer—and they’re not telling.) Double-click the style to edit its properties using the Rule Definition window. For a really quick edit, like changing the position of a drop-down menu by adjusting its margin property, you can use the Properties pane of the CSS Styles panel (pictured in the bottom half of this image). Just select the current value for the property and type in a new value. For example, in this image, clicking the “-5% 0 0 95%” value (which represent the top, right, bottom, and left margin values, respectively) to the right of the word “margin” lets you type in a new value: 0 0 0 100%, say. You’ll learn to edit using the Properties pane on page 382.
Drop-down menu button width. The ul.MenuBarVertical ul li and ul.MenuBarHorizontal ul li styles control the width of the drop-down menu buttons on the vertical and horizontal menu, respectively. Dreamweaver’s normal setting is 8.2 ems, but you can adjust this to create wider or narrower buttons.
Note
If you want to add space between buttons in a horizontal menu bar, add some left or right margin to the ul.MenuBarHorizontal li style. You then have to set that same margin (left or right) for the ul.MenuBarHorizontal ul li style to 0, so that the margins on the drop-down submenus aren’t affected.
The drop-down menus on vertical menu bars overlap the button that opens them (see Figure 4-17). This stacking appearance gives the menu a 3-D look, as if the drop-down menu really were popping out of the page. However, you may want the drop-down menu to appear directly next to the menu button, or to overlap it even more dramatically.
To change the position of the menu, edit the ul.MenuBarVertical ul (or ul.MenuBarHorizontal ul) style. The CSS margin property controls the placement of the menu. For a vertical menu, the drop-down menu has a -5% top margin; this places the top of the drop-down menu a little above the submenu button that triggers it. The left margin is set to 95%, which moves the drop-down menu to the far right of the submenu button. To make the drop-down menu appear directly to the right and aligned with the top of the submenu button, change the top margin to 0 and the left margin to 100%. To make the drop-down menu overlap even more, you could change -5% to -10% for the top margin, and 95% to 85% for the left margin.
A horizontal menu’s drop-down menu appears directly below the submenu button that triggers it. Its margin setting is 0. If you wish to make that menu overlap the submenu button, change the top margin to -5% and the left margin to 5%.
To get rid of a Spry menu, select it (for example, click the blue tab shown in Figure 4-15), and then press the Delete key. In addition to removing the HTML for the menu, Dreamweaver also—as long as there are no other Spry menus on the page—removes the menu’s linked external style sheet and JavaScript file.
Of course you’re not just going to create a Spry menu for a single page. Spry menus are intended to act as global navigation for an entire site (or least a significant subsection of a site), and so should appear on most if not all of your site’s pages. There are a couple ways you can reuse a Spry menu once you create it:
Copy and paste. If you click the blue tab of a Spry menu, you’ll select its HTML in Code view; however, Dreamweaver’s smart enough to know that there’s more than just HTML needed to make a Spry menu. When you copy the menu (Edit→Copy), open another page, click in that page, and choose Edit→Paste, Dreamweaver not only pastes the HTML for that menu, it also adds the necessary code to link to the external style sheet and JavaScript files, as well as the JavaScript code that makes the menu work.
One downside to this method is that Dreamweaver doesn’t make sure the links will work when you paste the menu into another page. In other words, if you paste the menu into a page that exists in a directory other than the one housing the page you copied the menu from, the menu links probably won’t work. Remember that document-relative links (Absolute Links) describe the path from the current page to the linked-to page, so the path from page A to page B may not be the same as the path from page C to page B if pages A and B are in different directories. To get around this, you could start with a “flat” file setup—that is, don’t create any subfolders for your site and place all your web pages in the root directory. That way, a document-relative path to a page in the site will be the same for all pages in the site. After you finish building the site, you could create subfolders and move your files around, letting Dreamweaver update all of the links so they continue to work (see Managing Files and Folders with the Files Panel for instructions on using the Files panel to organize site files).
Tip
If your Spry menu bars have broken links, use Dreamweaver’s Check Links Sitewide tool to fix them (see Find and Fix Broken Links). For example, if you copy a Spry menu and paste it in another page, inadvertently placing it in a page in a subfolder (essentially breaking the links for that menu), you can have Dreamweaver identify and help fix them with this handy site-management tool.
Use Save As. Another approach is to build a page for your site, complete the Spry menu, and then choose File→Save As to save a copy of that file. You can continue to use the Save As command to populate the rest of your site. The downside of this approach is that you need to build your menu before you build your pages, and that means you can’t create links using the Browse for File technique you learned in this chapter (that tool assumes the linked-to pages already exist in your site). Instead, you’ll need to figure out ahead of time how many pages you want and what you’ll name their files, and you need to manually type the links as you build the menu bar. This is a labor-intensive approach that’s prone to typos.
Use Dreamweaver templates. Dreamweaver’s Template feature, described in Chapter 19, is a great aid in building multi-page websites that use consistent design elements. Templates let you build pages that share common elements, like a layout, footer, banner, and, yes, navigation bars. With a template, you can manage your Spry menu bar from a single file—the template file. When you change a template file, like adding a button to a Spry menu bar or changing a link in a menu bar), Dreamweaver automatically passes those changes on to the other pages in the site.
Note
Dreamweaver has another site management feature called Library items (Chapter 18), which seem like they’d work great for managing Spry menu bars. They’re intended to hold chunks of HTML that you want to reuse throughout a site. But Spry menu bars are more than just a chunk of HTML—they also require JavaScript and links to CSS and JavaScript files to work, so you can’t make a Spry menu a Library item.
Get Dreamweaver CS6: The Missing Manual now with the O’Reilly learning platform.
O’Reilly members experience books, live events, courses curated by job role, and more from O’Reilly and nearly 200 top publishers.

