Whenever you build a new website or want to edit an existing one you created elsewhere, you have to introduce Dreamweaver to it—a process called setting up a site. This is the most important first step when you start using Dreamweaver, whether you plan to whip up a five-page website, build a thousand-page online store, or edit the site your sister built for you. At its most basic, defining a site lets Dreamweaver know where you store your web pages on your computer, and makes sure Dreamweaver correctly inserts images and adds links to the pages of your site. In addition, if you want to take advantage of Dreamweaver’s many timesaving site management tools, such as the link checker (see Capturing JavaScript interactivity), Library items (Chapter 19), Templates (Chapter 20), and FTP tool for moving your web files to a web server (Chapter 18), you have to set up a site.
Note
Dreamweaver CS5 introduces a completely revamped site setup procedure. If you’re a longtime Dreamweaver user, you’ll find the "Site Definition Wizard” gone, and that basic site setup is easier. However, you’ll also find some changes—such as setting up a connection to your web server or to a testing server—that are more confusing to use (when you’re ready to upload files to your web server turn to Chapter 18).
There are a lot of ways to configure your site, depending on your needs. For example, if you’re ready to move web pages to the Web, you need to tell Dreamweaver how to connect to your web server. But you only need to do a couple of things to get started using Dreamweaver effectively:
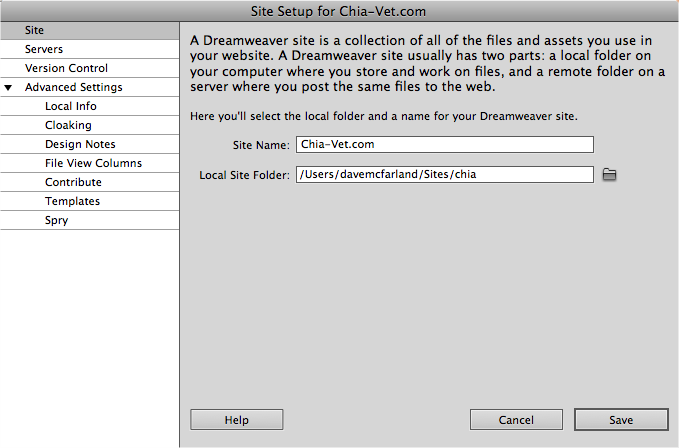
Choose Site→New Site to open the Site Setup window (see Figure 1-12).
You only need to provide a couple of pieces of information.
In the Site name field, type a name for your site.
The name you type here is solely for your own reference, to help you identify the site in Dreamweaver’s Files panel; it won’t appear on the Web.
Click the folder icon to the right of the Local site folder field.
The Choose Root Folder window opens, where you choose a folder on your hard drive that will serve as your local site’s root folder. This is a folder on your computer where you’ll store all of your site’s files—the HTML documents and graphics, CSS files, and other web files that make up your website.
Note
Another way to think of the local site folder: It’s the folder on your computer in which you’ll put your site’s home page.
Figure 1-12. The Site Setup window lets you tell Dreamweaver about your site—where you store your files, how to connect to your web server so you can upload files to the Internet, and so on. To get started, you only need to provide the two pieces of information in this window. You’ll find the other categories discussed later in the book: the Servers category lets you connect to a web server to upload files to your website (Chapter 18) and point Dreamweaver to a “testing server” for complex, database-driven websites (Part Six); the Version Control category is for those using the (very complex) Subversion system (most people—the author of this book included—never use this option, but if you’re curious, see the box on page 713 for more information). You’ll find the Advanced settings discussed in step 5 below and elsewhere in this book.
Browse to and select a folder for your site’s files.
Figure 1-13 demonstrates the process for Windows and Macs. If you’re editing an existing site, select the folder that contains the site’s files. If you’re creating a new site, create a folder for that site using the New Folder button in this window.
For a few additional options, select Advanced from the left-hand list of setup categories (see Figure 1-14).
This step is optional and you can happily skip it to begin building web pages. You’ll find most of the categories in the Advanced Setting category discussed elsewhere in the book, but you may want to visit the options in the Local Info category:
The Default Images folder field lets you select (or create) a folder inside your site folder that holds the images you’ll use on your web pages. Choosing an images folder is useful only if you tend to add images from outside your site folder—for example, if you have images sitting on your desktop or in another folder on your hard drive. If that’s the case, Dreamweaver automatically copies those files to the images folder you specify here. (Dreamweaver will still copy image files to your site without setting this option, but each time you add an image from outside your site folder, you have to tell Dreamweaver where to save the file. But, if you’ll primarily use images saved somewhere in your site, skip this setting.)
The Links relative to setting determines how your pages link to other files within your site: for example, how Dreamweaver writes links to other pages in your site, links to images in your site, and links to external files, like Cascading Style Sheet files, Flash movies, and so on. Unless you’re an experienced web designer, stick with the normal, “Document” setting here—you can read about the difference between (and uses for) Document and Site Root relative links on Understanding Links.
Type the web address for your site in the Web URL box: for example www.chiat-vet.com/. If you don’t yet have a web address, then you can leave this blank. In some cases, you may need to add some more information after the domain name. For example, the address for your website might look something like this: www.somecollege.edu/~bob. Or you might be responsible for maintaining just part of a larger site—sometimes called a “sub site.” Regardless, just type the address you normally type into a web browser to visit your site. For example, www.mybigcompany.com/marketing/.
Leave the Case-sensitive links checking box unchecked. This is useful only when you have web pages and files on a Unix server that allows files with the same name but different letter cases: for example, HOME.html, home.html or HoMe.html. Since Macs and Windows machines don’t let you do this, you’ll probably never have a site that has files named like this.
Keep the Enable Cache box checked. Dreamweaver creates a site cache for each site you set up. That’s a small database that tracks pages, links, images, and other site components. The cache helps Dreamweaver’s site management tools avoid breaking links, lets Dreamweaver warn you when you’re about to delete important files, and lets you reorganize your site quickly. The only reason to uncheck this box is if you have a really large website (tens of thousands of pages and images) and you notice that Dreamweaver is really slow whenever you begin to work on the site, move a file, change a file’s name, delete a file, or perform one of Dreamweaver’s other “site management” tasks. In that case, you may see a box saying “updating the site cache” or “checking links” that stays open and prevents you from using Dreamweaver for a minute or more—basically your site is so big that Dreamweaver has to spend a lot of time keeping track of your files and links.
Click the Save button to finish the site setup process.
Your site’s files (if there are any yet) appear in the Files panel. Now you’re ready to create web pages and take advantage of Dreamweaver’s powerful site-building tools.

Note
Dreamweaver lets you set up multiple websites at a time, a handy feature if you’re a web designer with several clients, or if your company builds and manages more than one site. To define an additional site, choose Site→New Site and then repeat the steps starting on Setting Up a Site. You can then switch from one site to another using the Sites menu in the Files panel (see Figure 16-6, later).
Get Dreamweaver CS5: The Missing Manual now with the O’Reilly learning platform.
O’Reilly members experience books, live events, courses curated by job role, and more from O’Reilly and nearly 200 top publishers.

