After all your hard work developing with Dojo, there comes a point when your application is ready for prime time. Util provides terrific build tools and a testing framework that can get you ready for production before you know it. The build tools provided by Util are the same ones that are used to produce each official Dojo release, and the Dojo Objective Harness (DOH) is a unit-testing framework that facilitates achieving some automated quality assurance before your app ever gets out the door.
For any production setting, minimizing the overall footprint of
your JavaScript files and the number of synchronous requests to the
server is absolutely essential. The difference in downloading scores
of individual resource files via synchronous requests incurred by
dojo.require versus one or two
calls back to the server makes all the difference in the world in
terms of a snappy page load.
Dojo's build tools makes accomplishing what may initially seem like such an arduous task quite easy. In a nutshell, the build tools automate the following tasks:
Consolidates multiple modules into a single JavaScript file called a layer
Interns template strings into JavaScript files, including layers, so that a standalone template is no longer needed
Applies ShrinkSafe, a JavaScript compressor based on Rhino, to minify the size of the layers by removing whitespace, linebreaks, comments, and shortening variable names
Copies all of the "built" files into a standalone directory that can be copied and deployed to a web server
One reason you may not have been aware of the build tools is that they aren't included in the util directory of an official release. To get them, you have to download a source release (a source release will have the -src suffix on the file base part of the filename) or just grab the source from the Subversion trunk. Chapter 1 provides an overview of getting the Dojo from Subversion, but basically, all that is necessary is to point your client at the Dojo repository and wait for it to download everything, whether it is the trunk or a specific tag.
In either case, you'll find that the util directory now holds some additional directories; one of these directories is buildscripts, which contains the goods we're looking for.
Tip
http://svnbook.red-bean.com/ contains the unofficial Subversion book, which is available in a variety of formats. Taking a moment to bookmark this valuable resource now will save you time later.
To run the build tools, you'll have to have Java 1.4.2 or later installed, available from http://java.sun.com (because ShrinkSafe is based on Rhino, which is written in Java). But don't worry about having to be a Java programmer to use ShrinkSafe; ShrinkSafe comes packaged as a single jar file (an executable Java archive), so you can treat it like any other executable.
The primary entry point for kicking off a build is via the buildscripts/build.sh (or build.bat for Windows users), and is really just a call through to the custom Rhino jar that does all of the work based on a custom profile that is provided (more on that in just a moment). As an ordinary executable, however, build tools such as Make or ant can easily include the jar file as an ordinary part of the production build process. This ability is especially convenient when server-side components are based on languages that must be compiled.
Executing the corresponding build script or executing the jar without any command-line options provides an impressive list of options. Table 16-1 is adapted directly from the standard option list that is displayed.
Table 16-1. Build script parameters
Option | Description |
|---|---|
| If the |
| Specifies how to
optimize CSS files. If |
| The name of the release. A directory inside releaseDir will be created with this name. By default, this value is dojo. |
| The set of locales to
use when flattening i18n bundles. By default this value is
|
| The top-level release directory where builds end up. The releaseName directories will be placed inside this directory. By default, this value is ../../release/. |
| Turn on or off
copying of test files. This value is |
| Inserts function
symbols as global references so that anonymous functions
will show up in all debuggers (especially in IE, which does
not attempt to infer function names from the context of
their definition). Valid values are |
| The build action(s)
to run. Can be a comma-separated list, like |
| Turn on or off for
widget template file interning. This value is |
| Change the default
dojo, dijit, and
dojox scope names to something else.
Useful if you want to use Dojo as part of a JS library, but
want to make a self-contained library with no external
dojo/dijit/dojox references. Format is
a string that contains no spaces, and is similar to the
scopeMap: [[\"dojo\",\"mydojo\"],[\"dijit\",\"mydijit\"], [\"dojox\",\"mydojox\"]] |
| Specifies how to
optimize module files. If |
| The type of dojo
loader to use. |
| Sets the logging
verbosity. See
util/buildtools/jslib/logger.js for
possible integer values. The default value is |
| A file path to the
profile file. Use this if your profile is outside of the
profiles directory. Do not specify the |
| If the |
| The build will be
stamped with this version string. The default value is
|
| The name of the
profile to use for the build. It must be the first part of
the profile file name in the profiles/
directory. For instance, to use
base.profile.js, specify |
| Specifies how to
optimize the layer files. If |
| If the |
| You can use |
| A comma-separated
list of layer names to build. Using this option means that
only those layers will be built. This helps if you are doing
quick development and test cycles with layers. If you have
problems with this option, try removing it and doing a full
build with |
| Inserts function
symbols as global references so that anonymous functions
will show up in all debuggers (especially IE, which does not
attempt to infer function names from the context of their
definition). Valid values are |
| Burns a scopeDjConfig={isDebug:true,scopeMap:[[\"dojo\",\"mydojo\"],
[\"dijit\",\"mydijit\"], [\"dojox\",\"mydojox\"]]}
Note that the backslashes are required to avoid shell escaping if you type this on the command line. |
While all of those options may seem like a lot to manage, the routine builds are really quite simple and involve only a handful of options. But first, we need a profile.
A profile is the configuration for your
build as provided via the profile
or profileFile option. The most
basic function of a profile is to specify the exact Dojo resources
that should consolidated into a standalone JavaScript file, also
known as a layer; a typical rule of thumb is
that each page of your application should have its own layer. The
beauty of a layer is that it is an ordinary JavaScript file, and can
be included directly into the head of a page, loading everything
you've crammed into it via a single synchronous request to the
serverâwell, sort of. By convention, Base is so heavily used that it
generally stays in its own individual dojo.js
file, so you normally have two synchronous calls, one for Base, and
one for your own layer.
Assuming your application has three distinct pages, you might have three layer files and one copy of Base.
Tip
If you really want to bundle up your own modules inside of the dojo.js file that normally only contains Base, you can name your layer dojo.js. However, it's often a good idea to keep Base separated because it would be used in every page of you application and is cacheable by your web browser.
Physically speaking, a profile is simply a file containing a
JSON object. Example 16-1 shows a
profile that consolidates several of the form dijits that are
explicitly dojo.required into a
page. All internal dependencies are tracked down automatically.
Just like with dojo.require,
you state what you need to use directly, and dependency tracking
is automated behind the scenes for you.
Example 16-1. A simple build profile
dependencies ={
    layers:  [
        {
            name: "form.js",
            dependencies: [
                "dijit.form.Button",
                "dijit.form.Form",
                "dijit.form.ValidationTextBox"
            ]
        }
    ],
    prefixes: [
        [ "dijit", "../dijit" ]
    ]
};
Assuming the previous profile is located at util/buildscripts/profiles/form.profile.js and you're working in a Bash shell, the following command from within the util/buildscripts directory would kick off a build. Note that the profile option expects profiles to be of the form <profile name>.profile.js and only expects the <profile name> as an option:
bash build.sh profile=form action=release
Tip
If you don't want to save the file in
util/buildscripts/profiles/form.profile.js,
you can use the profileFile
option instead of the profile
option.
After executing the command, you should see a bunch of output indicating that the build is taking place and that of strings are being interned from template files into JavaScript files. The artifact of the build is a release directory containing dojo, dijit, and util. Inside of the dojo directory, you'll find the usual suspects, but there are four especially important artifacts to note:
The compressed and uncompressed version of Base, dojo.js and dojo.js.uncompressed.js
The compressed and uncompressed version of your form layer in form.js and form.js.uncompressed.js (go ahead and take a peek inside to see for yourself)
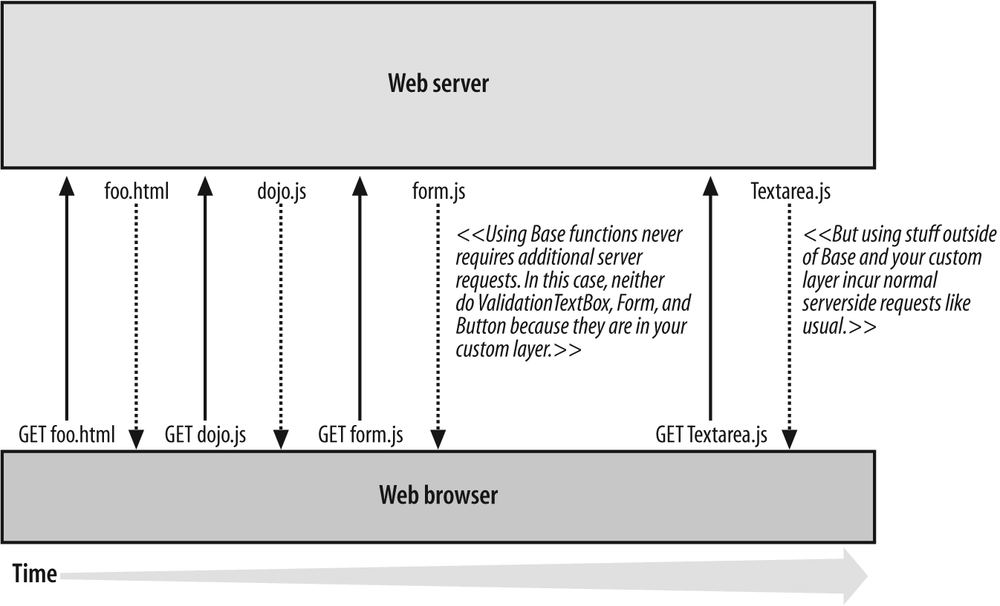
But what if you need resources that are not included in your
custom layer file? No problemâif resources aren't included in a
profile, they are fetched from the server whenever the dojo.require statement that specifies
them is encountered. Assuming you take the entire release
directory and drop it somewhere out on your server, the dojo.require statements requesting
nonlayered resources will behave normally, though you will incur a
small roundtrip cost for the request to the server.
Requests for Base functions and resources in your layer do
not incur server-side requests when they are encountered in a
dojo.require statement because
they're already available locally. Resources not in your layer,
however, incur the routine overhead of synchronous HTTP requests
(Figure 16-1).
While you may generally want to include every possible
resource that is needed in a build, there may be some situations
where you want to lazy load. The tradeoff is always between a
"small enough" initial payload size over the wire versus the cost
of synchronous loading via dojo.require later.
Warning
If you accidentally misspell or otherwise provide a
dependency that does not exist, ShrinkSafe may still complete
your build even though it could not find all of the
dependencies. For example, if you accidentally specify dijit.Button (instead of dijit.form.Button), you'll most likely
still get a successful build, and you may not ever notice that
dijit.form.Button wasn't
bundled because a call to dojo.require("dijit.form.Button")
would fetch it from the server and your application would behave
as normal.
It's always a good idea to double-check your build by taking a look at the Net tab in Firebug to ensure that everything you expect to be bundled up is indeed bundled up.
A slightly more clever way to set up the build profile just discussed is to create a custom module that does nothing more than require in all of the resources that were previously placed in the layer via the profile file. Then, in the profile file, simply include the custom module as your sole dependency for the layer.
First, Example 16-2
shows how your custom module would look. Let's assume the module
is dtdg.page1 and is located at
called dtdg/page1.js.
Example 16-2. A custom module for a more clever build profile
dojo.provide("dtdg.page1");

dojo.require("dijit.form.Form");
dojo.require("dijit.form.Button");
dojo.require("dijit.form.ValidationTextBox");
Now, your profile need only point to the custom module, as the other dependencies are specified inside of it and will be tracked down automatically. Example 16-3 demonstrates an updated profile, which assumes your custom module directory is a sibling directory of util.
Example 16-3. Updated build profile
dependencies ={
    layers:  [
        {
            name: "form.js",
            dependencies: [
                "custom.page1"
            ]
        }
    ],
    prefixes: [
        [ "custom", "../custom" ]
    ]
};
Finally, your page might contain the following SCRIPT tag to pull in the module along
with Base:
<script type="text/javascript"
djConfig="baseUrl: './',modulePaths: {custom:'path/to/custom/page1.js'},
    require: ['custom.page1']"
src="scripts/dojo.js"></script>Notice that the util/buildscripts/profiles directory contains a number of example build profiles as well as the standard.profile.js file that contains the layers for a standard build of Dojo. The standard profile builds Base as well as a baseline Dijit layer that contains common machinery that is used in virtually any circumstance involving dijits, as well as a couple of other useful layers. Note that any profile in the standard.profile.js file should be available over AOL's CDN. For example, to retrieve the baseline Dijit profile, you could simply execute the following statement:
dojo.require("dijit.dijit");Remember, however, that the first SCRIPT tag should always be the one for
Base (dojo.xd.js), so you'd include any
additional SCRIPT tags for
layers after the one for Base.
In virtually any production setting, you'll want to apply ShrinkSafe to minify all of your code. While the previous build example build did optimize the build in the sense that it minified dojo.js and form.js as well as interned template strings, ShrinkSafe can minify every file in the release.
Recall that the size "over the wire" is what really matters
when you're talking about performance from a payload perspective.
While files may be a set size as they exist on the server, most
servers are able to apply gzip compression to
them if the web browser is capable of handling it. While
ShrinkSafe minifies JavaScript files by removing artifacts like
whitespace, comments, and so on, the further compression is
possible because the repetitive use of public symbols such as
dojo, dijit, and your own custom tokens allows
for actual compression to occur.
Tip
Minification is the reduction of a file's size by removing artifacts such as commas, whitespace, linebreaks, etc. Compression is an algorithmic manipulation that reduces a file's size by using by finding multiple instances of the same tokens and encoding an equivalent file by using shorter placeholders for the repetitive tokens. To learn more, see http://en.wikipedia.org/wiki/Gzip for an overview of gzip compression.
An especially notable feature of ShrinkSafe is that it never mangles a public API; this is a direct contrast to some JavaScript tools that attempt to encrypt JavaScript by applying regular expressions or convoluted logic to "protect" the script. In general, attempting to protect your JavaScript is mostly pointless. As an interpreted language that runs in the browser, the user of your application will almost certainly have access to your source code, and it's not terribly difficult to use a debugger to unroll the protected script into something that's fairly intelligible.
Tip
ShrinkSafe itself is not a Dojo-specific tool; you can apply it to any JavaScript file to gain the benefits of compression using the online demonstration at http://shrinksafe.dojotoolkit.org/. OS X users can download a version at http://dojotoolkit.org/downloads, and users of other platforms can grab the standalone custom Rhino jar from http://svn.dojotoolkit.org/dojo/trunk/buildscripts/lib/custom_rhino.jar.
In other words, ShrinkSafe shrinks your files without changing public symbol names. In fact, if you look at the form.js file that is an artifact of the previous build examples, you can see for yourself that ShrinkSafe strips comments, collapses and/or eliminates frivolous whitespace, including newline characters, and replaces nonpublic symbols with shorter names. Note that replacing all symbols with shorter, meaningless names qualifies as a lame attempt at encryptionânot particularly useful for debugging purposes either.
Let's update our existing profile:
Minify all files in the release with the
optimize="shrinksafe"optionDesignate a custom notice that should appear at the top of every minified JavaScript file in an additional (mythical)
foomodule provided by CUSTOM_FILE_NOTICE.txtDesignate a custom notice that should appear at the top of the final form.js provided by the same CUSTOM_LAYER_NOTICE.txt
Provide a custom name for the release directory via the
releaseName="form"optionProvide a custom version number for the build via the
version="0.1.0."option
Here's the modified form.profile.js file from Example 16-1. Note that the information in the custom notices must be wrapped in JavaScript comments; the path for the custom notices should be relative to the util/buildscripts directory or an absolute path:
dependencies ={
    layers:  [
        {
            copyrightFile : "CUSTOM_LAYER_NOTICE.txt",
            name: "form.js",
            dependencies: [
                "dijit.form.Button",
                "dijit.form.Form",
                "dijit.form.ValidationTextBox"
            ]
        }
    ],
    prefixes: [
        [ "dijit", "../dijit" ],
        [ "foo", "../foo", "CUSTOM_FILE_NOTICE.txt" ]

    ]
};
The augmented command to kick off this build is straightforward enough, and creates the artifacts in the release/form directory that exist alongside the dojo source directories:
bash build.sh profile=form action=release optimize=shrinksafe releaseName=form
version=0.1.0
To actually use your custom release, simply include the paths to the compressed dojo.js and form.js files in script tags in the head of your page, like so. The dojo.js layer must be included first, because form.js depends on it:
<html>
  <head><title>Fun With Forms!</title>
    <!--  include stylesheets, etc. -->
    <script type="text/javascript" path="relative/path/to/form/dojo.js"></script>
    <script type="text/javascript" path="relative/path/to/form/form.js"></script>
  </head>
  <!--  rest of your page -->
And that's it. It takes only two synchronous requests to
load the JavaScript (which now have interned templates) into the
page; other resources included in your build via the prefixes list are at your disposal via
the standard dojo.require
statements.
If you are completely sure you'll never need any additional
JavaScript resources beyond dojo.js and your
layer files, it is possible to pluck out just the individual
resources you need from the release directory structure. However,
you'll have to go through a little extra work to track down
dependencies with built-in CSS themes such as
tundra because some of the stylesheets may
use relative paths and relative URLs in import statements.
Get Dojo: The Definitive Guide now with the O’Reilly learning platform.
O’Reilly members experience books, live events, courses curated by job role, and more from O’Reilly and nearly 200 top publishers.

