Warning
BorderContainer is a new
layout dijit introduced in version 1.1 that resulted in LayoutContainer and SplitContainer getting deprecated because
BorderContainer is essentially a
union of the two. Although you may see examples on the web using
LayoutContainer and SplitContainer, it is not a good idea to
start building an application with deprecated features. For this
reason, these two deprecated widgets are not covered in this
book.
A BorderContainer provides an
easy way to define a layout that normally involves several layout
tiles that occur on the top/bottom/left/right/center,
top/bottom/center, or left/right/center of the page. These tiles may
have resizable handles, so the BorderContainer is an especially notable
value-added widget in that it simplifies what could have otherwise
been a grueling workload into a really simple widgetized solution. As
you might have guessed, it is called a "border" container because up
to four tiles surround its border with the center filling in to
whatever is leftover.
Table 14-4 shows the API.
Table 14-4. BorderContainer API
Name | Type | Comment |
|---|---|---|
| String | Valid values include
|
| Boolean | Whether to continuously
resize while the mouse drags or to resize on the |
| Boolean | Whether to save splitter positions as a cookie. |
When using a BorderContainer,
the additional attributes shown in Table 14-5, which BorderContainer depends on, are available
via ContentPane.
Tip
You might find it interesting to know that the means of making
these additional attributes available via ContentPane is that the BorderContainer resource file extends
_Widget's prototype to contain
these values behind the scenes. This is a clever solution to the
problem as it uses JavaScript's dynamism to provide these extras on
demand, instead of requiring an a priori
solution, which would really junk up and create unnecessary
couplings on ContentPane's
implementation.
Table 14-5. Attributes available to children of BorderContainer
A layout that involves a top and bottom that extends the width of the container is called a headline layout, and a layout that involves a left and right that extends the width of the container is called a sidebar layout. Either layout can optionally contain additional tiles that increase the number of layout areas from three to five. In any case, the remaining space that is leftover is the center area that gets filled in with the center tile.
Let's kick things off with a simple headline layout in markup, shown in Example 14-2. The top will be a blue pane, the bottom a red panel, and the middle will remain white. The top pane has minimum height of 10 pixels and a maximum height of 100 pixels (its default height).
Example 14-2. Creating a BorderContainer in markup
<html>
    <head><title>Fun with BorderContainer!</title>


        <link rel="stylesheet" type="text/css"
          href="http://o.aolcdn.com/dojo/1.1/dojo/resources/dojo.css" />
        <link rel="stylesheet" type="text/css"
          href="http://o.aolcdn.com/dojo/1.1/dijit/themes/tundra/tundra.css" />

        <script
            djConfig="parseOnLoad:true",
            type="text/javascript"
            src="http://o.aolcdn.com/dojo/1.1/dojo/dojo.xd.js">
        </script>

        <script type="text/javascript">
            dojo.require("dijit.layout.ContentPane");
            dojo.require("dijit.layout.BorderContainer");
            dojo.require("dojo.parser");
        </script>
    </head>
    <body class="tundra">

        <div dojoType="dijit.layout.BorderContainer" design="headline"
             style="height:500px;width:500px;border:solid 3px;">

            <div dojoType="dijit.layout.ContentPane" region="top"
              style="background-color:blue;height:100px;" splitter="true"
                 minSize=10 maxSize=100>top</div>

            <div dojoType="dijit.layout.ContentPane" region="center">center</div>

            <div dojoType="dijit.layout.ContentPane" region="bottom"
              style="background-color:red;height:100px;" splitter="true">bottom</div>

        </div>
    </body>
</html>
Adding tiles to fill in the left and right sides takes only two
additional ContentPane dijits, as
shown in Figure 14-1.
Consider the following revision to the BODY tag:
<body class="tundra">

        <div dojoType="dijit.layout.BorderContainer"
          design="headline" style="height:500px;width:500px;border:solid 3px;">

            <div dojoType="dijit.layout.ContentPane" region="top"
              style="background-color:blue;height:100px;" splitter="true"
                minSize=10 maxSize=100>top</div>

            <div dojoType="dijit.layout.ContentPane" region="center">center</div>

            <div dojoType="dijit.layout.ContentPane" region="bottom"
              style="background-color:red;height:100px;" splitter="true">bottom</div>

            <div dojoType="dijit.layout.ContentPane" region="left"
              style="background-color:yellow;width:100px;" splitter="true">
left</div>

            <div dojoType="dijit.layout.ContentPane" region="right"
              style="background-color:green;width:100px;" splitter="true"
>right</div>

        </div>
</body>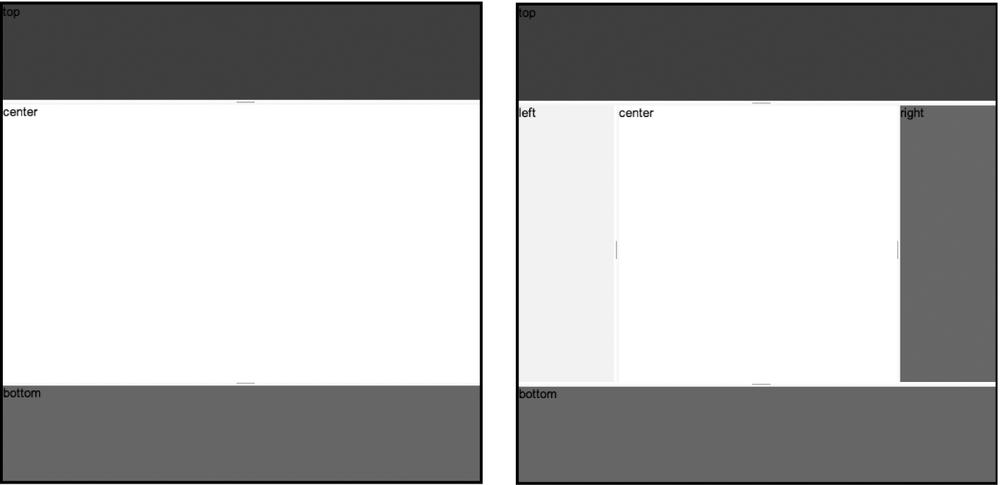
Figure 14-1. Left: the BorderContainer before adding in additional panels on the left and right; right: the BorderContainer after adding in left and right panels
Like all other dijits, programmatically creating a BorderContainer entails the same basic
constructor function that takes a collection of properties and a
source node. Adding in the child ContentPanes involves systematically
creating them one by one as well. Although more tedious than markup,
it's the same basic pattern. Example 14-3 shows how you'd create Example 14-2
programmatically.
Example 14-3. Programmatically creating a BorderContainer
<html>
    <head><title>Fun with BorderContainer!</title>

        <link rel="stylesheet" type="text/css"
          href="http://o.aolcdn.com/dojo/1.1/dojo/resources/dojo.css" />
        <link rel="stylesheet" type="text/css"
          href="http://o.aolcdn.com/dojo/1.1/dijit/themes/tundra/tundra.css" />


        <script
            djConfig="parseOnLoad:true",
            type="text/javascript"
            src="http://o.aolcdn.com/dojo/1.1/dojo/dojo.xd.js">
        </script>

        <script type="text/javascript">
            dojo.require("dijit.layout.BorderContainer");
            dojo.require("dijit.layout.ContentPane");
            dojo.require("dojo.parser");
            dojo.addOnLoad(function(  ) {
                //the BorderContainer
                var bc = new dijit.layout.BorderContainer(
                    {
                        design: "headline",
                        style: "height:500px;width:500px;border:solid 3px"
                    },
                    "bc"
                );

                var topContentPane = new dijit.layout.ContentPane(
                    {
                        region: "top",
                        style: "background-color:blue;height:100px;",
                        splitter: true,
                        minSize : 10,
                        maxSize : 100
                    },
                    document.createElement("div")
                );

                var centerContentPane = new dijit.layout.ContentPane(
                    {
                        region: "center"
                    },
                    document.createElement("div")
                );

                var bottomContentPane = new dijit.layout.ContentPane(
                    {
                        region: "bottom",
                        style: "background-color:red;height:100px;",
                        splitter: true
                    },
                    document.createElement("div")
                );

                bc.startup(  ); // do initial layout (even though there are no
children)

                //now add the children.
                bc.addChild(topContentPane);
                bc.addChild(centerContentPane);
                bc.addChild(bottomContentPane);

            });
        </script>
    <head>
    <body class="tundra">
        <div id="bc"></div>
    </body>
</html>
Tip
The previous example called startup(
) to do initial layout and then used the addChild method to add children. The
following approach would also have worked:
bc.domNode.appendChild(topContentPane.domNode);
bc.domNode.appendChild(centerContentPane.domNode);
bc.domNode.appendChild(bottomContentPane.domNode);
bc.startup(  );
BorderContainer dijits are
quite flexible and can be nested arbitrarily if the situation calls
for it. They're also a great way to set up a headline style or sidebar
style layout with virtually no effort, although you should generally
consider plain old CSS for production situations in which widgets
don't add any value.
Get Dojo: The Definitive Guide now with the O’Reilly learning platform.
O’Reilly members experience books, live events, courses curated by job role, and more from O’Reilly and nearly 200 top publishers.

