Chapter 3. ASP.NET Web API 101
Itâs easier to plot a course once youâve seen the map.
Now that weâve established the context around why Web APIs are important for modern networked applications, in this chapter weâll take a first look at ASP.NET Web API. ASP.NET Web API and the new HTTP programming model offer different capabilities for both building and consuming Web APIs. First weâll explore some of the core Web API goals and the capabilities that support them. Weâll then see how those capabilities are exposed to your code in ASP.NET Web API by looking at its programming model. What better way to examine that than by looking at the code provided by the Visual Studio Web API project template? Finally, weâll go beyond the default template code and construct our first âHello Worldâ Web API.
Core Scenarios
Unlike many technologies, ASP.NET Web API has a very well-documented and accessible history (some is recorded on CodePlex). From the beginning, the development team made the decision to be as transparent as possible so that the product could be influenced by the community of experts who would ultimately use it to build real systems. Iâve distilled all that history down to the core goals that ASP.NET was created to address:
- First-class HTTP programming
- Symmetric client and server programming experience
- Flexible support for different formats
- No more âcoding with angle bracketsâ
- Unit testability
- Multiple hosting options
Now, while these are key goals, they by no means represent an exhaustive list of all that the framework enables. ASP.NET Web API brings together the best of Windows Communication Foundation (WCF), with its infinitely extensible architecture, client support, and flexible hosting model, and ASP.NET MVC, with its support for convention over configuration, improved testability, and advanced features such as model binding and validation. As weâll begin to explore in this chapter, the result is a framework that is approachable for getting started, and easily customizable as your needs evolve.
First-Class HTTP Programming
When you are building modern Web APIsâespecially for simpler clients such as mobile devicesâthe success of that API is often related to its expressiveness. And the expressiveness of a Web API depends on how well it uses HTTP as an application protocol. Using HTTP as an application protocol goes far beyond simply handling HTTP requests and producing HTTP responses. It means that the behavior of both the application and the underlying framework is controlled by HTTP control flow and data elements rather than by some additional data that is merely (and incidentally) transmitted via HTTP. For example, consider the following SOAP request used to communicate with a WCF service:
POST http://localhost/GreetingService.svc HTTP/1.1
Content-Type: text/xml; charset=utf-8
SOAPAction: "HelloWorld"
Content-Length: 154

<s:Envelope xmlns:s="http://schemas.xmlsoap.org/soap/envelope/">
  <s:Body>
        <HelloWorld xmlns="http://localhost/wcf/greeting"/>
  </s:Body>
</s:Envelope>
In this example, the client issues a request to the server to obtain a friendly greeting message. As you can see, the request is being sent via HTTP. However, this is really where the association with HTTP stops. Rather than using HTTP methods (sometimes called verbs) to communicate the nature of the action requested of the service, the approach shown here sends all requests using the same HTTP methodâPOSTâand wraps the application-specific details in both the HTTP request body and the custom SOAPAction header. As you might expect, we see the same pattern repeated on the response produced by the service:
HTTP/1.1 200 OK
Content-Length: 984
Content-Type: text/xml; charset=utf-8
Date: Tue, 26 Apr 2011 01:22:53 GMT

<s:Envelope xmlns:s="http://schemas.xmlsoap.org/soap/envelope/">
  <s:Body>
    <HelloWorldResponse xmlns="http://localhost/wcf/greeting">
      ...
    </HelloWorldResponse>
  </s:Body>
</s:Envelope>
As in the case of the request message, the protocol elements used to control the applicationâthat is, the way that the client and server applications understand one anotherâhave been pulled out of the HTTP elements and placed inside the XML bodies of the request and response, respectively.
In this approach, HTTP is not being used to express the application protocol, but rather as a simple transport for a different application protocolâSOAP, in this case. And while this can be a good thing for scenarios where a single service needs to communicate with similar clients across lots of different protocols, it can be problematic when the need is to communicate with lots of very different clients across a single protocol. These kinds of problems are illustrated perfectly in the case of Web APIs, where the diversity of not only clients, but also of the communication infrastructure between clients and services (e.g., the Internet), is large and constantly changing. In this world, clients and services should be optimized not for protocol independence but rather for creating a first-class experience around a common application protocol. In the case of applications that communicate via the Web, that protocol is HTTP.
At its core, ASP.NET Web API is built around a small set of HTTP primitive objects. The two most notable of these are HttpRequestMessage and HttpResponseMessage. The purpose of these objects is to provide a strongly typed view of an actual HTTP message. For example, consider the following HTTP request message:
GET http://localhost:50650/api/greeting HTTP/1.1 Host: localhost:50650 accept: application/json if-none-match: â1â
Assuming that this request was received by an ASP.NET Web API service, we can access and manipulate the various elements of this request using code similar to the following in a Web API controller class:
varrequest=this.Request;varrequestedUri=request.RequestUri;varrequestedHost=request.Headers.Host;varacceptHeaders=request.Headers.Accept;varconditionalValue=request.Headers.IfNoneMatch;
This strongly typed model provides the correct level of abstraction over HTTP, empowering the developer to work directly with an HTTP request or response while freeing her from having to deal with lower-level issues such as raw message parsing or generation.
Symmetric Client and Server Programming Experience
One of the most appealing aspects of ASP.NET Web APIs being built around this HTTP-focused object library is that the library can be used not only on the server but also in client applications that are built using the .NET Framework. This means that the HTTP request shown here can be created with the same HTTP programming model classes that are ultimately used to work with the request inside of a Web API, as shown later in this chapter.
As youâll see in Chapter 10, thereâs a lot more to the HTTP programming model than simply manipulating the various data elements of requests and responses. Features like message handlers and content negotiation are built directly into the HTTP programming model so that you can take advantage of them on both the client and the server to deliver sophisticated client-server interactions while simultaneously reusing as much of your code as possible.
Flexible Support for Different Formats
Content negotiation will be talked about in much more depth in Chapter 13, but at a high level, it is the process whereby a client and server work together to determine the right format to use when exchanging representations over HTTP. There are several different approaches and techniques for performing content negotiation, and by default, ASP.NET Web API supports the server-driven approach using the HTTP Accept header to let clients choose between XML and JSON. If no Accept header is specified, ASP.NET Web API will return JSON by default (though, like most aspects of the framework, this default behavior can be changed).
For example, consider the following request to an ASP.NET Web API service:
GET http://localhost:50650/api/greeting HTTP/1.1
Because this request contains no Accept header to provide the server with a desired format, the server will return JSON. We can change this behavior by adding an Accept header to our request and specifying the correct media type identifier for XML:[1]
GET http://localhost:50650/api/greeting HTTP/1.1
accept: application/xml
No More âCoding with Angle Bracketsâ
As the .NET Framework has matured, one of the ever-growing complaints from developers has been related to the amount of XML configuration required to enable seemingly basic or even default scenarios. Even worse, because configuration controlled things such as which types should be loaded at runtime, configuration changes could introduce errors into a system that would not be caught by the compiler, but only at runtime. One of the biggest examples of this complaint can be found in ASP.NET Web APIâs predecessor, WCF. And while WCF itself has improved in the amount of configuration it requires, the ASP.NET Web API team went a totally different direction by introducing an entirely code-based configuration mode. ASP.NET Web API configuration will be discussed at length in Chapter 11.
Unit Testability
As techniques such as test-driven development (TDD) and behavior-driven development (BDD) have become more popular, there has been a proportional increase in frustration with many of the popular service and web frameworks over their use of static context objects, sealed types, and deep inheritance trees. These techniques make unit testing challenging in that objects become difficult to create and initialize in isolation from the underlying runtime; they also are very hard to substitute with a âfakeâ instance for better testing isolation.
For example, ASP.NET relies heavily on the HttpContext object, while WCF similarly relies on OperationContext (or WebOperationContext depending on the type of service). The fundamental problem with static context objects like these is that they are set up by and rely on their respective frameworkâs runtimes. As a result, testing a service that was developed using these context objects requires actually starting a service host and running the service. And while this technique is generally acceptable for integration-style tests, it is unsuitable for a development style such as TDD, which relies on being able to run smaller unit tests very quickly.
One of the goals in ASP.NET Web API is to provide much-improved support for these kinds of development styles, and there are two characteristics of the framework that accomplish this goal. First, ASP.NET Web API has the same programming model as the MVC framework. This enables it to take advantage of the testability work that was done a few years ago, including abstractions to avoid having to use static context objects and wrappers so that âfakeâ instances can be supplied to unit tests.
Second, remember that ASP.NET Web API is built around the HTTP programming model. The objects in this model are effectively simple data structures that can be created, configured, passed to an action method as a parameter, and analyzed when returned. This enables unit tests to be authored in a very clean, focused manner. As ASP.NET Web API has evolved, testing has remained a focus area for the team, as evidenced by the HttpRequestContext class in Web API 2. Testability will be discussed at greater length in Chapter 17.
Multiple Hosting Options
Despite some of its lesser qualities, one of the greatest attributes of WCF was its ability to âself-hostâ--that is, its ability to run in any process, for example a Windows service, a console application, or Internet Information Services (IIS). In fact, this kind of hosting flexibility made its limitations in unit testing almost bearableâ¦almost.
When consolidating WCF Web API with ASP.NET to form ASP.NET Web API, the team wanted to keep this self-hosting ability, and so ASP.NET Web API services, like WCF services, can run in whatever process you choose. Weâll look at hosting in much greater depth in Chapter 11.
Getting Started with ASP.NET Web API
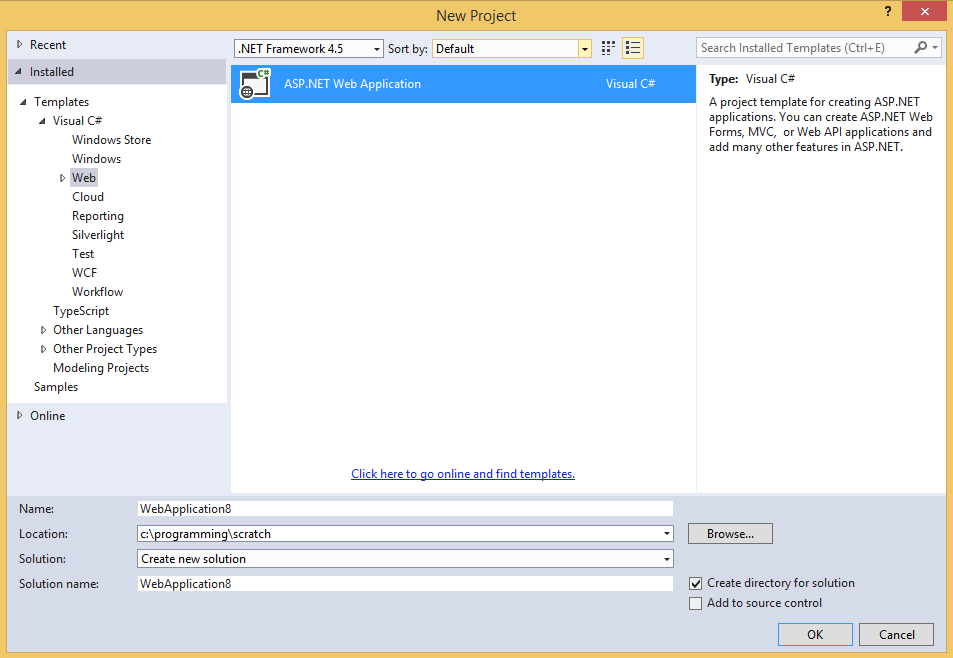
Now that weâve reviewed some of the goals behind the development of ASP.NET Web API, letâs dive in and take a look at some of the various elements that you will be working with as you create your own Web APIs. One of the simplest ways to accomplish this is by creating a brand new ASP.NET Web API project and looking at the artifacts that the project template creates. To create a new ASP.NET Web API project, navigate to the Web node in the New Project dialog and select ASP.NET Web Application (Figure 3-1).
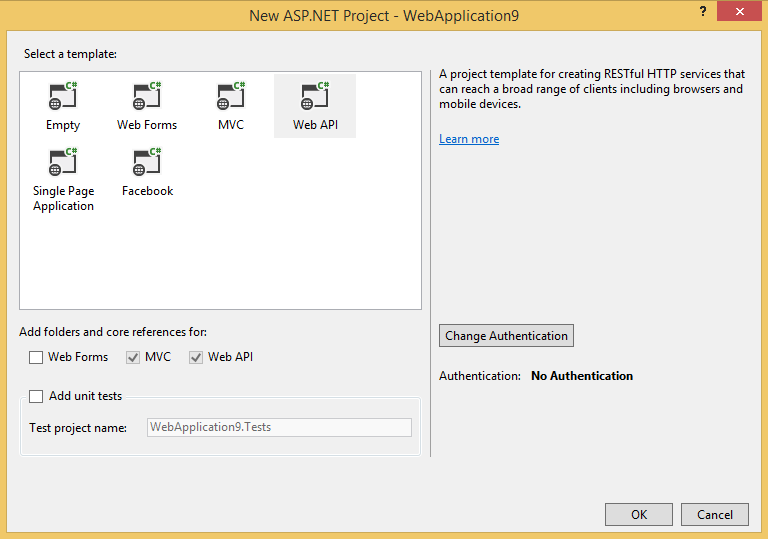
Once you choose to create an ASP.NET Web application, you will be presented with an additional dialog that gives you the ability to choose various project configurations. From this dialog, you will see the option to create a Web API project (Figure 3-2).
The key thing to note through this process is that Web API is simply a different project template within the family of ASP.NET projects. This means that Web API projects share all of the same core components as the other web project types, and differ only by the files that the template creates for you as a starting point. It also means that itâs both valid and desired to include Web APIs in any of the other templates shown in Figure 3-2.
In fact, at the end of the day, ASP.NET Web API is simply a set of classes built on top of the Web API framework components and hosted by a process, whether itâs the ASP.NET runtime as the default template sets up or your own custom host (as we will describe in more detail later in this chapter). This means that a Web API can go into any type of project, whether itâs an MVC project, a console application, or a class library that you reference from multiple host projects.
The ASP.NET Framework components are made available to your Web API projects via the NuGet package management application. The NuGet packages listed in Table 3-1 are installed by the default project template. To create a Web API in your own project, you simply need to ensure that youâve installed the same packages based on the level of functionality that you require.
| Package name | Package ID[a] | Description | Package dependencies[b] |
Microsoft .NET Framework 4 HTTP Client Libraries | Microsoft.Net.Http | Provides the core HTTP programming model, including | (none) |
Microsoft ASP.NET Web API | Microsoft.AspNet.WebApi | NuGet meta-package[c] providing a single reference for installing everything needed to create and host a Web API in ASP.NET | Microsoft.AspNet.WebApi.WebHost |
Microsoft ASP.NET Web API Client Libraries | Microsoft.AspNet.WebApi.Client | Contains extensions to the core .NET Framework 4 HTTP client libraries to enable features such as XML and JSON formatting as well as the ability to perform content negotiation | Microsoft.Net.Http Newtonsoft.Json[d] |
Microsoft ASP.NET Web API Core Libraries | Microsoft.AspNet.WebApi.Core | Contains the core Web API programming model and runtime components including the key | Microsoft.AspNet.WebApi.Client |
Microsoft ASP.NET Web API Web Host | Microsoft.AspNet.WebApi.WebHost | Contains all of the runtime components needed to host a Web API in the ASP.NET runtime | Microsoft.Web.Infrastructure Microsoft.AspNet.WebApi.Core |
[a] You can use the package ID to learn more about the package by appending it to the URL ID}. [b] A NuGet package dependency means that when you install a package, NuGet will first attempt to install all of the packages on which that the package depends. [c] A NuGet meta-package is a package that contains no actual content of its own, but only dependencies to other NuGet packages. [d] While used by ASP.NET Web API, Newtonsoft.Json is an external component available for free download. | |||
In addition to the NuGet packages that are installed as a part of the default project templates, the NuGet packages shown in Table 3-2 are also available.
| Package name | Package ID | Description | Package dependencies |
Microsoft ASP.NET Web API Self Host | Microsoft.AspNet.WebApi.SelfHost | Contains all of the runtime components needed to host a Web API in a custom process (e.g., console application) | Microsoft.AspNet.WebApi.Core |
Microsoft ASP.NET Web API OWIN | Microsoft.AspNet.WebApi.Owin | Allows you to host ASP.NET Web API within an OWIN server and provides access to additional OWIN features | Microsoft.AspNet.WebApi.Core, Microsoft.Owin, Owin |
Looking at the set of NuGet packages as a graph may give you a better understanding of which package or packages to install in your project based on what you are trying to accomplish. For example, consider Figure 3-3.
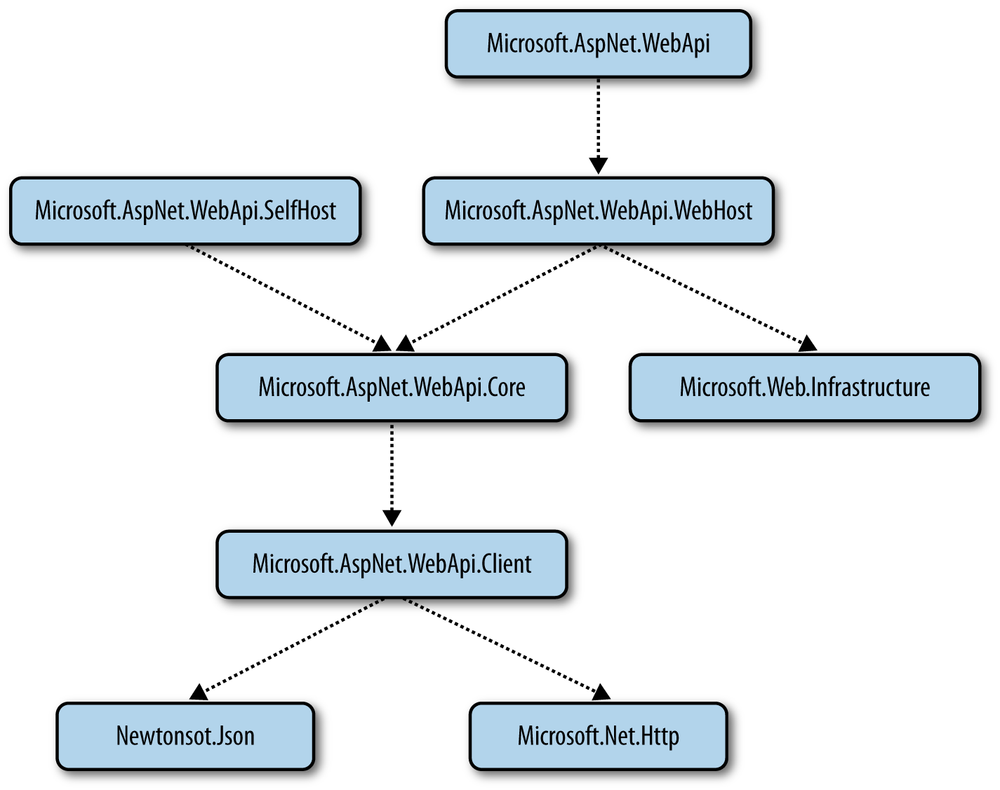
As you can see from the dependency graph, installing any one of these NuGet packages will automatically install all of the NuGet packages that are connected, directly or indirectly, to it. For example, installing Microsoft.AspNet.WebApi will install Microsoft.AspNet.WebApi.WebHost, Microsoft.AspNet.WebApi.Core, Microsoft.Web.Infrastructure, Microsoft.AspNet.WebApi.Client, Newtonsoft.Json, and Microsoft.Net.Http.
Exploring a New Web API Project
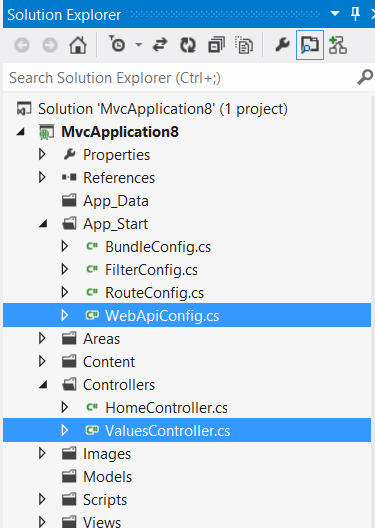
Now that weâve created a new web-hosted ASP.NET Web API project, weâll explore some of the key elements created by the project template, which we will customize in order to create our own Web APIs. We will focus on two key files: WebApiConfig.cs and ValuesController.cs (Figure 3-4).
WebApiConfig
This C# or Visual Basic.NET file is located in the App_Start top-level folder and declares the class WebApiConfig. This class contains a single method called Register and is called by code in the Application_Start method inside of global.asax. As its name indicates, the purpose of the class is to register various aspects of Web APIâs configuration. By default, the primary configuration code generated by the project template registers a default Web API route. This route is used to map inbound HTTP requests onto controller classes as well as parse out data elements that may be sent as a part of the URL and make those available to other classes in the processing pipeline. The default WebApiConfig class is shown in Example 3-1.
publicstaticclassWebApiConfig{publicstaticvoidRegister(HttpConfigurationconfig){// Web API configuration and services// Web API routesconfig.MapHttpAttributeRoutes();config.Routes.MapHttpRoute(name:"DefaultApi",routeTemplate:"api/{controller}/{id}",defaults:new{id=RouteParameter.Optional});}}
If you are familiar with MVC development, then you may have observed that ASP.NET Web API provides a different set of extension methods to register its routes than the default MVC routes. For example, the very same new project containing the WebApiConfig class also contains the following:
publicclassRouteConfig{publicstaticvoidRegisterRoutes(RouteCollectionroutes){routes.IgnoreRoute("{resource}.axd/{*pathInfo}");routes.MapRoute(name:"Default",url:"{controller}/{action}/{id}",defaults:new{controller="Home",action="Index",id=UrlParameter.Optional});}}
Having two route configuration methods can be confusing on first inspection, so itâs worth explaining the high-level differences between them. The point to keep in mind here is that these âMapâ methods are simply extension methods that create an instance of a route and add it to the route collection associated with the host. The difference between them, and the subsequent reason behind the two different methods, is in the fact that ASP.NET MVC and ASP.NET Web API use completely different route classes and even route collection types. The details of these types will be discussed in greater detail in Chapter 11, but the reason for breaking away from the routing types used by ASP.NET MVC was to enable ASP.NET Web API to split from much of the legacy that resided alongside the Route and RouteCollection classes in the System.Web assembly, thereby providing a great deal more flexibility in terms of hosting options. An immediate benefit of this design decision is ASP.NET Web APIâs self-host capability.
Configuring ASP.NET Web API routing requires declaring and adding HttpRoute instances to the route collection. Even though HttpRoute instances are created with a different extension method than that used for ASP.NET MVC, the semantics are nearly identical, including elements such as route name, route template, parameter defaults, and even route constraints. As you can see in Example 3-1, the project templateâs route configuration code sets up a default API route that includes a URI prefix of âapiâ followed by the controller name and an optional ID parameter. Without any modification, this route declaration is typically sufficient for getting started creating APIs that allow for fetching, updating, and deleting data. This is possible because of the way in which ASP.NET Web APIâs controller class maps HTTP methods onto controller action methods. Weâll cover HTTP method mapping in more detail later in this chapter, as well as in much greater detail in Chapter 12.
ValuesController
The ApiController class, which is the parent class of ValuesController, is at the heart of ASP.NET Web API. While we can create a valid ASP.NET Web API controller by simply implementing the various members of the IHttpController interface, in practice weâll create most ASP.NET Web API controllers by deriving from the ApiController class. This class plays the role of coordinating with various other classes in the ASP.NET Web API object model to perform a few key tasks in processing an HTTP request:
- Select and run an action method on the controller class.
- Convert elements of an HTTP request message into parameters on a controller action method and convert the return value of an action method into a valid HTTP response body.
- Run various types of filters that have been configured for the action method, the controller, or globally.
- Expose appropriate context state to the action methods of the controller class.
By deriving from ApiController and taking advantage of the key processing tasks that it performs, the ValuesController class that is included as a part of the Web API template shows the higher-level abstraction that can be built on top of ApiController. Example 3-2 shows the ValuesController code.
publicclassValuesController:ApiController{// GET api/valuespublicIEnumerable<string>Get(){returnnewstring[]{"value1","value2"};}// GET api/values/5publicstringGet(intid){return"value";}// POST api/valuespublicvoidPost([FromBody]stringvalue){}// PUT api/values/5publicvoidPut(intid,[FromBody]stringvalue){}// DELETE api/values/5publicvoidDelete(intid){}}
The ValuesController class, while simple, provides a helpful first look at the controller programming model.
First, notice the names of the controllerâs action methods. By default, ASP.NET Web API follows the convention of selecting an action method, in part, by comparing the HTTP method to the action name. More precisely, ApiController looks for a controller action method whose name starts with the appropriate HTTP method. Therefore, in Example 3-2, an HTTP GET request to /api/values will be served by the parameterless Get() method. The framework offers different ways to tailor this default name-matching logic and provides extensibility points, enabling you to replace it entirely if desired. More details on controller and action selection can be found in Chapter 12.
In addition to selecting an action method based on the HTTP method, ASP.NET Web API can select the action based on additional elements of the request, such as query string parameters. More importantly, the framework supports binding these request elements to parameters of the action method. By default, the framework uses a combination of approaches to accomplish parameter binding, and the algorithm supports both simple and complex .NET types. For HTTP responses, the ASP.NET Web API programming model enables action methods to return .NET types and it converts those values into the appropriate HTTP response message body using content negotiation. You can find much more detail on parameter binding and content negotiation in Chapter 13.
At this point, weâve discussed some of ASP.NET Web APIâs design, and weâve scratched the surface of the programming model in looking at the code provided as a part of the project template. Weâll now go a bit deeper and create our first âHello Worldâ Web API.
âHello Web API!â
For our first ASP.NET Web API, weâre going to build a simple greeting service. And what greeting is more ubiquitous in programming literature than âHello World!â? Therefore, weâll start out with this simple read-only greeting API and then add several improvements throughout the remainder of this chapter to illustrate other aspects of ASP.NET Web APIâs programming model.
Creating the Service
To create the service, simply create a new ASP.NET Web Application from Visual Studioâs New Project dialog. From the Web Application Refinement dialog, select Web API. This action will create a new ASP.NET Web API project from the default template.
A read-only greeting service
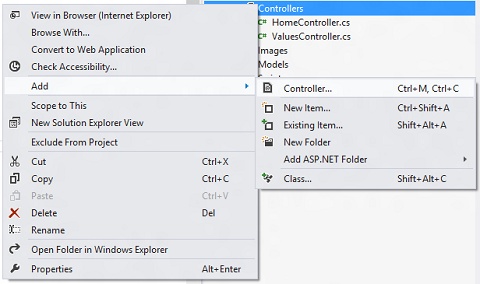
Starting from the default Web API project template, add a new controller. You can do this by either adding a new class or leveraging the controller item template provided by Visual Studio. To add the controller using the item template, right-click on the controllers folder and select the Add â Controller option from the context menu (Figure 3-5).
This will display another dialog from which youâll provide additional configuration details about the controller being created. We are going to create a controller called GreetingController and will use the Empty API controller item template (Figure 3-6).
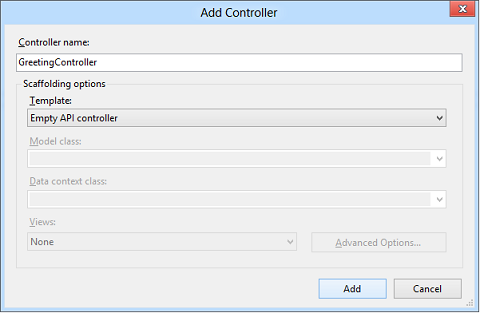
Completing the item template dialog will produce a new GreetingController class, which derives from the ApiController class. To have our new API return a simple greeting, we need to add a method capable of responding to an HTTP GET request for the controller. Remember that because of our default routing rule, GreetingController will be selected for an HTTP request, api/greeting. Therefore, letâs add a simple method to handle GET requests as follows:
publicclassGreetingController:ApiController{publicstringGetGreeting(){return"Hello World!";}}
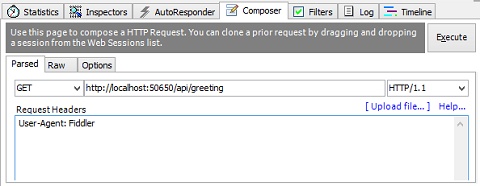
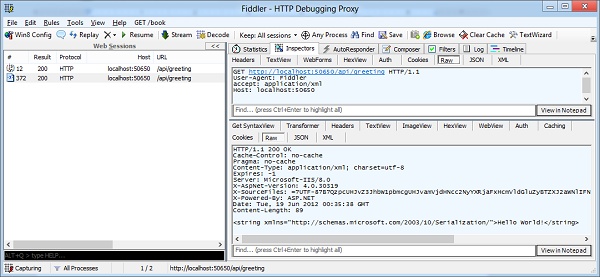
We can now test our Web API to see that it is in fact returning our simple greeting. For this, weâll use the HTTP debugging proxy tool called Fiddler. One particularly helpful feature of Fiddler when it comes to testing Web APIs is its ability to compose HTTP messages and execute them. We can use this feature to test our greeting API as shown in Figure 3-7.
When we execute the request, we can then explore both the request and response using Fiddlerâs session inspector as shown in Figure 3-8.
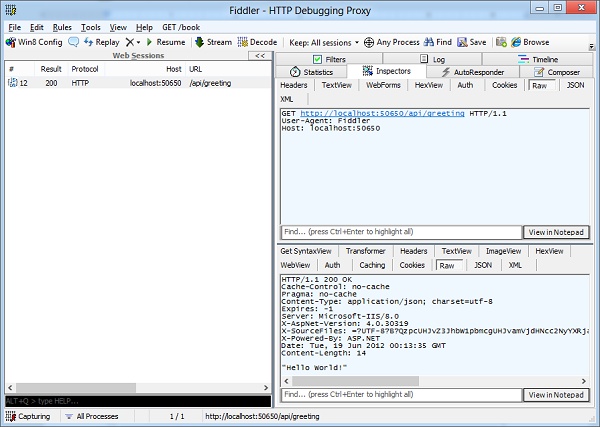
As expected, this basic HTTP GET request to the greeting service returns the simple string âHello World!â
Content negotiation
Returning to Figure 3-8, take a closer look at the HTTP Content-Type response header. By default, ASP.NET Web API will transform return values from action methods into the JSON format using the popular Json.NET library first referenced in Figure 3-3. However, as described earlier in this chapter, ASP.NET Web API supports server-driven content negotiation, and by default supports content negotiation between JSON and XML. To see this in action, go back to Fiddlerâs request composer and add the following line to the request headers text box:
accept: application/xml
Then execute the request again and notice that the response now contains the header Content-Type: application/xml and the response body is now formatted as XML (Figure 3-9).
Add a greeting
While itâs interesting to be able to get a greeting in different formats, any nontrivial API needs the ability to manipulate the state, or the data, of the system. Therefore, weâll extend the greeting service and give clients the ability to add new greetings. The idea is that a client can specify a greeting name and message, add it to the service, and then GET it again later via a URL that includes the greeting name. In addition, we need to handle cases where a client misspells or otherwise incorrectly specifies the greeting name in the URL by returning an HTTP 404 status code indicating that the resource could not be found.
To allow the client to create new greetings on the server, we need to create a model class to hold the greeting messageâs name and message properties. We accomplish this by adding the following class to the projectâs Models folder:
publicclassGreeting{publicstringName{get;set;}publicstringMessage{get;set;}}
We then create an action method on the GreetingController, which handles the HTTP POST request and is capable of accepting a Greeting instance as a parameter.
The action adds the greeting to a static list of greetings and returns an HTTP 201 status code along with a Location header pointing to the URL of the newly created greeting resource. The additional location header makes it possible for clients to simply follow the link value rather than requiring them to construct the URL for the new greeting resource, thereby making them more resilient since server URL structures can change over time:
publicstaticList<Greeting>_greetings=newList<Greeting>();publicHttpResponseMessagePostGreeting(Greetinggreeting){_greetings.Add(greeting);vargreetingLocation=newUri(this.Request.RequestUri,"greeting/"+greeting.Name);varresponse=this.Request.CreateResponse(HttpStatusCode.Created);response.Headers.Location=greetingLocation;returnresponse;}
After adding the new greeting to the static collection, we create a URI instance representing the location where the new greeting can be found in subsequent requests. We then create a new HttpResponseMessage using the CreateResponse factory method of the HttpRequestMessage instance provided by the ApiController base class. The ability to work with HTTP object model instances from within action methods is a key feature of ASP.NET Web API; it provides fine-grained control over the HTTP message elements, such as the location header, in a way that does not rely on static context objects like HttpContext or WebOperationContext. This proves particularly beneficial when it comes to writing unit tests for Web API controllers, as weâll discuss next.
Finally, we need to add an overload for the GetGreeting method that is capable of fetching and returning a client-supplied, custom greeting:
publicstringGetGreeting(stringid){vargreeting=_greetings.FirstOrDefault(g=>g.Name==id);returngreeting.Message;}
This method simply looks up the first greeting where the Name property matches the supplied id parameter and then returns the Message property. It is worth noting that there is currently not any sort of input validation on the id parameter. This will be discussed in the next section.
By default, an HTTP POST body will be handled by a MediaTypeFormatter object that is chosen based on the Content-Type request header. Accordingly, the following HTTP request will be handled by the default JSON formatter, which will use Json.NET to deserialize the JSON string into an instance of the Greeting class:
POST http://localhost:50650/api/greeting HTTP/1.1
Host: localhost:50650
Content-Type: application/json
Content-Length: 43

{"Name": "TestGreeting","Message":"Hello!"}
This resulting instance can then be passed to the PostGreeting method, where it is added to the collection of greetings. After PostGreeting has processed the request, the client will see the following HTTP response:
HTTP/1.1 201 Created
Location: http://localhost:50650/api/greeting/TestGreeting
From the location header, the client can then issue a request for the new greeting:
GET http://localhost:50650/api/greeting/TestGreeting HTTP/1.1
Host: localhost:50650
And, as in the case of our initial read-only greeting service, the client can expect the following response:
HTTP/1.1 200 OK
Content-Type: application/json; charset=utf-8
Content-Length: 8

"Hello!"
Handling errors
The previous HTTP exchange works wonderfully so long as the server never has any errors and all clients follow the same rules and conventions. However, what happens in the event of a server error or an invalid request? This is another area where the ability to create and work with instances of the HTTP object model proves quite helpful. In Example 3-3, we want the action method to return a greetingâs string given its name. However, if the requested greeting name is not found, we want to return a response with the HTTP 404 status code. For this task, ASP.NET Web API provides the HttpResponseException.
publicstringGetGreeting(stringid){vargreeting=_greetings.FirstOrDefault(g=>g.Name==id);if(greeting==null)thrownewHttpResponseException(HttpStatusCode.NotFound);returngreeting.Message;}
While it would have been reasonable to simply return a new HttpResponseMessage that included the 404 status code, this would have required always returning an HttpResponseMessage from the GetGreeting action methodâunneccessarily overcomplicating the nonexception code path. Additionally, the response message would have needed to flow back through the entire Web API pipeline, which would likely be unnecessary in the case of an exception. For these reasons, we will throw an HttpResponseException rather than return an HttpResponseMessage from the action method. In the event that an exception contains a response body that supports content negotiation, you can use the Request.CreateErrorResponse method from the base controller class and pass the resulting HttpResponseMessage to the HttpResponseException constructor.
Testing the API
One additional benefit of working directly with HTTP object model instances rather than static context objects is that it enables you to write meaningful unit tests against your Web API controllers. Testing will be covered in greater depth in Chapter 17, but as an introductory example, letâs write a quick unit test for the GreetingControllerâs PostGreeting action method:
[Fact]publicvoidTestNewGreetingAdd(){//arrangevargreetingName="newgreeting";vargreetingMessage="Hello Test!";varfakeRequest=newHttpRequestMessage(HttpMethod.Post,"http://localhost:9000/api/greeting");vargreeting=newGreeting{Name=greetingName,Message=greetingMessage};varservice=newGreetingController();service.Request=fakeRequest;//actvarresponse=service.PostGreeting(greeting);//assertAssert.NotNull(response);Assert.Equal(HttpStatusCode.Created,response.StatusCode);Assert.Equal(newUri("http://localhost:9000/api/greeting/newgreeting"),response.Headers.Location);}
This test follows the standard arrange, act, assert pattern of writing unit tests. We create some control state, including a new HttpRequestMessage instance, to represent the entire HTTP request. We then call the method under test using the context and finally process a few assertions about the response. In this case, the response is an instance of HttpResponseMessage, and as a result, we are able to process assertions on data elements of the response itself.
The Client
As mentioned at the beginning of this chapter, one of the other key benefits to building ASP.NET Web API around a core HTTP programming model is the fact that the same programming model can be used to build great HTTP applications for both the server and the client. For example, we can use the following code to construct a request that will be handled by our first GetGreeting action method:
classProgram{staticvoidMain(string[]args){vargreetingServiceAddress=newUri("http://localhost:50650/api/greeting");varclient=newHttpClient();varresult=client.GetAsync(greetingServiceAddress).Result;vargreeting=result.Content.ReadAsStringAsync().Result;Console.WriteLine(greeting);}}
Just like on the server, the client code here creates and processes instances of HttpRequestMessage and HttpResponseMessage. Additionally, ASP.NET Web API extension components, such as media type formatters and message handlers, work for clients as well as servers.
The Host
Developing an ASP.NET Web API for hosting in a traditional ASP.NET application feels very much the same as developing any other ASP.NET MVC application. One of the great characteristics of ASP.NET Web API, however, is that it can be hosted in any process that you designate with hardly any additional work. Example 3-4 shows the code required for hosting our GreetingController in a custom host process (a console application, in this case).
classProgram{staticvoidMain(string[]args){varconfig=newHttpSelfHostConfiguration(newUri("http://localhost:50651"));config.Routes.MapHttpRoute(name:"DefaultApi",routeTemplate:"api/{controller}/{id}",defaults:new{id=RouteParameter.Optional});varhost=newHttpSelfHostServer(config);host.OpenAsync().Wait();Console.WriteLine("Press any key to exit");Console.ReadKey();host.CloseAsync().Wait();}}
In order to host our Web API in a custom process, we did not modify the controller and we didnât have to add any magical XML in the app.config file. Rather, we simply created an instance of HttpSelfHostConfiguration, configured it with address and routing information, and then opened the host. Once the host is open and listening for requests, we block the main console thread in order to avoid closing the server. When the user chooses to close the host (by pressing any key), we close the Web API host and exit the console application. Hosting is discussed in greater detail in Chapter 11.
Conclusion
In this chapter, we described some of the key design goals behind ASP.NET Web API. We then used the Web API project template to see how the different components that compose the framework are organized and distributed via NuGet, and also to begin to explore the frameworkâs programming model by looking at the default template code. Finally, we wrote our own âHello World!â Web API and took advantage of ASP.NET Web APIâs self-hosting abilities.
The chapters that follow will drill into each of the topics introduced here and provide a great deal more depth, starting with Chapter 4, which explores the underlying mechanics that make the ASP.NET Web API work.
Get Designing Evolvable Web APIs with ASP.NET now with the O’Reilly learning platform.
O’Reilly members experience books, live events, courses curated by job role, and more from O’Reilly and nearly 200 top publishers.

