Automatic White-Balance Correction
Dragging the color-correction sliders by hand is one way to address color imbalances in a picture. But there's an easier, more automatic way.
It relies on your ability to find, somewhere in your photo, an area of what should appear as medium gray or white. You can use either. Once you find the gray or white point, iPhoto/Picasa can take it from thereâit can adjust all of the other colors in the photo accordingly, shifting color temperature, tint, and saturation, all with a single click. This trick works amazingly well on some photos.
Before you use this feature, though, make sure you've already adjusted the overall exposure, using the steps described on the previous pages.
Next, scan your photo for an area that should appear as a neutral gray or clean white. Slightly dark grays are better for this purpose than bright, overexposed grays. Once you've found that white or gray spot, you're ready:
iPhoto. Click the tiny eyedropper icon next to the Tint slider.
Picasa. Click the tiny eyedropper icon labeled Neutral Color Picker.
Your mouse pointer becomes crosshairs that you can position over your gray or white sample. Then simply click.
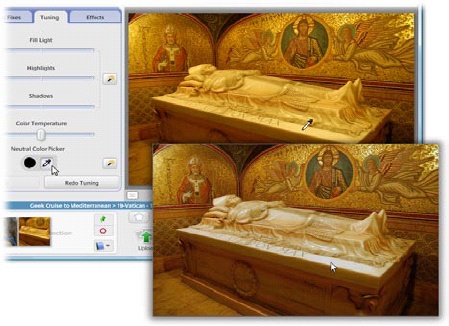
Instantly, the program automatically adjusts the color-balance sliders to balance the overall color of the photo. If you don't like the correction, use Undo and then try again on a different neutral area.
Tip
Picasa Tip: Click ...
Get David Pogue's Digital Photography: The Missing Manual now with the O’Reilly learning platform.
O’Reilly members experience books, live events, courses curated by job role, and more from O’Reilly and nearly 200 top publishers.

