The Post-Import Inspection
Once you've imported a batch of pictures, what's the first thing you want to do? If you're like most people, you want to look at them. This is the first opportunity you have to see, at full-screen size, the masterpieces you and your camera created. After all, until this moment, the only sight you've had of your photos is on the little screen on the back of the camera.
Step 1: Click the "Container"
To begin inspecting photos, you first have to tell the program which photos you want to inspect.
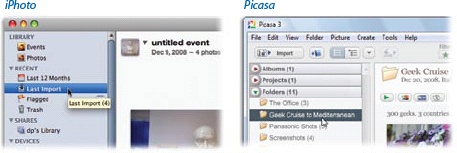
iPhoto: Click the Last Import icon in the Source list.
Picasa: Click the name of the folder that contains your newly imported pictures. It should be easy to remember, since you just typed it a few minutes ago. (It's in the Folder list.)
Either way, in the main window, you're now treated to a soon-to-be-familiar display: a grid of thumbnails. In this case, they represent the pictures you just imported.
Tip
You can adjust the size of these thumbnails by dragging the size slider at the lower-right edge of the window.
To inspect a photo, double-click it. If all goes well, it swells to fill the main part of the window.
Note
iPhoto Note: If double-clicking the photo did not open it up into a window like what you see below, it's likely that you or somebody else has changed the iPhoto preferences so that double-clicking a thumbnail does not magnify a photo for inspection. Choose iPhotoâPreferences, ...
Get David Pogue's Digital Photography: The Missing Manual now with the O’Reilly learning platform.
O’Reilly members experience books, live events, courses curated by job role, and more from O’Reilly and nearly 200 top publishers.

