Here's a dirty little secret: Plenty of professionals leave their cameras in auto mode most of the time.
It's true. Oh, they still duck into manual mode when necessary. (And there are also plenty who never use auto mode.) But today's digital cameras have extremely sophisticated light metering, white-balance detection, and autofocus; why not exploit their powers?
It probably goes without saying that auto mode works well for the huge majority of amateurs, too.
All SLRs, and a fair number of compact cameras, nonetheless offer manual controls, tooâoverrides for shutter speed, aperture size, focus, and so on. If you have them, you gain a lot flexibility you don't get in auto. Only with manual shutter-speed controls can you blur a brook into a milky, silky ribbon; only with manual focus can you specify exactly which element of a photo is in sharp focus. Chapter 6 gives these controls a workout.
Nowadays, though, there's something in between auto and manual: scene modes. If you've lived your life so far in auto, scene modes should be your first step up.
Camera companies have realized that learning to use manual controls is beyond the patience of casual shutterbugs. So, in their never-ending quest to make photography idiot-proof, camera makers routinely stock their latest models with a bunch of scene modes. These are prefab, memorized settings for common lighting and subject situations like Sports, Night Portrait, Beach/Snow, and so on. These canned modes exploit the flexibility of the camera without requiring you to know how to dial in specific settings.
Note
The most expensive SLRs generally don't have scene modes. The logic: If you're serious enough to buy a professional model, you probably know how to dial up the proper settings yourself. (In fact, to many professional photographers, the very presence of scene modes is insulting.)
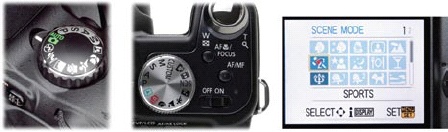
You'll find the scene modes in one of two places:
On the Mode dial. If there are just a handful of scene modes, they're probably right on the Mode dial itself, marked by tiny icons: a silhouetted person for Portrait mode, a pair of mountains for Landscape mode, and so on, as in the first two examples here.
On the screen. If there are too many modes to fit on the dial, then calling up a scene preset is usually a two-step process. First, you turn the Mode dial to Scene, or press the Scene buttonâand then, on the screen, you cycle through the various options until you find the one you want.
Truth is, there's no real magic to scene modes. They make pretty predictable changes to the camera's photographic settings. For example:
Auto mode. The camera makes all decisions for you. It analyzes the brightness of the scene, distance to your subject, and so on, and chooses settings accordingly. Many newer pocket cameras actually switch to one of the other modes (like Landscape or Sunset, described below), if an examination of the scene suggests that that would be appropriate.
Sports mode. (Usual icon: Running man.) Fast shutter speed. No flash. (Works only in bright lightâlike sunshine.) On nicer cameras, burst mode is turned on (Burst Mode or One-Shot?).
Portrait mode. (Usual icon: Lady's head, often wearing a hat.) Large aperture, which increases the pleasant blurry-background effect. Especially receptive to skin tones.
Landscape mode. (Usual icon: Mountains; sometimes there's a tiny cloud.) No flash (because the scenery is presumably farther away than 10 feet). Large aperture, creating a large depth of fieldâin other words, everything is in focus, near and far.
Night Portrait. (Usual icon: Person with a star or moon over his shoulder.) A flash to illuminate the subject, then the shutter stays open to capture the background. In other words, the same thing as slow-synchro flash, described previously.
Night Landscape. (Usual icon: Mountain with a star or moon over his shoulder.) No flash, slow shutter, wide aperture. Keep 'er steady!
Macro. (Usual icon: A tulip, for some reason.) Macro, in photography, means super close up. Usually, the Macro setting has its own dedicated button, right there opposite the Flash button.
Kids & Pets mode. Continuous autofocus. Once you've aimed the camera and half pressed the shutter button to lock focus, the camera continuously refocuses as you or your subject move around. (The idea here is that children and animals typically don't hold still.)
Candlelight. No flash. Slow shutter speed. High ISO (Goose the ISO).
Underwater. Sunlight becomes more diffuse the deeper you go, and different colors of the spectrum drop out at different rates; red being the first to go. So Underwater mode adjusts the camera's white-balance controls to balance out the overwhelming blue tint.
Beach/Snow. Throttles back exposure so the brightness doesn't nuke the details out of the bright areas. Adjusts white balance for proper colors in sunshine. Boosts color saturation (vividness) to avoid pale sand and sky.
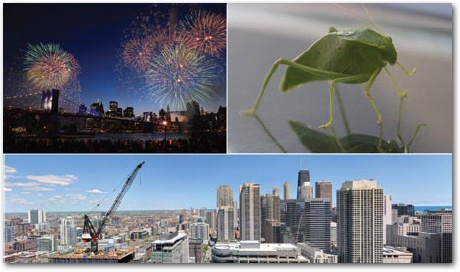
Fireworks. No flash. Long exposures (slow shutter) to capture those fireworks trailsâso the camera really has to be sitting still (tripod, wall). Autofocus at infinity (because it's so dark, the camera wouldn't otherwise know what to focus on). Large aperture to keep everything in focus. Low ISO to minimize digital noise (Goose the ISO).
Sunset. Boosts saturation of reds, oranges, and yellows. Large aperture to keep everything, near and far, in focus.
Panorama. Very cool. The point here is to let you take several side-by-side photosâand the camera stitches them all together. Step-by-step instructions are in Chapter 6.
Get David Pogue's Digital Photography: The Missing Manual now with the O’Reilly learning platform.
O’Reilly members experience books, live events, courses curated by job role, and more from O’Reilly and nearly 200 top publishers.

