Developers should follow Aqua’s menu guidelines
carefully so users of their applications can learn and work faster.
Common menu structure and commands are crucial to better user
productivity within a GUI. In this section, we discuss most of the
standard Mac OS X menus and associated keyboard equivalent
guidelines. For further details, see the
“Introduction to the Aqua Human Interface
Guidelines” at Apple’s developer
web site or in the /Developer folder (references
are provided at the end of this chapter).
A keyboard equivalent is a way of manipulating a graphical object (usually a menu) using the keyboard rather than the mouse. To use a keyboard equivalent, type a single key (perhaps modified by the Shift key) while pressing one of the Command keys near the bottom of the Apple keyboard (depending on your Mac, you may have only one Command key on your keyboard). Experienced users use keyboard equivalents because they are faster than manipulating the mouse. Using the mouse is a more natural way to manipulate graphical objects, but it’s often slower and less convenient, either because the user’s hands are already on the keyboard or because mouse (cursor) movements across a screen are time-consuming and clumsy.
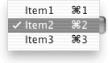
A keyboard equivalent usually substitutes for a click on a menu command from the menu bar, but it may also substitute for a pop-up menu command. Pop-up menu key equivalents should be digits (e.g., Command-2 activates the second item down from the top of a pop-up menu, as shown in Figure 1-30).
Because most keyboard equivalents are common across applications, a user will need to learn only a few of them to work considerably faster. The most common and useful keyboard equivalents are listed in the tables in the following sections. Others can be seen in the screen shots of the menus themselves. Note that the keyboard equivalent labels on Mac OS X menus are displayed in capital letters, but you must actually use lowercase letters to make the commands work (unless the label contains the shift icon — for example, File → Save As).
Every application has an application menu , the menu to the immediate right of the Apple menu. Figure 1-31 contains a screen shot of the application menu for a generic application template. Application menus contain commands that affect the entire application, including the following: display the About window, display the Preferences dialog (if any), Hide the application, Hide Others (i.e., all other applications), Show All (applications), and Quit. We’ll discuss the Services submenu later.
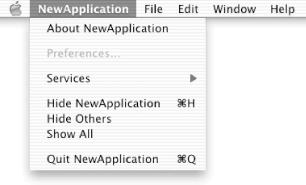
The standard key equivalents for Application menu commands are listed in Table 1-1.
Table 1-1. Standard key equivalents for Application menu commands
|
Keyboard equivalent |
Command |
|---|---|
|
Command-H |
Hide |
|
Command-Q |
Quit |
The menus (File, Edit, etc.) to the right of the application menu in the menu bar are application-dependent, but if included they should be placed in the order shown in Figure 1-31. If additional menus such as View, Format, and Tools are included, they should be inserted between the Edit and Window menus. Mac OS X users are accustomed to finding the File, Edit, Window, Help, and other menus in the same place for every application, so don’t frustrate them by moving the menus around when designing your application.
A command from a submenu is sometimes promoted up a level to the main menu if it’s essential to the application. For example, the Font command might be promoted from the Format submenu to the main menu in a word processor or other font-dependent application. If this decision is made, the promoted command should immediately follow the submenu where it would normally be found. Thus, a promoted Font command, for example, would follow Format in the main menu.
The File menu contains commands that affect a document (or file) as a whole. These commands are used to open, create, or save the type of document(s) associated with the application. As with the application menu, not all of the commands in the File menu are required, but if included they should be ordered as shown in Figure 1-32.
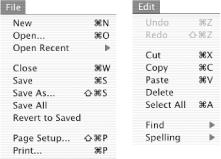
The Save and Save As commands will both save the contents of the main document window to a file, but Save As allows you to save the file to a name that is different from the current name. The standard key equivalents for the File menu are listed in Table 1-2. Note that the Save As and Page Setup key equivalents are three-key combinations requiring the Shift key.
The Edit menu commands can be used to manipulate text, graphics, and other objects in the key window (i.e., the one with keyboard focus). Edit menu keyboard equivalents — listed in Table 1-3 — are perhaps the most worthwhile to learn, because they are used very often and in a variety of places. The Cut, Copy, Paste, and Select All commands can be used in most text and graphics areas in any main window or dialog that is key. Edit menu key equivalents are very convenient for right-handed people, because they can be performed easily with the left hand while one’s right hand is on the mouse.
The Find submenu shown in Figure 1-33 allows easy access to common activities such as finding a character string and finding the next or previous appearance of the same string. The common key equivalent Command-F brings up the Find dialog (window) for specific searches.
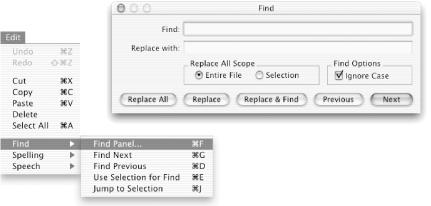
The Use Selection for Find command finds the next string that matches the current selection. The standard key equivalents for the Find menu are listed in Table 1-4.
Format menu commands affect the layout of text and graphics documents. The Format menu is not available in every application, but it is usually found in applications that deal with text, such as TextEdit. The Font submenu is usually a choice in the Format menu (as in the TextEdit menu shown in Figure 1-34), but it can be promoted to the main menu, as described previously. There are no standard keyboard equivalents for the Format menu, but there are many for the Font submenu (the Format key equivalents in Figure 1-34 are specific to TextEdit).
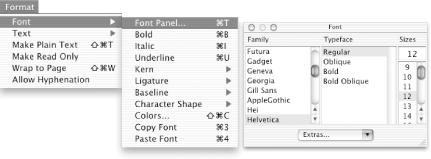
Font submenu commands such as Bold and Italic affect one aspect of the text font. There are several other common Font submenu commands that affect font size and style, some of which are shown in Figure 1-34. The Font Panel command brings up a standard Font utility window with font family, typeface, and size choices, as shown in Figure 1-34. The standard key equivalents for the Font menu are shown in Table 1-5.
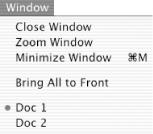
Window menu commands such as those in Figure 1-35 apply to windows within the active application. The Close, Zoom, and Minimize Window commands apply only to the key window. (Close Window is usually in the File menu, with the Command-W key equivalent, but it can also be placed in the Window menu.) The Bring All to Front command brings all the windows in the active application to the front of the desktop. The Doc 1 command brings the Doc 1 document window to the front and makes it the key window (the Doc 2 menu command works similarly). The dot next to Doc 1 in Figure 1-35 indicates that it has not been saved to disk (same meaning as the dot in a document window’s red close button). These two menu commands that affect document windows were added to the Window menu dynamically, as the corresponding documents (files) were opened.
The standard key equivalents for the Window menu commands are shown in Table 1-6.
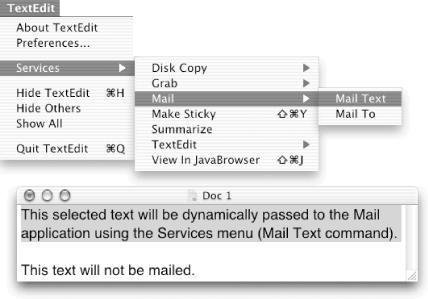
The Services submenu commands like those in Figure 1-36 allow for communication between different
applications. Most services take the selected text or object in the
key window and perform some sort of function with it. For example, if
you select some text in TextEdit and then choose Services
→ Mail → Mail Text, the text will
be sent to the Mac OS X Mail application, which will place it in a
Compose window that opens automatically. Likewise, you can choose
Services → Mail → Make Sticky to
turn the selected text into a “sticky
note” on your screen (launch the Stickies
application in the /Applications folder to find
out about stickies).
Services such as these enable applications to interoperate with each other without any prior arrangement on the part of the programmer or the user. Unique to Mac OS X, services are an extremely powerful aspect of the operating environment that result from the dynamic binding of the Objective-C language. We’ll learn how to create an application that provides services functionality in Chapter 20.
Get Building Cocoa Applications: A Step by Step Guide now with the O’Reilly learning platform.
O’Reilly members experience books, live events, courses curated by job role, and more from O’Reilly and nearly 200 top publishers.

