Chapter 1. What’s New?
Within a few short years, ASP.NET has become one of the favorite tools of web applications developers, and now it’s about to undergo its second major upgrade. Microsoft is making major improvements to the product based on feedback from its millions of customers and the company’s own experience in developing and deploying web applications. Moreover, the market for web development tools has become increasingly competitive with the rise of open source PHP and Macromedia Flash, both of which have steadily gained market share.
- Controls
ASP.NET 2.0 ships with several new controls to make the life of a web application developer easier. In ASP.NET 2.0, there are now new controls that help you to perform data access, site navigation, login, and personalization using Web Parts.
- Page Framework
ASP.NET 2.0 supports some useful additions to its Page framework such as visual inheritance, technically known as Master Pages. Besides Master Pages, ASP.NET 2.0 also supports “theming” through Themes and Skins, allowing you to maintain a consistent look-and-feel for your web sites. Another noteworthy feature in ASP.NET is the improved support for localization, which reduces the amount of work you need to do to internationalize your web applications.
- Services and APIs
Behind the various new controls in ASP.NET 2.0 lie the foundation services and APIs that do the heavy lifting needed to support the controls. For example, behind the new Login controls you’ll find the new collection of Membership APIs, which perform such tasks such as user authentication, registration of new users, etc. Besides using the new controls, you can directly make use of these APIs in code.
Table 1-1 summarizes some of most important new features of ASP.NET 2.0.
|
Controls |
Page Framework |
Services and APIs |
|
Data Controls Includes controls that simplify the connection to data sources, as well as the new GridView and DetailsView controls. We will discuss this topic in Chapter 4. |
Master Pages Visual page inheritance for Web Forms. We will discuss this topic in Chapter 2. |
Membership The core service for user management, such as user creation, deletion, authentication, retrieval of passwords, etc. We will discuss this topic in Chapter 5. |
|
Login Controls Contains controls that make web site user management and user authentication easy and efficient. We will discuss this topic in Chapter 5. |
Themes and Skins Maintain consistent look-and-feel for the entire site by using Skins definitions grouped by themes. We will discuss this topic in Chapter 8. |
Role Management Manages the assignment of roles to users, such as add user to role, delete user from role, enquire if user is in role, etc. We will discuss this topic in Chapter 5. |
|
Web Parts Provides the infrastructure for creating Web Parts. We will discuss this topic in Chapter 3. |
Localization Simplify the steps needed to globalize and localize your web applications. We will discuss this topic in Chapter 8. |
Site Maps Supports the retrieval of site information, as well as display of site maps. We will discuss this topic in Chapter 2. |
|
Navigation Controls Contains controls that display site information and menus. We will discuss this topic in Chapter 2. |
Compilation Supports dynamic compilation of business logic without the need for explicit recompilation when the code is changed. Also supports automatic generation of Web Services proxy class using WSDL. We will discuss this topic in Chapter 6. |
Profile Supports the personalization of Web sites through the Profile object. We will discuss this topic in Chapter 7. |
|
Additional Standard Controls Contains controls such as ImageMap, FileUpload, MultiView, and TreeView. |
This chapter starts with a walkthrough of the steps you now follow to create a web application with Visual Studio 2005, and then dives into a few of the coolest new controls and control functionality.
Tip
If the professional editions of Visual Studio 2005 are too expensive for you, try the Visual Web Developer 2005 Express Edition, a lightweight, easy-to-use, and easy-to-learn development tool focused exclusively on web development. It is primarily targeted at hobbyist developers and students who may find the cost of Visual Studio 2005 prohibitive. At the time of this writing, Microsoft has not yet announced pricing for the Visual Web Developer 2005 Express Edition but is widely expected to sell this version for a nominal amount.
Create a New Web Project
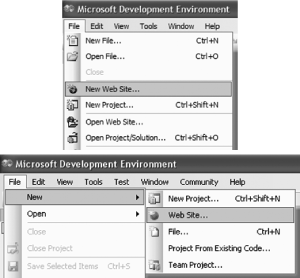
The way you create a new web application project has changed in Visual Studio 2005. In Visual Studio .NET 2003, you select File→ New Project on the Visual Studio menu and then select the kind of project you want to create (Web, Windows, Windows Services, and so on) in the New Project Dialog. In Visual Studio 2005, you open a new web project with the New Web Site... command in the File menu.
Note
With Visual Studio 2005, it’s now easier than ever to start building an ASP.NET web application. You’ve got to try it to believe it!
How do I do that?
To get a feel for how you create a new web application in Visual Studio 2005, try walking through the following steps. First we’ll open the application, pick a location to host it for development, and then add a second web form. Finally, we will see how we can debug the application.
You can change the IDE settings (listed in Sidebar 1-2 via Tools→ Import and Export Settings.... Since this book is all about web development, we naturally suggest you select Web Development Settings. Launch Visual Studio 2005. If you selected the Web Development Settings option in Visual Studio 2005, go to the File menu and select New Web Site..., as shown at the top of Figure 1-1. If you have chosen any other setting, go to the File menu and choose New→ Web Site... (see the bottom part of Figure 1-1).
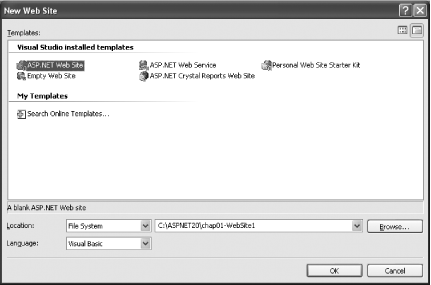
When the New Web Site dialog box appears, select a project template from the Templates pane. Since we’re creating a blank ASP.NET web site in this lab, select the ASP.NET Web Site template.
In the New Web Site dialog, you need to choose a development language and a place to locate the project. We’ll be using Visual Basic as our language of choice throughout this book, so from the Language drop-down listbox, select Visual Basic.
Visual Studio 2005 provides four ways to develop a web site. For this lab, you’ll use the File System option. Choose File System from the Location drop-down list. This new ASP.NET 2.0 option frees you from having to use IIS (Microsoft Internet Information Server) for development. Instead, Visual Studio 2005 provides its own built-in web server, which it launches when you run the web application. Use C:\ASPNET20\ as the location of your application and chap01-WebSite1 as its name. Type the complete pathname, C:\ASPNET20\chap01-WebSite1, into the drop-down combo box to the right of the Location box.
Note
No more worries about creating virtual directories on your web server! Visual Studio 2005 comes with a file-based web server for developing ASP.NET 2.0 applications. Now you can also develop ASP.NET 2.0 web applications on a Windows XP Home Edition PC, which traditionally does not include IIS.
Figure 1-2 shows the completed New Web Site dialog.
Tip
For all subsequent examples in this book, you will use C:\ASPNET20\ as the directory in which to store your projects.
If you do wish to use IIS for development purposes, select HTTP from the Location drop-down list and enter a URL for the application instead, such as http://localhost/chap01-WebSite1.
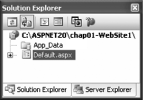
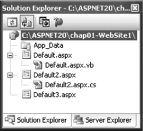
Once you have selected your template, language, and location, click OK. Visual Studio creates your project, and the Solution Explorer should display the files shown in Figure 1-3.
By default, ASP.NET creates a folder named App_Data and an initial application page, a Web Form named Default.aspx with a code-behind page named Default.aspx.vb (to see the contents of this file, click the + symbol to the left of Default.aspx icon in the Solution Explorer).
In Visual Studio 2005, a Web Form is displayed in Source View by default. In Source View, you can modify the various attributes of the form and the controls contained within it. To switch to Design View, click on the Design button at the bottom of the screen. In Design View, you can visually inspect the page and drag and drop controls onto the form. To view the code-behind of the form, you can simply double-click on the form and the code-behind will appear. In Code View, you write your business logic for your application as well as service the events raised by the various controls on the page. Figure 1-4 shows the three views.
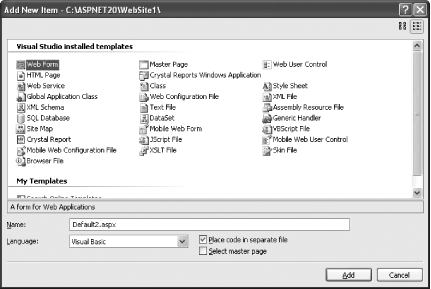
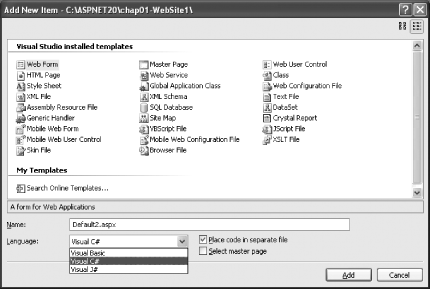
To add a new item (such as an additional Web Form) to your project, you can right-click the project name and select a template from the Add New Item... dialog box shown in Figure 1-5.
Notice that you have the option to “Place code in separate file.” If this option is unchecked, your code will reside in the same file as your Web Form. For all the examples in this book, you will place the code in a separate file. Hence, check the “Place code in separate file” option. Click Add.

Tip
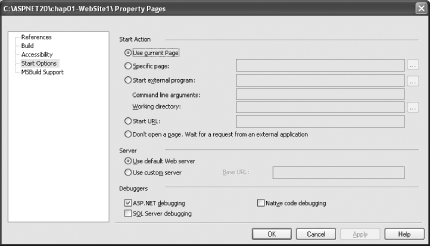
If you wish to debug your application (by using F5), you need to have a Web.config file in your project. By default, if there is no Web.config file when you try to debug your application, Visual Studio will prompt you to add one.
In Visual Studio 2005 (unlike Visual Studio .NET 2003), Web.config is not automatically added to your project. To add a Web.config file yourself, simply go to the Add New Item... dialog box, and select Web Configuration File from the “Visual Studio installed templates” window.
What about...
...modifying the code generated by the Visual Designer?
If you look at the code-behind of a Web Form, you will realize that the bulk of the user interface code generated by Visual Studio is no longer visible, as it has been in ASP.NET 1.x. Instead, you see a partial class:
Partial Class Default_aspx

End Class
You add your business logic to this partial class. Unlike ASP.NET 1.x, where the code-behind contains code generated by the Visual Designer, ASP.NET 2.0 does not display this section. Instead, at compile time, the Visual Designer automatically generates the partial class needed to implement the user interface and merges it with your code-behind.
...choosing another location for your web application?
Visual Studio 2005 provides four possible locations for a web application. If you are developing a simple web application (or are just trying out some of the new features in ASP.NET), the quick and easy way to build the application is to use the File System method. This method is also useful for developers who do not have a web server (such as IIS) installed on their machine, or for developers who are using Windows XP Home Edition as their development workstation.
If you already have a web server installed on your machine and you want to use it to host your web application, you can choose the Local IIS method. Doing so allows your web application to be accessed from other machines during development time.
If your web server is located remotely, such as in a hosting environment, then you could use the FTP method. Use FTP Sites if your hosting vendor supports FTP access. Alternatively, you can host your application on another remote server through HTTP using the Remote Web Site option. To use this option, the remote server must be configured with the FrontPage Server Extensions.
Where can I learn more?
Visit the Visual Studio 2005 home page at http://lab.msdn.microsoft.com/vs2005/ for information on the latest changes to Visual Studio 2005.
If you prefer to use the Visual Web Developer 2005 Express Edition, head over to http://lab.msdn.microsoft.com/express/vwd/default.aspx for information on how to download a trial copy.
Use Multiple Languages
Unlike ASP.NET 1.x, which requires that you use the same language throughout a web application, ASP.NET 2.0 lets you vary your languages from page to page within a project.
Tip
While support for multiple languages is a useful feature, developers should use it in moderation (and only if necessary). Going with multiple languages in a single project is likely to increase the effort required in maintaining the project, particularly if the application ends up being maintained by someone who’s not familiar with all the languages used.
Figure 1-7 shows a project with three pages, each of which is programmed with a different language: VB.NET (Default.aspx), C# (Default2.aspx), or VJ# (Default3.aspx).
Tip
VJ# does not support code-behind pages, so none appear for Page3.aspx in the Solution Explorer window.
How do I do that?
To verify that you can really mix languages in an ASP.NET 2.0 web application, in this lab you will create an application that uses two languages: VB.NET and C#.
Using the project created in the last lab, add a new Web Form by right-clicking the project name in Solution Explorer and then selecting Add New Item.... Select Web Form from the list of installed templates.
In the Add New Item dialog, you can choose the language you want to use, as shown in Figure 1-8. ASP.NET 2.0 supports three languages: VB2005, C#, and VJ#. Use the default name of Default2.aspx and choose the C# language. Click Add.
In the Code View of Default.aspx, code the following:
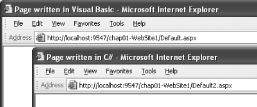
Protected Sub Page_Load(ByVal sender As Object, _
                        ByVal e As System.EventArgs) _
                        Handles Me.Load
    Page.Title = "Page written in Visual Basic"
End Sub
In the Code View of Default2.aspx, code the following:
void Page_Load(object sender, EventArgs e)
{
    Page.Title = "Page written in C#";
}
To test the application, select Default.aspx in Solution Explorer and press F5. In IE, note the title of the window. Now, change the URL to load Default2.aspx. Figure 1-9 shows the effect of loading the two forms.
What about...
...using other .NET-supported languages such as C++, Python, or Perl?
Visual Studio 2005 will support only VB2005, C#, and VJ# for web development. The other languages are, however, available for other types of non-web projects.
Where can I learn more?
There is a good discussion on mixing languages in a .NET project at http://weblogs.asp.net/dreilly/archive/2003/05/17/7164.aspx. So before you go ahead and write your next ASP.NET web application using both VB.NET and C# (or J#), check out what other developers have to say.
Set the Focus of Controls
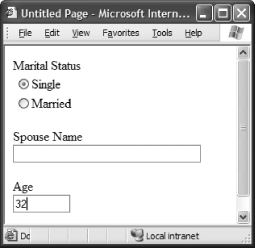
In earlier versions of ASP.NET, assigning focus to a control involves writing client-side script (such as JavaScript). In ASP.NET 2.0, this process has been much simplified, and you can now set the focus of a control via its Focus( ) method. Consider the example shown in Figure 1-10. If the user clicks on the Single radio button, you would expect the focus to now be assigned to the Age text box. If the Married option is selected, the Spouse Name text box should get the focus.
How do I do that?
To try out the new Focus( ) method, work through the following steps to implement the form shown in Figure 1-10.
In Visual Studio 2005, create a new ASP.NET 2.0 web application and name it C:\ASPNET20\chap01-ControlFocus.
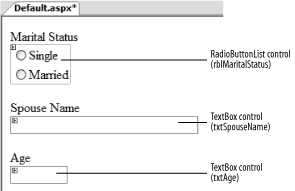
Add a radio button list and two text box controls to the default Web Form and give them the names shown in Figure 1-11.
Populate the
RadioButtonListwith two items: Single and Married. To do so, switch to Source View and add the following bold lines:<asp:RadioButtonList ID="rblMaritalStatus" runat="server" AutoPostBack="True"> <asp:ListItem>Single</asp:ListItem> <asp:ListItem>Married</asp:ListItem> </asp:RadioButtonList><br />To ensure that the Spouse Name text box gets the focus when the user selects the Married radio button, and the Age text box gets the focus when the user selects the Single radio button, you need to set the AutoPostBack property of the RadioButtonList control (
rblMaritalStatus) totrue. This can be done either in the Tasks Menu of the RadioButtonList control (check the Enable AutoPostBack option) or via the Properties window.To implement the desired focus rules described in the previous step, double-click the RadioButtonList control to reveal the code-behind, and add the following code to the page:
Protected Sub rblMaritalStatus_SelectedIndexChanged( _
          ByVal sender As Object, _
          ByVal e As System.EventArgs) _
          Handles rblMaritialStatus.SelectedIndexChanged
    If rblMaritialStatus.SelectedValue = "Single" Then
        txtAge.Focus( )
    Else
        txtSpouseName.Focus( )
    End If
End Sub
Tip
You can also set the focus of a control through the SetFocus( ) method of the Page class. The syntax is:
Page.SetFocus(controlName)
What about...
...setting a default button on a Web Form?
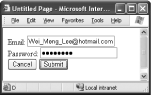
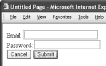
In ASP.NET 2.0, you can set a default button on a form. For example, Figure 1-12 shows a page with two TextBox controls and two Button controls. You can configure the Submit button to be the default button so it is automatically clicked when a user presses the Enter key.
To try this out on your own, follow these steps:
Note
In ASP.NET 2.0, you can now set a default button on a page so that when the user presses the Enter key the button is automatically invoked.
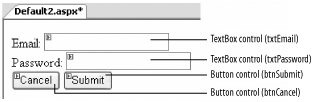
Create a form like the one shown in Figure 1-13.
Switch the Web Form to Source View and then add the lines of code shown in bold. The defaultfocus attribute sets the control that will be assigned the focus when the form is loaded. The defaultbutton attribute sets the button to be activated when the Enter key is pressed:
<form id="form1" runat="server"
   defaultbutton="btnSubmit"
   defaultfocus="txtEmail"
   >
<div>
    Email:
    <asp:TextBox ID="txtEmail" runat="server" Width="174px"></asp:TextBox>
    <br />
    Password:
    <asp:TextBox ID="txtPassword" runat="server" Width="153px"
       TextMode="Password"></asp:TextBox>
    <br />
    <asp:Button ID="btnCancel" runat="server" Text="Cancel" />
    <asp:Button ID="btnSubmit" runat="server" Text="Submit" /><br />
    <br />

</div>
</form>
Press F5 to load the form; note that the focus is on the Email text box (see Figure 1-14), and the Submit key is set as the default button.
Where can I learn more?
The Focus( ) method in ASP.NET 2.0 works on the server side; hence, every time you need to set the focus of a control, you need to initiate a postback. If you want to set the focus of controls on the client side without a postback, check out the following two links:
Define Multiple Validation Groups on a Page
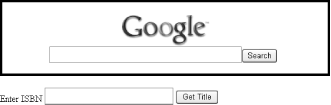
In ASP.NET 1.x, all controls in a single page are validated together. For example, suppose you have a Search button and a Get Title button, as shown in Figure 1-15. If you use a RequiredFieldValidator validation control on the ISBN text box, then clicking the Search button will not result in a postback if the ISBN text box is empty. This is because the entire page is invalidated as long as one control fails the validation.
Note
By grouping controls into validation groups, you can now independently validate collections of controls.
In ASP.NET 2.0, group validation allows controls in a page to be grouped logically so that a postback in one group is not dependent on another.
How do I do that?
The best way to explore this new feature is to create a form with multiple postback controls, add a validator to one of them, and then assign each control to a separate group. In this lab, you’ll implement the form shown in Figure 1-15.
Launch Visual Studio 2005 and create a new web site project. Name the project C:\ASPNET20\chap01-Validation.
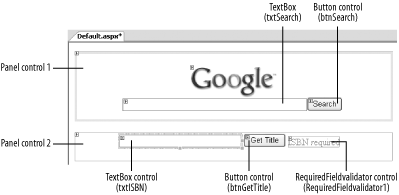
Populate the default Web Form with the Panel, TextBox, and Button controls shown in Figure 1-16.
In the top panel (Panel control 1), you’ll configure the Search button to post the search string to the server, which in turn will redirect to Google’s site. To do so, double-click the Search button (
btnSearch) and enter the following code on the code-behind to redirect the search string to Google’s site:Sub btnSearch_Click(ByVal sender As Object, _ ByVal e As System.EventArgs) _ Handles btnSearch.Click Dim queryStr As String = HttpUtility.UrlEncode(txtSearch.Text) Response.Redirect("http://www.google.com/search?q=" & queryStr) End SubThe TextBox control contained in the bottom panel (Panel control 2) will take in an ISBN number and perhaps perform some processing (like retrieve details of a book from Amazon.com). Associate the RequiredFieldValidator control with the ISBN text box (you can configure it in Source View):
<asp:RequiredFieldValidator
   ID="RequiredFieldValidator1" Runat="server"
   ErrorMessage="RequiredFieldValidator"
   ControlToValidate="txtISBN"
   SetFocusOnError="True">
   ISBN required</asp:RequiredFieldValidator>
To divide the controls into two separate validation groups, switch to Source View and use the ValidationGroup attribute, as shown in the following code sample (highlighted in bold):
... <asp:TextBox ID="txtSearch" Runat="server" Width="320px" Height="22px"> </asp:TextBox> <asp:Button ID="btnSearch" Runat="server" Text="Search"ValidationGroup="SearchGroup"/> ... <asp:TextBox ID="txtISBN" Runat="server" Width="212px" Height="22px"> </asp:TextBox> <asp:Button ID="btnGetTitle" Runat="server" Text="Get Title" ValidationGroup="BooksGroup" /> <asp:RequiredFieldValidator ID="RequiredFieldValidator1" Runat="server" ErrorMessage="RequiredFieldValidator" ControlToValidate="txtISBN" ValidationGroup="BooksGroup">ISBN required </asp:RequiredFieldValidator> ...Here, the Search button is assigned the SearchGroup validation group, while the Get Title button and the
RequiredFieldValidatorare both assigned to the BooksGroup validation group.Press F5 to test the application. Now you can click the Search and Get Title buttons independently of each other.
What about...
...setting the focus on the field on error?
All validation controls in ASP.NET 2.0 now support the SetFocusOnError property. Simply set a validator control’s SetFocusOnError attribute to True so that the browser will set the focus on the control on error.
In the previous example, if the RequiredFieldValidator control has the SetFocusOnError attribute:
<asp:RequiredFieldValidator
   ID="RequiredFieldValidator1" Runat="server"
   ErrorMessage="RequiredFieldValidator"
   ControlToValidate="txtISBN"
   ValidationGroup="BooksGroup"
   SetFocusOnError="True">
Then the ISBN text box will get the focus if you click the Get Title button when the ISBN text box is empty.
Where can I learn more?
If you are interested in simulating the validation group behavior of ASP.NET 2.0 in ASP.NET 1.x, check out http://weblogs.asp.net/skoganti/archive/2004/12/05/275457.aspx.
Insert Client Script into a Page
There are times when you need to insert client-side JavaScript into your page to implement client-side functionalities. Take the example of an eBanking web application. If the user has not been active for a certain period of time after logging in, the application will prompt the user with a pop-up window asking if the user would like to continue. Employing a pop-up window is more likely to draw the user’s attention than simply displaying the message on the web page, and this is best implemented with client-side script.
Note
You can now insert client script into your web page as naturally as writing your server-side code.
In ASP.NET 2.0, you can insert client-side script by using the ClientScript property of the Page class.
How do I do that?
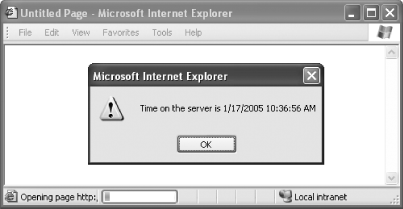
To see how you can insert a client script into an ASP.NET 2.0 web application, you will create an application that displays the current time in a JavaScript window when the application is loaded.
In Visual Studio 2005, create a new web site project and name it C:\ASPNET20\chap01-ClientScript.
Double-click the default Web Form to switch to the code-behind.
In the Form_Load event, insert a client script onto the page using the RegisterClientScriptBlock( ) method. The following example inserts a JavaScript code that displays the current time on the server. The time will be displayed in a window, as shown in Figure 1-17.
Protected Sub Page_Load(ByVal sender As Object, _
                        ByVal e As System.EventArgs) _
                        Handles Me.Load
    '---inserting client-side script
    Dim script As String = _
        "alert('Time on the server is " & Now & "');"
    Page.ClientScript.RegisterClientScriptBlock( _
        Me.GetType, "MyKey", script, True)
End Sub
Tip
The RegisterClientScriptBlock( ) method is also available in ASP.NET 1.x and appears under the Page class. However, its namespace has changed in ASP.NET 2.0 and appears under the ClientScriptManager class. You can get an instance of the ClientScriptManager class via
Page.ClientScript.The parameters of the RegisterClientScriptBlock( ) method are:
- Type
The type of the calling page
- Key
The key to identify the script
- Script
Content of the script to be sent to the client side
- AddScript
Indicates whether the script should be enclosed within a <script> block. The script generated on the client-side would look like this:
<script type="text/javascript">
<!--
alert('Time on the server is 7/18/2004 12:07:23 PM');//
-->
</script>
If the AddScript parameter is set to False, the script will not be executed on the client side; instead, it simply will be shown on the web page.
What about...
...including a script file?
Instead of inserting strings of client-side script into your application, you might have a much more sophisticated client-side application that is saved in a separate file. In this case, it is more effective for you to include the file directly rather than insert the scripts line by line.
Suppose you have a script file saved as hello.js and its content contains JavaScript code (without the <script> tag):
alert("Hello world, from JavaScript");You can include this script in your page through the RegisterScriptInclude( ) method:
'--including script files
Dim scriptURL As String = "./hello.js"
Page.ClientScript.RegisterClientScriptInclude( _
    Me.GetType, "MyKey", scriptURL)
The generated output looks like this:
<script src="./hello.js" type="text/javascript"></script>
Where can I learn more?
MSDN has a comprehensive article on injecting client-side script from an ASP.NET server control: http://msdn.microsoft.com/library/default.asp?url=/library/en-us/dnaspp/html/aspnet-injectclientsidesc.asp.
Post to Another Page
Most ASP.NET developers are familiar with the postback feature of ASP.NET server controls. However, in some cases, posting back to the same page is not the desired action—you might need to post to another. For example, you might need to build an application to perform some surveys. Instead of displaying 50 questions on one page, you would like to break it down to 10 questions per page so that the user need not wade through 50 questions in one go. Moreover, answers to certain questions might trigger a related set of questions in another page. In this case, using a conventional postback mechanism for your web pages is clearly not the solution. You might want to post the values (i.e., the answers to the questions) of one page to another. In this situation, you need to be able to cross-post to another page and, at the same time, be able to retrieve the values from the previous page.
In ASP.NET 1.0 and 1.1, there is no easy way to transfer to another
page, and most developers resort to using
Server.Transfer. Even so, passing values from one
page to another this way is a challenge.
In ASP.NET 2.0, cross-page posting is much easier. Controls now inherently support posting to another page via the PostBackUrl attribute.
How do I do that?
To see cross-page posting in action, you will create an application that contains two pages. One page lets you choose items from a CheckBoxList control and then lets you cross-post to another page. You will learn how the values that were cross-posted can be retrieved in the destination page. In addition, you will see the difference between cross-page posting and the old Server.Transfer( ) method.
In Visual Studio 2005, create a new web site project and name it C:\ASPNET20\chap01-CrossPagePosting.
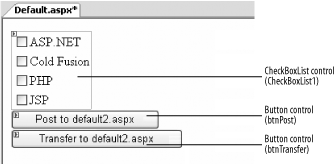
Populate the default Web Form with the controls shown in Figure 1-18. The CheckBoxList1 control contains CheckBox controls that let users choose from a list of values. When the “Post to Default2.aspx” button is clicked, you will post the values to Default2.aspx using the new cross-page posting feature in ASP.NET 2.0. The “Transfer to Default2.aspx” button uses
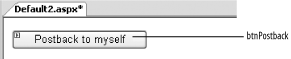
Server.Transferto load Default2.aspx.Add a new Web Form to your project and populate it with a Button control (see Figure 1-19).
In Default.aspx, switch to Source View and add the PostBackUrl attribute to
btnPostso that it can perform a cross-page post to Default2.aspx:<asp:Button ID="btnPost" PostBackUrl="~/Default2.aspx" runat="server" Text="Post to Default2.aspx" />For
btnTransfer, add the following code-behind:Protected Sub btnTransfer_Click(ByVal sender As Object, _ ByVal e As System.EventArgs) _ Handles btnTransfer.Click Server.Transfer("Default2.aspx") End SubIn order for Default2.aspx to access the value of the CheckBoxList1 control in Default.aspx, expose a public property in Default.aspx. To do so, switch to the code-behind of Default.aspx and type in the following code shown in bold:
Partial Class Default_aspx Inherits System.Web.UI.Page Public ReadOnly Property ServerSide( ) As CheckBoxList Get Return CheckBoxList1 End Get End Property Protected Sub btnTransfer_Click(ByVal sender As Object, _ ByVal e As System.EventArgs) _ Handles btnTransfer.Click Server.Transfer("Default2.aspx") End Sub End ClassIn Default2.aspx, you need to specify that Default.aspx is going to post to it by using the PreviousPageType directive. In Default2.aspx, switch to Source View and add the PreviousPageType directive:
<%@ Page Language="VB" AutoEventWireup="false"
    CodeFile="Default2.aspx.vb" Inherits="Default2_aspx" %>
<%@ PreviousPageType VirtualPath="~/Default.aspx" %>
When Default.aspx posts to Default2.aspx, all the information about Default.aspx is encapsulated in a special property known as
PreviousPage. When Default2.aspx loads, you must first determine whether it was posted by Default.aspx or it gets loaded by itself. So check ifPreviousPagecontains a reference:Sub Page_Load(ByVal sender As Object, ByVal e As System.EventArgs) Handles Me.Load If PreviousPage IsNot Nothing Then ...Then check if this is a cross-page post or a
Server.Transferby using the new IsCrossPagePostBack property. This property will be true if Default.aspx cross-posts to Default2.aspx, false if Default.aspx performs aServer.Transferto Default2.aspx:If PreviousPage IsNot Nothing Then '--checks the type of posting If PreviousPage.IsCrossPagePostBack Then Response.Write("This is a cross-post") Else Response.Write("This is a Server.Transfer") End IfFinally, display the selections made in the CheckBoxList control in Default.aspx:
Response.Write("<br/>You have selected :")
Dim i As Integer
For i = 0 To PreviousPage.ServerSide.Items.Count - 1
    If PreviousPage.ServerSide.Items(i).Selected Then
        Response.Write( _
        PreviousPage.ServerSide.Items(i).ToString & " ")
    End If
Next
Tip
The ServerSide property refers to the property exposed in Default.aspx. The advantage to exposing properties in the page is that the data is strongly typed.
The entire block of code is as shown:
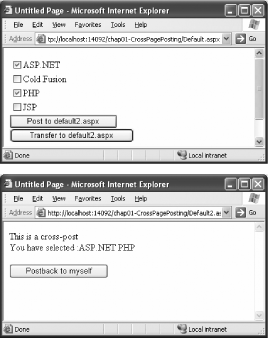
Protected Sub Page_Load(ByVal sender As Object, _
                        ByVal e As System.EventArgs) _
                        Handles Me.Load
    If PreviousPage IsNot Nothing Then
        '--checks the type of posting
        If PreviousPage.IsCrossPagePostBack Then
            Response.Write("This is a cross-post")
        Else
            Response.Write("This is a Server.Transfer")
        End If

        Response.Write("<br/>You have selected :")
        Dim i As Integer
        For i = 0 To PreviousPage.ServerSide.Items.Count - 1
            If PreviousPage.ServerSide.Items(i).Selected Then
                Response.Write( _
                PreviousPage.ServerSide.Items(i).ToString & " ")
            End If
        Next
    End If
End Sub
To see the example in action, Figure 1-20 shows a cross-page post.
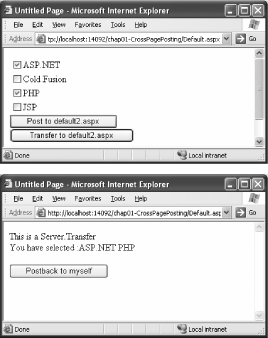
Figure 1-21 shows posting to Default2.aspx via the Server.Transfer method. Note the URL of both pages (they are the same for
Server.Transfer).If you click the button “Postback to myself” in Default2.aspx, you will notice that the information from Default.aspx is no longer displayed; a postback will clear the object reference in the PreviousPage property.
What about...
...having multiple pages post to the same page?
In this case, you would not be able to use the early binding mechanism accorded by the PreviousPage property, because the PreviousPageType directive predefines the type of a previous page:
<%@ PreviousPageType VirtualPath="~/default.aspx" %>
So if there are different pages posting to a common page, having this directive is not useful, because those pages may have different controls and types. Hence, a better way would be to use late-binding via the FindControl( ) method.
Example 1-1 shows how you can use the AppRelativeVirtualPath property of the PreviousPage property to get the address of the last page posted to it. The application then uses the FindControl( ) method to locate the controls within the source page.
Note
Use the FindControl( ) method to locate values in the previous page if multiple pages post to one page.
If PreviousPage.AppRelativeVirtualPath = "~/Default.aspx" Then
    Dim serverSide As CheckBoxList
    serverSide = CType(PreviousPage.FindControl("checkboxlist1"), _
                     System.Web.UI.WebControls.CheckBoxList)
    If serverSide IsNot Nothing Then
        Dim i As Integer
        For i = 0 To serverSide.Items.Count - 1
            If serverSide.Items(i).Selected Then
                Response.Write(serverSide.Items(i).ToString & " ")
            End If
        Next
    End If
ElseIf PreviousPage.AppRelativeVirtualPath = "~/Default3.aspx" Then
    Dim userName As TextBox
    userName = CType(PreviousPage.FindControl("txtName"), _
               System.Web.UI.WebControls.TextBox)
    If userName IsNot Nothing Then
        Response.Write(userName.Text)
    End If
End IfWhere can I learn more?
To learn more about the various ways to redirect users to another page, check out the Microsoft Visual Studio 2005 Documentation Help topic “Redirecting Users to Another Page.”
Selectively Display Groups of Controls
One task that is common in web applications is data collection. For example, you may need to create a page for user registration. On that page, you may want to collect a fair bit of information, such as username, birth date, and perhaps answers to survey questions (often used to collect subscriber information for controlled circulation magazines). A good practice is to split your questions across multiple pages so that the user need not scroll down a page that contains all the questions. Alternatively, ASP.NET 1.x developers often like to use the Panel controls to contain all the questions and then selectively display the relevant panels (and hide the other panels).
In ASP.NET 2.0, the MultiView control takes the drudgery out of creating multiple pages for this task. It allows controls to be contained within multiple View controls (a new control in ASP.NET 2.0), which you can then programmatically display.
How do I do that?
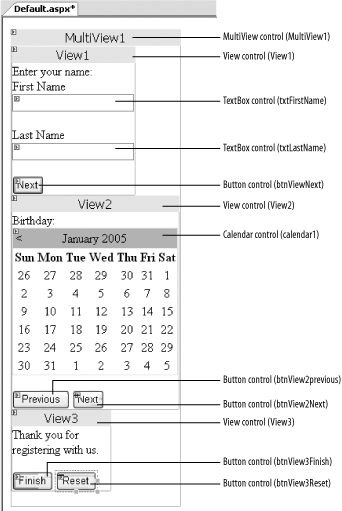
To see how the MultiView control works, you will create an application that contains a MultiView control with three View controls embedded in this control. You can then treat each View control like an ordinary Web Form and populate controls in it. You then connect these View controls together so that users can step through them in a specific order.
Launch Visual Studio 2005 and create a new web site project. Name the project C:\ASPNET20\chap01-MultiView.
Double-click the MultiView control (located in the Toolbox under the Standard tab) to add it to the default Web Form.
Double-click the View control (also located in the Toolbox under the Standard tab) and drag and drop it onto the MultiView control. Drag two more View controls onto the MultiView control.
Populate the View controls with the additional controls shown in Figure 1-22.
Double-click the Web Form to switch to its code-behind page. Add the code shown in Example 1-2 to service the Click events of all Button controls on Default.aspx.
Example 1-2. Event handler for all Click events on Default.aspxProtected Sub btnAllButtons_Click(ByVal sender As Object, _ ByVal e As System.EventArgs) _ Handles btnView1Next.Click, _ btnView2Next.Click, btnView2Previous.Click, _ btnView3Finish.Click, btnView3Reset.Click Select Case CType(sender, Button).Text Case "Next" MultiView1.ActiveViewIndex += 1 Case "Previous" MultiView1.ActiveViewIndex -= 1 Case "Finish" Response.Write("You have registered as " & _ txtFirstName.Text & _ txtLastName.Text & "<br/>") Response.Write("Birthday " & _ Calendar1.SelectedDate) btnView3Finish.Enabled = False btnView3Reset.Enabled = False Case "Reset" MultiView1.ActiveViewIndex = 0 End Select End SubThe ActiveViewIndex property of the MultiView control sets the View control to display. Set the ActiveViewIndex property of the MultiView control to 0 so that the first View control will be displayed when the page is loaded.
Press F5 to test the application. Figure 1-23 shows the results of stepping through the application.
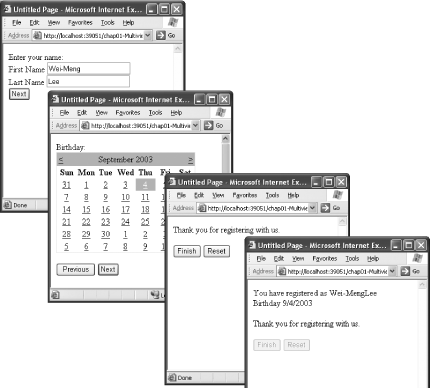
Notice that for every change of view, a postback to the server occurs.
What about...
...a more efficient method for dividing screens that does not require a postback?
While this lab uses the MultiView control to split a long page into multiple views, the inherent disadvantage with this control is that every change of view requires a postback. Unless you need to access data on the server side, it is much more efficient to use the Wizard control, which performs similar tasks without a postback.
The Wizard control can be found in the Toolbox under the Standard tab. To try out the functionality of the Wizard control:
Launch Visual Studio 2005 and create a new web site project. Name the project C:\ASPNET20\chap01-Wizard.
Add the Wizard control to the default Web Form.
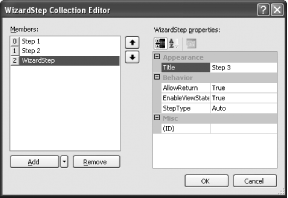
In the Wizard Tasks menu, click the Add/Remove WizardSteps... link (see Figure 1-24) to add one additional step to the control (by default, there are two steps created for you).
In the WizardStep Collection Editor window, click the Add button and then type “Step 3” in the Title text box (see Figure 1-25). Click OK.
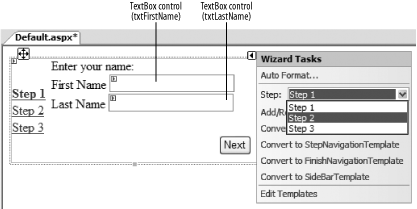
Populate the Step 1 of the Wizard control with two TextBox controls, as shown in Figure 1-26. To go to the next step, select Step 2 in the Wizard Tasks menu.
Populate Step 2 with the Calendar control (use the default name of Calendar1), as shown in Figure 1-27.
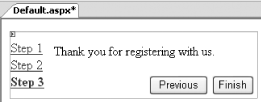
In Step 3, type the string as shown in Figure 1-28.
Double-click the Wizard control so that you can service the FinishButtonClick event when the user clicks on the Finish button in the final step (Step 3):
Protected Sub Wizard1_FinishButtonClick(ByVal sender As Object, _
    ByVal e As System.Web.UI.WebControls.WizardNavigationEventArgs) _
    Handles Wizard1.FinishButtonClick

    Response.Write("You have registered as " & _
            txtFirstName.Text & _
            txtLastName.Text & "<br/>")
    Response.Write("Birthday " & _
                    Calendar1.SelectedDate)
    Wizard1.Visible = False
End Sub
To test the application, press F5. Figure 1-29 shows the Wizard control in action.


Where can I learn more?
Check out the Visual Studio 2005 Help entries for the MultiView and Wizard controls to learn more about their full capabilities. In particular, the Wizard control contains many properties for you to customize.
Upload Files to Your Web Site
ASP.NET 2.0 now includes the FileUpload control, allowing web site users to upload files onto the web server for archival or file-submission purposes. For example, students typically need to upload their files to their school’s server when they submit their assignment or project work. You’ll find the FileUpload control in the Toolbox under the Standard tab.
How do I do that?
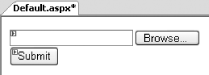
The Visual Studio designer represents the FileUpload control by adding an empty text box and a Button control to a Web page. To upload the selected file, you need to explicitly trigger an event, such as clicking a button (see the Submit button in Figure 1-30). In the following example, you will build an application that allows users to upload files to a particular directory on the server. You will also check the size of the file uploaded to ensure that users do not upload files that exceed an imposed limit.
Launch Visual Studio 2005 and create a new web site project. Name the project C:\ASPNET20\chap01-FileUpload.
In the Toolbox, double-click the FileUpload control located under the Standard tab to add the control to the default Web Form, Default.aspx.
Add a Button control to the default form, change its Text to “Submit”, and name the button “btnSubmit”.
Your form should now look like the one shown in Figure 1-30.
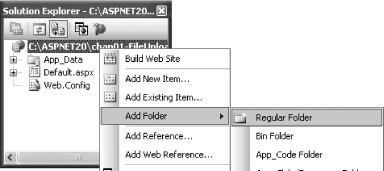
Right-click the project name in Solution Explorer and then select Add Folder→ Regular Folder (see Figure 1-31). Name the new folder “uploads”. This folder will be used to store the files uploaded by the user.
Double-click the Submit button to reveal the code-behind. Enter the following code for the Submit button:
Sub btnSubmit_Click(ByVal sender As Object, _
                    ByVal e As System.EventArgs) _
                    Handles btnSubmit.Click
    ' get the application path
    Dim savePath As String = Request.PhysicalApplicationPath
    ' uploads to a special upload folder
    savePath += "uploads\"
    If FileUpload1.HasFile Then ' verify if there is file to upload
        savePath += FileUpload1.FileName
        ' existing file will be overwritten
        FileUpload1.SaveAs(savePath)
        Response.Write("File uploaded successfully!")
    Else
        Response.Write("No file to upload")
    End If
End Sub
Tip
You use the FileUpload1.SaveAs( ) method to save the file onto the specified directory. If there is a file of the same name, this method will simply overwrite it with the new file. Hence it is important that you do some error checking before writing the file to the server.
You find out the path that the current application resides in by using the PhysicalApplicationPath property from the Request object. The HasFile property of the FileUpload control specifies if the user has selected a file to upload. The file selected is saved in the FileName property of the FileUpload control.
What about...
...limiting the size of uploaded files?
For security reasons, it is important to restrict the size of files that users may upload to your web site. (Allowing users to upload a file that is too large could potentially expose an app to a denial-of-service attack.) You can check the size of the file uploaded by using the ContentLength property, as the following example shows:
Note
Be sure to check the size of the file that your user is trying to upload. Failing to do so may allow users to upload large files thereby slowing (or crashing) your web server.
' ensure size if below 3MB
If FileUpload1.PostedFile.ContentLength <= 3145728 Then
   savePath += FileUpload1.FileName
   ' existing file will be overwritten
   FileUpload1.SaveAs(savePath)
   Response.Write("File uploaded successfully!")
Else
   Response.Write("File size exceeds 3MB.")
End If
Where can I learn more?
If you want to learn more about how file uploading is done in ASP.NET 1.x, check out this article: http://www.ondotnet.com/pub/a/dotnet/2002/04/01/asp.html.
Create an Image Map
Modern web sites use image maps to allow users to navigate to another part of the site, or to initiate an action by clicking on one or more hotspots of an image. For example, you want to display a world map on a page so that users can click on specific parts of the map to see information about a particular country. ASP.NET 2.0 includes a new ImageMap control that allows you to create image maps easily and painlessly.
The ImageMap control can be found in the Visual Studio Toolbox under the Standard tab.
How do I do that?
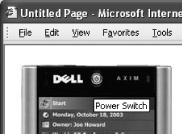
To see how the ImageMap control works, you will use an ImageMap control to display the image of a Pocket PC. You will define three different hotspots of different shapes on the Pocket PC so that users are able to click on the different parts of the image to see more information.
In Visual Studio 2005, create a new web site project and name it C:\ASPNET20\chap01-ImageMap.
Double-click the ImageMap control in the Toolbox to add a control to the default Web Form.
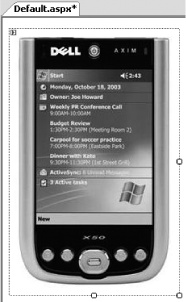
In Solution Explorer, right-click the project name and add a new folder named Images, where you’ll store the image used in this project. Save an image named dellaxim.jpg (see Figure 1-32) into the new folder: C:\ASPNET20\chap01-ImageMap\Images\.
To display the image in the ImageMap control, set its ImageURL property to point to the file you just saved (Images/dellaxim.jpg ). The ImageMap control will now display the image of a Pocket PC, as shown in Figure 1-32.
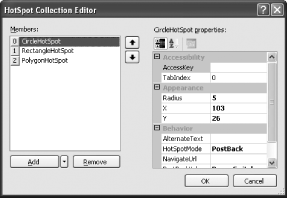
An image map works by providing one or more hotspots for users to click on, each initiating a particular action—for example, jumping to another page or altering the image itself. To define one or more hotspots, go to the Properties window for the ImageMap control, scroll down to the Hotspots property, and click on the Collections button (...) to invoke the HotSpot Collection Editor (shown in Figure 1-33).
The ImageMap control supports three kinds of hotspot: circles (
CircleHotSpot), rectangles (RectangleHotSpot), and polygons (PolygonHotSpot). The drop-down menu to the right of the dialog’s Add button dialog lets you choose the type of hotspot to add. Once you add a hotspot, a Properties window appears that allows you to specify the location and dimensions of the hotspot, as well as its key properties. Figure 1-33 displays the properties of aCircleHotSpotthat has a radius of5and x and y coordinates of103and26, respectively.You can also specify your hotspots by hand. You can switch to Source View and add in the hotspots elements manually, like this:
<asp:ImageMap ID="ImageMap1" runat="server"
   ImageUrl="Images/dellaxim.jpg">
   <asp:CircleHotSpot HotSpotMode="PostBack"
      X="103" Y="26" PostBackValue="PowerSwitch"
      Radius="5" />
   <asp:RectangleHotSpot Top="48" Bottom="242"
      Left="30" NavigateUrl="./screen.aspx"
      Right="177" />
   <asp:PolygonHotSpot
      Coordinates="92,273,112,273,123,287,112,303,92,303,83,287"
      PostBackValue="Navigation" HotSpotMode="PostBack" />
</asp:ImageMap>
Tip
You can use Microsoft Paint to display the image and then position your cursor at the various hotspots you want to define. You can find the coordinates of the cursor at the bottom of the window.
If you add the code shown in Step 6 or use the same attribute values to create hotspots with the HotSpot Collection Editor, you will end up with the hotspots shown in Figure 1-34.
Figure 1-34 shows an ImageMap with the three hotspots: a
CircleHotSpot, aRectangleHotSpot, and aPolygonHotSpot. TheCircleHotSpotdefines the region containing the power switch of the Pocket PC as a circle hotspot, whereas theRectangleHotSpotdefines the screen region as a rectangle hotspot. ThePolygonHotSpotdefines the navigational buttons on the Pocket PC as a polygon hotspot.A HotSpot control supports one of four modes of behavior, defined by its HotSpotMode property:
-
Not Set If a hotspot’s
HotSpotModeis set to "Not Set“, its behavior will assume that of theHotSpotModeas defined in the ImageMap control.-
Navigate Another page can be loaded when a hotspot is clicked.
-
PostBack A postback is sent to the server. This is useful in cases where you need to perform some action (such as increment a variable) when the user clicks on a hotspot.
-
Inactive Disables the hotspot.
Tip
The HotSpotMode property of the ImageMap control defines the default behavior of all the hotspots in that control’s HotSpot collection. A particular hotspot can override this behavior by setting its own HotSpotMode property.
To illustrate how a hotspot can be used to postback to a server, set the HotSpotMode property of the
CircleHotSpottoPostBackand the PostBackValue property value toPowerSwitch. To receive the postback value on the server side, add an event handler to service the click event of the ImageMap control:Protected Sub ImageMap1_Click(ByVal sender As Object, _ ByVal e As System.Web.UI.WebControls.ImageMapEventArgs) _ Handles ImageMap1.Click Dim str As String = "You have clicked " & e.PostBackValue Response.Write(str) End Sub-
Add a new Web Form to your project (right-click the project name in Solution Explorer, select Add New Item..., and then select Web Form) and name it screen.aspx. This page will be displayed when the user clicks on the
RectangleHotSpot.Use the
RectangleHotSpotto navigate to another page by setting its HotSpotMode property toNavigateand setting the NavigateURL property value toscreen.aspx.Press F5 to test the application. Note how your mouse pointer changes when it hovers over the various hotspots.

What about...
...adding Tool Tip text to the hotspots?
You can add Tool Tip text to the various controls in the ImageControl control using the AlternateText property. Adding Tool Tip text to hotspots greatly improves the usability of your application, as users can view more information about a hotspot. You can add Tool Tip text in Source View:
<asp:CircleHotSpot
   HotSpotMode="PostBack"
   X="103" Y="26" Radius="5"
   PostBackValue="PowerSwitch"
   AlternateText="Power Switch" />
You can also add it programmatically:
Protected Sub Page_Load(ByVal sender As Object, _
                        ByVal e As System.EventArgs) _
                        Handles Me.Load
    ImageMap1.HotSpots(0).AlternateText = "Power Switch"
    ImageMap1.HotSpots(1).AlternateText = "Screen"
    ImageMap1.HotSpots(2).AlternateText = "Navigation"
End Sub
The next time the user’s mouse hovers over the hotspots, he will see the Tool Tip text as shown in Figure 1-35.
Where can I learn more?
Besides using the ImageMap control to implement an image map, you can use the ImageButton as an image map. To see how, check out this link: http://samples.gotdotnet.com/quickstart/aspplus/samples/webforms/ctrlref/webctrl/imagebutton/doc_imagebut.aspx.
Get ASP.NET 2.0: A Developer's Notebook now with the O’Reilly learning platform.
O’Reilly members experience books, live events, courses curated by job role, and more from O’Reilly and nearly 200 top publishers.

