
Designed for
Illustrator
Repurposed
from
Photoshop
What I love about dynamic effects—also known as “live” effects—
is that very few Illustrator users know they exist. And even those
that do have only the sketchiest idea of how powerful and fl exible
they can be. My hope is that once you try them out for yourself, it
won’t be so much the effects that come alive as your imagination.
The Best (and Worst) Effects
The Effect menu contains more than 120 commands, all of which
produce different results, nearly half of which were designed for
Photoshop (and have little practical application in Illustrator), and
some of which refuse to work except under very specifi c conditions.
In other words, they’re not the friendliest bunch.
Fortunately, Illustrator does a nice job of dividing them into cat-
egories. And a few of the effects are exceedingly useful. Here’s how
the Effect menu (pictured in Figure 10-2, with the best submenus
highlighted in red) breaks down, from most useful to least:
•
Effect→Distort & Transform→Transform lets you nudge, scale,
rotate, and otherwise transform whole objects (or individual
stroke and fi ll attributes) from a single dialog box. Transform
is heads and shoulders the most practical of the dynamic ef-
fects, which is why—if you loaded my dekeKeys (see page xviii
of the Preface)—I’ve assigned it a keyboard shortcut of Ctrl+E
(on the Mac, -E) for Effect. You’ll be seeing a lot of this one.
•
Effect→Stylize→Drop Shadow casts a shadow behind a se-
lected path. Many complain that drop shadows get overused,
but they’re overused for good reason: They help offset objects
and create a sense of depth. For dekeKeys loaders, again I have
a shortcut: Ctrl+Alt+E (or -Option-E).
• Most of the other commands in the Effect→Distort & Trans-
form submenu (that is, besides Transform) twist and turn path
outlines. I long ago christened these the path wigglers. Because
that’s what they do, and they’re very good at it. Pucker & Bloat
is just one example.
•
Effect→Stylize→Scribble breaks a fi ll, stroke, or both into a
series of back-and-forth crosshatch lines. It offers an intricate
dialog box, but it’s one of the best commands in all of Illustrator.
• Effect→Stylize→Round Corners smooths away the acute cor-
ners along a selected path. And brilliantly, it does so on-the-
fl y, so that you can make the corner more or less round at a
moment’s notice.
Figure 10-2 .
331
The Best (and Worst) Effects
•
The remaining Effect→Stylize commands ( Feather,
Inner Glow, Outer Glow) blur path outlines and add
edge effects. If Feather doesn’t give you quite the
effect you’re looking for, try Effect→Blur→Gaussian
Blur from the Photoshop effects.
• The three commands in the Effect→3D submenu
transform one or more 2D paths into a 3D illus-
tration. Illustrator’s 3D opportunities are limited,
but with care you can create some eye-popping
effects, as you’ll learn in “Creating 3D Text and
Graphics” on page 372.
• The commands in the Effect→Warp submenu let
you distort text blocks and other objects without
requiring you to jump through hoops when you
later need to apply edits.
•
Effect→Crop Marks appends dynamic crop marks
to a selected path, group, or layer. It’s great for
business cards.
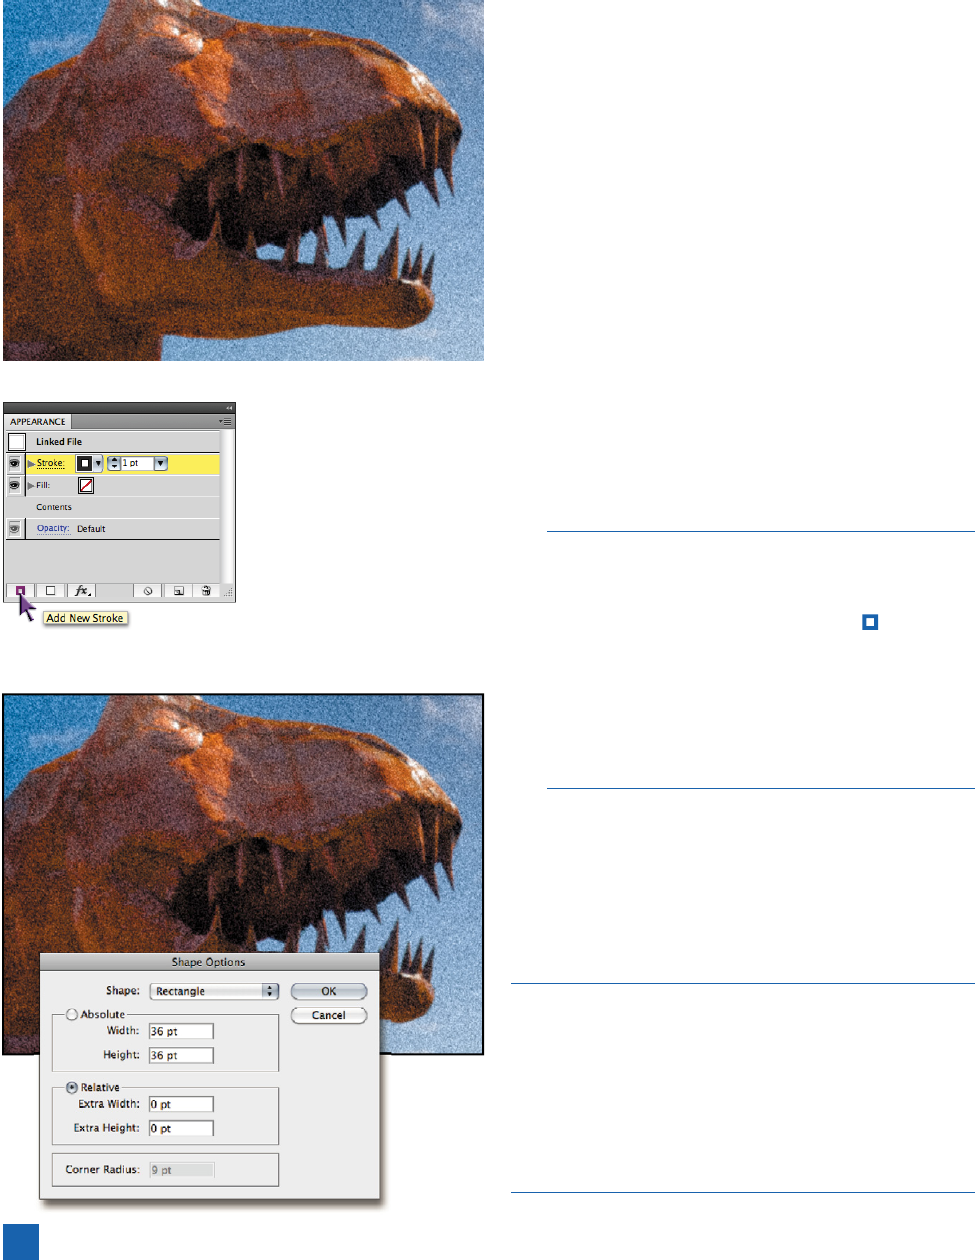
Here’s an interesting one: Normally, Illustrator doesn’t
allow you to stroke an imported photograph. But you can
force a stroke to frame a photo with the help of an effect.
Select the placed image, and click the
icon in the
bottom-left corner of the Appearance panel. Then, with
the Stroke attribute highlighted, choose Effect→Convert
to Shape→Rectangle. Select the Relative radio button,
set the Extra Width and Extra Height values to 0, and
click OK. I’ve taken the liberty of diagramming the entire
process in the gigantic and terrifying Figure 10-3.
• The rest.
If that seems glib, permit me to elaborate: Although
on occasion powerful, the commands in the Path and
Pathfi nder submenus are designed less for creative pur-
poses and more for problem solving.
Here’s an example. Start with a selected block of point text,
with a slim drop shadow, as shown at the top of Figure 10-4.
Select the text with the black arrow tool and apply a stroke
from the Appearance panel. With the Stroke attribute
selected, choose Effect→Path→Offset Path. Enter an Offset
value and click OK to move the stroke outward. Problem is,
the strokes intersect each other. To reconcile the overlaps,
choose Effect→Pathfi nder→Add. Figure 10-4 tells the story.
Select an imported photo, .. .
and apply Effect
→Convert to Shape→Rectangle
with the settings shown below.
add a new stroke from the Appearance panel, .. .
Figure 10-3 .
332
Lesson 10: The Amazing World of Dynamic Effects
Get Adobe Illustrator CS5 One-on-One now with the O’Reilly learning platform.
O’Reilly members experience books, live events, courses curated by job role, and more from O’Reilly and nearly 200 top publishers.

