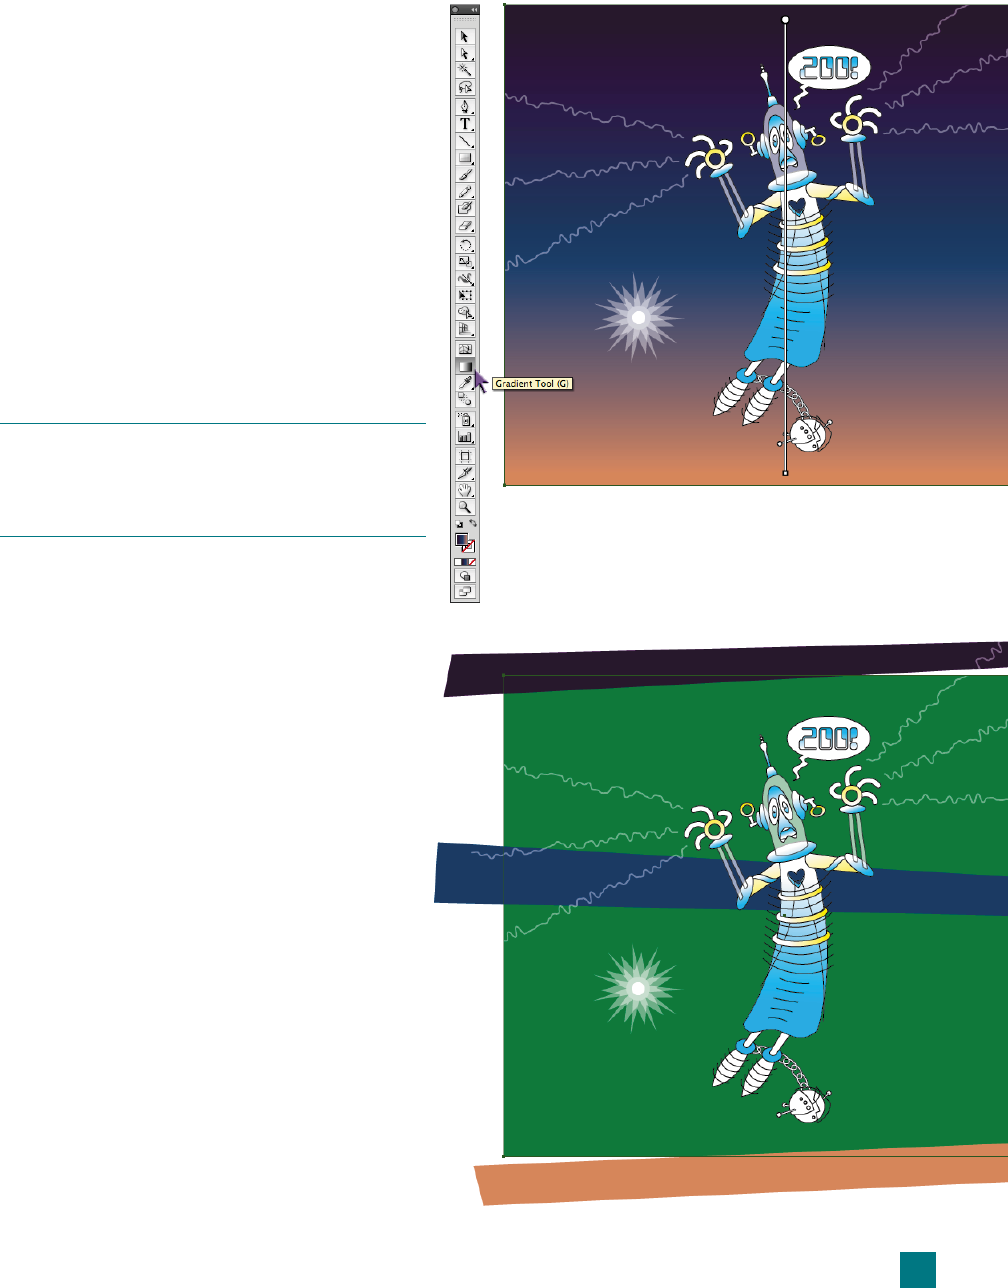
Figure 7-4 .
Points in a gradient mesh behave just like anchor points in a path.
You can move them, adjust their control handles, and otherwise
modify them as selective points in a larger whole.
The beauty of both blends and gradient mesh objects is that they are
forever editable. Change the color or shape of a blended path, and
all pieces of the blend update immediately. You can even change the
path of a blend, so it slows down, speeds up, or curves on its way
from one shape to the other. Plus, you can blend between multiple
shapes, fi ll and stroke attributes, and levels of transparency. Mean-
while, each and every point in a gradient mesh lies forever in wait
of your next edit, whether it be one of position, curvature, or color.
I demonstrate how to create and modify gradients with the gradi-
ent tool in Video Lesson 7, “Gradients.” In the exercises that fol-
low, I show you how to exploit the power of blends, masks, and
gradient mesh fi lls.
Blending Between Paths
The primary purpose of a blend is to create a custom gradient, in
which colors fl ow in controlled patterns. Because a blend trans-
forms one path into another, you need a mechanism for placing
those paths inside a larger shape. Hence the clipping mask, which
is a shape that crops the boundaries of the blended paths below it.
Although blends and masks rank among Illustrator’s
oldest features, they are some of its most powerful
as well. I show you how to create a blend in this ex-
ercise. I explain how to mask that blend in the next.
1.
Open an illustration with a gradient
background. Open Lone ghost.ai, found
in the Lesson 07 folder inside Lesson
Files-AIcs5 1on1 folder. Pictured in ,
this fi le is the sequel to the ghost robot you built
in Lesson 6. He’s shrieking the spooky “2oo!”—in
case you read it as the large number 200, which
would be a curious non sequitur even for a ghost
robot. Notice that I’ve restored some of the origi-
nal path outlines—including those in the smock,
shoes, and ball—so that we can rebuild those de-
tails using masks. The fi le also features a gradient
background, which we’ll replace with a blend.
206
Lesson 7: Blends, Masks, and Gradient Mesh

2. Select the large gradient rectangle. Scroll to the
bottom of the Layers panel and Alt-click (or on
the Mac, Option-click) in the second column to
the left of the Backdrop layer to lock all the other
layers in the illustration. This will make it easier to
navigate inside the illustration without selecting the
wrong objects. Then, using the black arrow tool,
click the outline of the largest rectangle to select it.
3. Select the gradient tool. Click the gradient tool
in the toolbox, as demonstrated in Figure 7-5, or
press the G key. Illustrator shows the gradient
annotator (also on display in the fi gure), with the
circular origin point at the top and the square ter-
minus point at the bottom.
If the gradient annotator gets in the way of seeing your
artwork, you can hide it by choosing View
→Hide Gradient
Annotator or by pressing Ctrl+Alt+G (
-Option-G). To
bring it back, choose View
→Show Gradient Annotator.
4. Examine the color stops. Hover your cursor over
the gradient annotator to see a total of three color
stops, one each at the top, middle, and bottom.
Double-click a color stop to bring up a pop-up
panel with CMYK values.
The existing fi ll pattern is a simple linear gradient,
progressing from a deep purple to blue and fi nally
ending in peach. The colors are fi ne, but I’d like
to introduce some moderate wave action to the
gradient using a blend.
5.
Switch to a solid fi ll. The next steps will show up
better if you eliminate the existing gradient. Go to
the Color panel (if you don’t see it, press F6) and
click a green in the spectrum bar at the bottom of
the panel. Although the exact shade of green isn’t
important, I opted for CMYK values of 100, 0,
100, and 35, respectively.
6.
Turn on the objects. In the Layers panel, twirl
open the Backdrop layer. Then click the fi rst col-
umn in front of the group called Objects to display
the three paths of color pictured in Figure 7-6.
Figure 7-5 .
Figure 7-6 .
207
Blending Between Paths
Get Adobe Illustrator CS5 One-on-One now with the O’Reilly learning platform.
O’Reilly members experience books, live events, courses curated by job role, and more from O’Reilly and nearly 200 top publishers.

