three. Group the squares into a single ornament by pressing
Ctrl+G (-G) or by choosing Object➝Group.
That’s it for the tonalpohualli for now. You’ve seen the start of what
you can do armed with only the scale tool. Save your work, grab a
snack, maybe get up and stretch—or dive right in to the next ex-
ercise, where the real magic of power transformations and series
duplication shines.
Rotate, Refl ect, and
Series Duplication
The ancient Aztec calendar still has some wisdom to impart—
namely, the use of the transformation tools to quickly recreate the
repeating ornaments around the circles of the calendar, also referred
to as series duplication. The current art contains just one of each of
these elements. In the Lesson 2 fi les, I had pre-created the bulk of
these ornaments; here, you’ll learn the secrets of how I made them.
1. Open the art in progress. If you have your artwork
from the last exercise, by all means, use it. Otherwise,
make your way to the Lesson 05 subfolder inside the
Lesson Files-AIcs5 1on1 folder, and open the fi le called
to rotate.ai. You’ll see just a smattering of ornaments; by the
end of the exercise, you’ll have recreated the full set.
2.
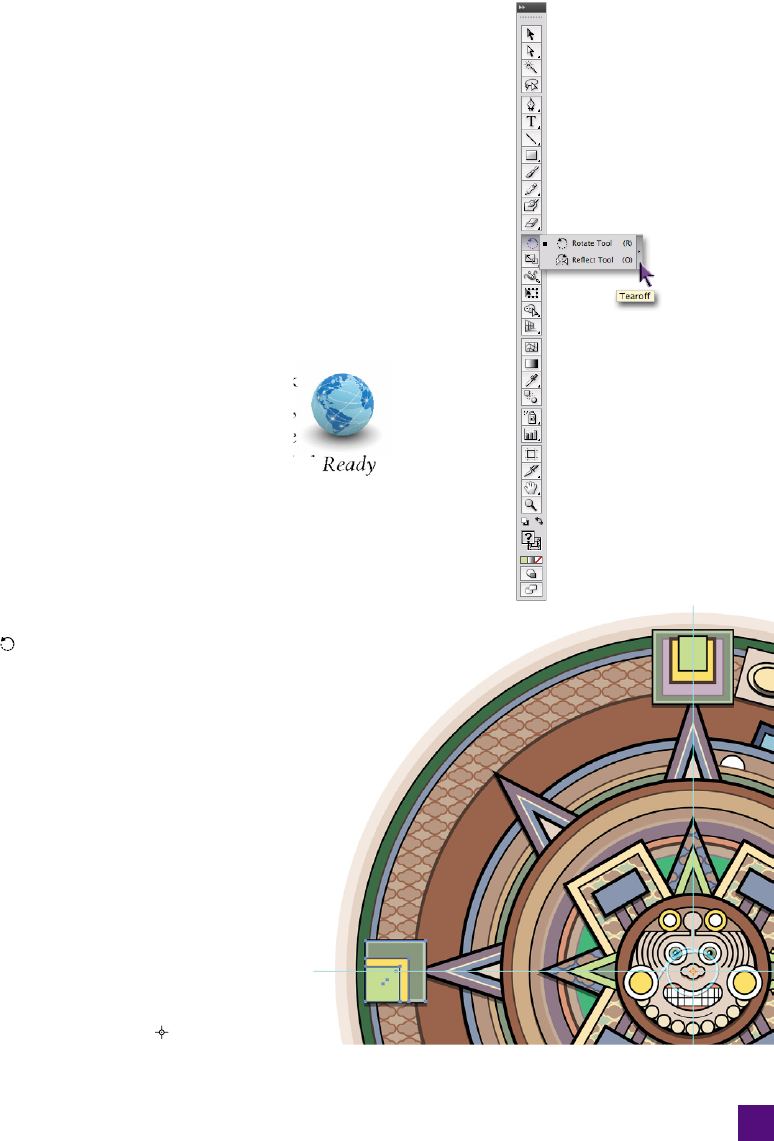
Tear off the rotate and refl ect tools. In this exercise, you’ll
be switching between the rotate and refl ect tools, which share
a spot in the toolbox. But there’s a better way to access them.
Click and hold the tool, and when you move over the tear-off
bar, as shown in Figure 5-43, release the mouse button. This
creates a fl oating minitoolbox that you can position anywhere
on the screen.
3.
Turn on the Guides layer. Click the far left column next to the
Guides layer to turn it on. You should now see two guides,
bisecting the horizontal and vertical centers of the art.
4. Select the ornament and set the origin. With the black
arrow tool, select the ornament you grouped in Step 16 of
the last exercise. Press the R key to switch to the rotate
tool, and click at the intersection of the two guides to
set the transformation origin, as shown in Figure 5-44.
(In the fi gure, I’ve changed the origin point to orange to
make it easier to see; by default, the icon will appear
in the same color as your guides.)
Figure 5-44 .
Figure 5-43 .
157
Rotate, Refl ect, and Series Duplication
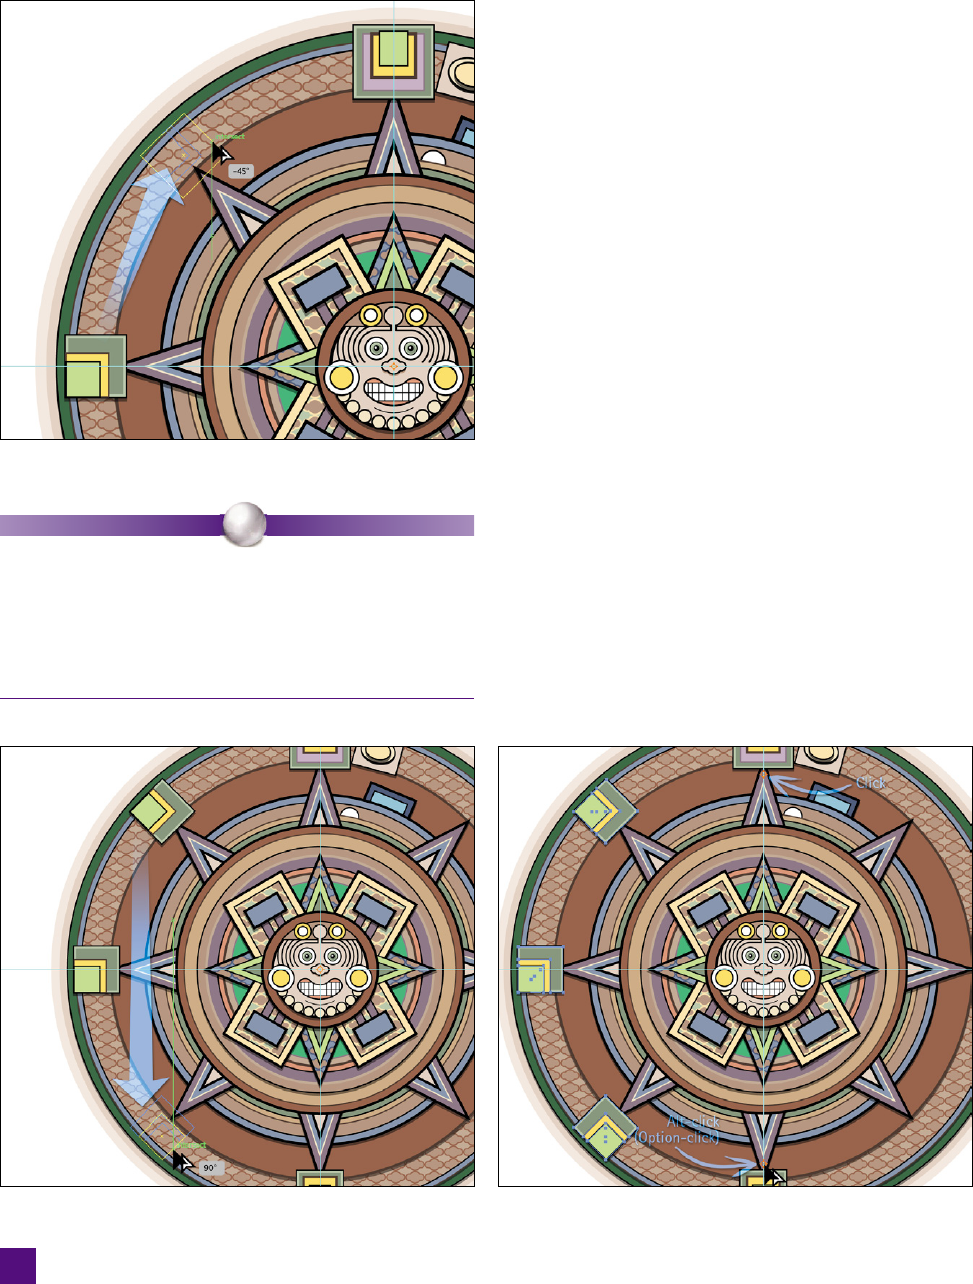
5. Rotate and clone the square ornament. Drag the
ornament clockwise around the calendar, as shown
in Figure 5-45. Add the Shift key to constrain the
rotation to 45-degree angles. Finally, add the Alt
(or Option) key to clone the shape, and then release
the mouse button.
6. Clone the ornament again. The cloned ornament
should still be selected; repeat the preceding step,
this time dragging counterclockwise. Your smart
measurement should read 90º when you release the
mouse button, as in Figure 5-46.
7.
Refl ect the three square ornaments. Now that you
have one half of the ornaments complete, it’s time
to clone them to the other side:
•
Switch to the black arrow tool, and add the
fi rst two square ornaments to the selection by
Shift-clicking them; all three ornaments should
be selected.
•
Switch to the refl ect tool by pressing the O key,
and click somewhere along the upper part of
the vertical guide.
•
Next, Alt-click (or Option-click) somewhere
along the lower part of the vertical guide, as in
Figure 5-47.
Figure 5-45 .
Figure 5-46 . Figure 5-47 .
P E A R L O F W I S D O M
It may seem counterintuitive, but for rotation purposes, positive
values rotate the object counterclockwise and negative values
rotate clockwise. I’ll spare you the gory details, but it stems
from the polar coordinate system (that forgotten lesson from
high school geometry), which is the same system Illustrator
uses to calculate rotations.
158
Lesson 5: Transform and Reshape
Get Adobe Illustrator CS5 One-on-One now with the O’Reilly learning platform.
O’Reilly members experience books, live events, courses curated by job role, and more from O’Reilly and nearly 200 top publishers.

