
You can adjust the leading value directly from the Character
panel (or from the Character panel pop-up menu by clicking
the word Character in the control panel), but there’s also a
keyboard shortcut that allows you to adjust it without chang-
ing tools and see your changes as you go. Press Alt+ or Alt+
(Option- or Option-) to adjust the leading up or down by
0.5 points (assuming you changed your preferences as directed
in the sidebar). Adding the Ctrl (or ) key increases the change
to fi ve times the normal value. After each keypress, the value
updates in the Character panel; once you’ve reached a leading
of 15 pt, you should have the spacing shown in Figure 4-19.
11. Change the byline tracking. I’d like the byline to fi ll out more
of the space under the title, but I don’t want to change the point
size. What I want is to increase the space between the charac-
ters; this attribute is known as tracking. You
can adjust the tracking directly from the
Character panel, but there is (you guessed
it) a shortcut. Press Alt+ and Alt+ (Op-
tion- and Option-) to adjust the tracking
out or in by
5
/1000 of an em space. A tracking
value of 0 uses standard spacing. Negative
numbers reduce the space between letters,
or tighten the tracking, while positive num-
bers increase the space, or loosen the track-
ing. Keep loosening the tracking until the
byline takes up roughly the space under
the six center capitals in the title (around a
value of 130 or so), like that in Figure 4-20.
That’s it for now. Save your work, because
we’ll be returning to this poem once again
in the next exercise. I’ll demonstrate how
to work with area type, and fl ow text from
one text frame to the next.
Editing Area Type
Now that you’ve learned the basics of formatting text, it’s time to turn
your attention to working with area type. Area type behaves much
more like type in traditional layout programs: Text automatically
wraps inside its text block, and text can fl ow from one block to the
next. The best use of area type is for longer passages of text—say,
body copy for an advertisement or the legalese present on nearly
Figure 4-19 .
Figure 4-20 .
122
Lesson 4: Creating and Formatting Text
every piece of printed material. In this exercise, you’ll use area type
to work with the fi rst two stanzas of our poem.
1.
Open the poem in progress. If you have your fi le from
the end of the preceding exercise, open it now. Oth-
erwise, open the document Area type.ai inside the
Lesson 04 folder.
2. Make the bounding box visible. Armed with
the black arrow tool, click anywhere on a line
of type in the body of the poem to select the
text box. Make the bounding box visible by
pressing Ctrl+Shift+B (-Shift-B on the Mac)
or choosing View➝Show Bounding Box. The
eight white-fi lled square handles should now
be visible.
3.
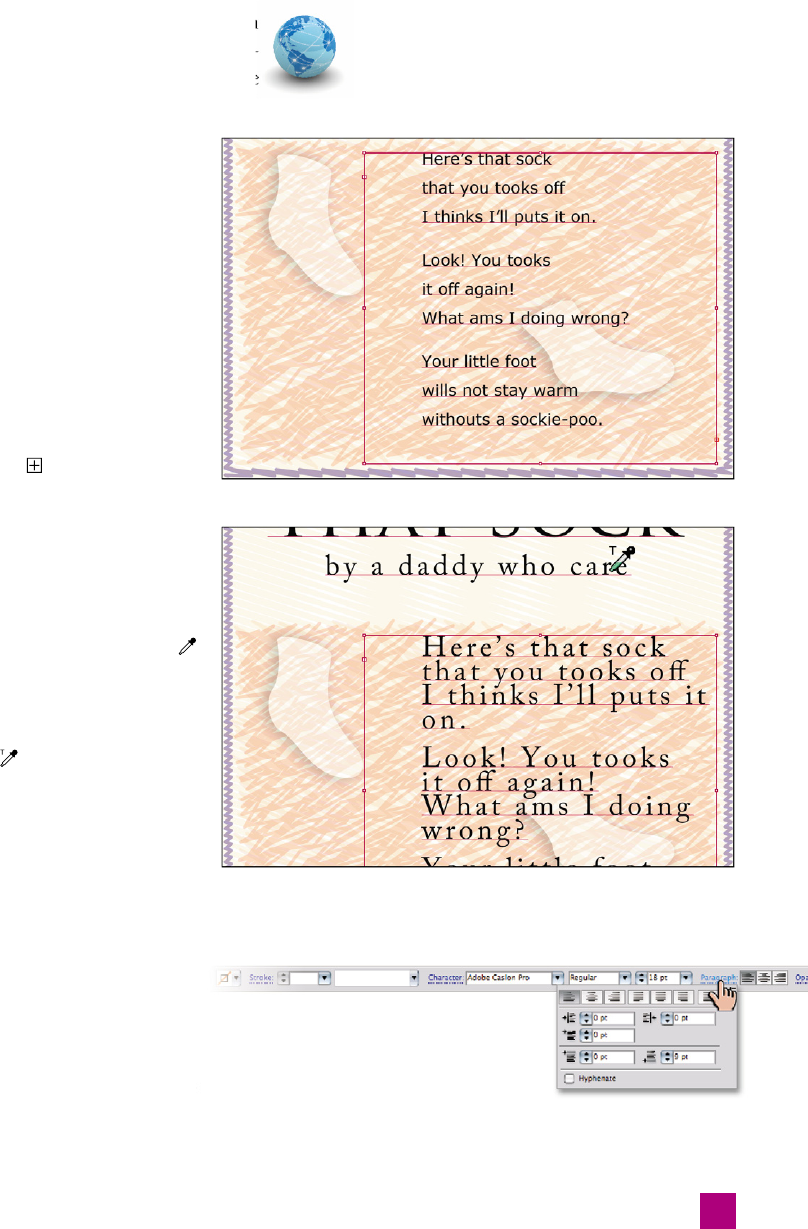
Resize the text block. Still using the black
arrow tool, resize and move the text block into
the approximate position shown in Figure 4-21.
Don’t worry about the red icon warning you
of overset text; we’ll fi x that in a later step.
4.
Lift the text attributes with the eyedropper
tool. Remember the eyedropper tool introduced
back on page 42 in Lesson 2? In addition to fi ll
and stroke attributes, the eyedropper tool can
lift text formatting attributes. Switch to the
tool in the toolbox (or press the I key). Move
the cursor over the byline to pick up its format-
ting. Note that when you pass the cursor over
the text, it switches to
. Click when you see
that icon to lift the text formatting, as shown
in Figure 4-22.
5.
Remove the indent. Unfortunately, the indent
on the type is still hanging on from the origi-
nal Word document. (You removed it from the
title back in Step 3 on page 118, but not from the
byline.) Click the word Paragraph in the con-
trol panel to bring up the paragraph options,
shown in Figure 4-23, and change the left in-
dent from 36 points to 0 points.
6.
Edit the point size, leading, and tracking. Now
that you’ve removed the indent, it’s time to
clean up the character-level formatting. Start
Figure 4-21 .
Figure 4-22 .
Figure 4-23 .
123
Editing Area Type
Get Adobe Illustrator CS5 One-on-One now with the O’Reilly learning platform.
O’Reilly members experience books, live events, courses curated by job role, and more from O’Reilly and nearly 200 top publishers.

