
•
Locate and double-click the Lesson Files-AIcs5 1on1 folder.
• Lastly, double-click the Lesson 01 folder.
3. Select a fi le. Click the fi le called Radio station.ai to select it.
This is the fi rst of the documents pictured in Figure 1-3, pro-
moting a fi ctional radio station and based on a poster illustra-
tion by iStockphoto illustrator Ryan Burke.
If you’re using a Windows-based PC and you don’t see the document
you want, you probably need to change the setting in the Files of Type
pop-up menu at the bottom of the dialog box. Although this menu is
useful for narrowing the choices in a folder full of fi les
—
you can view
just one of many fi le types (PDFs, or Encapsulated PostScript documents,
for example)
—
these options may prevent you from seeing the piece of
artwork that you want. For day-to-day work, the default setting of All
Readable Files is your best bet.
4. Open the artwork. Click the Open button or press the Enter
or Return key to open the document in Illustrator. If the docu-
ment appears on screen, all is well. However, if you established
your own color settings—something other than what I asked
you to do in the Preface (see Step 8, page xvii)—Illustrator may
greet you with a Profi le or Policy Mismatch message; just click
OK or Continue to make it go away.
I’ll be asking you to open and modify many fi les during the course
of this book. Explore these fi les if you want, seeing how the differ-
ent shapes are put together to create the overall effect. When you
arrive at the successful conclusion of an exercise, as you have now,
you may do with the document as you will—inspect it, modify it,
or ignore it altogether. (Sometimes I will ask you to save the fi le.)
To tidy up and move on, click
in the title bar ( on the Mac). Or
you can choose File→Close.
Organizing Your Artwork
In the previous exercise, we saw the simple way to open a fi le, but
there is a better way—using the standalone Adobe Bridge. The
Bridge is no mere image opener, however; it’s a complete digital
asset manager. In the Bridge, you can review images and illustra-
tions, rotate them, delete them, move them to different folders, or-
ganize them into collections, and fl ag them for later use. You can
even preview artwork at full size, fi lter which documents you see
and which you don’t, and group related assets into stacks. If you
have just a few dozen fi les lying around your hard drive, this may
10
Lesson 1: Starting a Document
seem like overkill. But if you have a few hundred, a thousand, or a
hundred thousand, the Bridge is an absolute necessity.
P E A R L O F W I S D O M
In many ways, the Bridge is a better and more fl exible navigation tool than
either the Windows or Macintosh operating system. Where else can you tear
through a folder of images or illustrations and view instantly scalable, high-
quality thumbnails? Or rename a group of fi les in a single operation? It’s a
media manager’s dream.
To get a sense of what the Bridge can do, try the following. (These
steps assume that the Bridge is set to the Essentials workspace, as
it is by default.)
1. Open the Bridge. Click in the application bar. Or press the
shortcut, Ctrl+Alt+O (or -Option-O).
2.
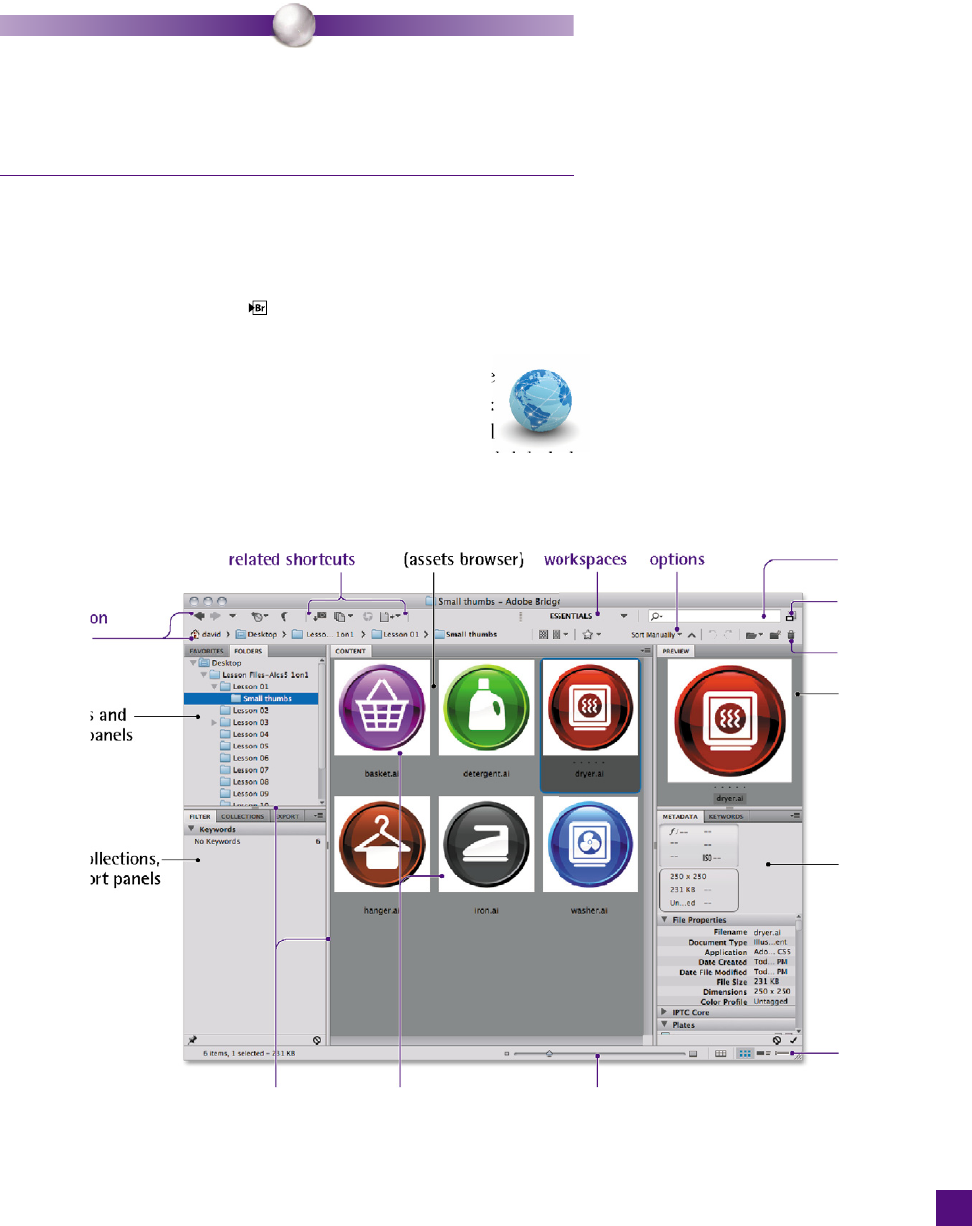
Navigate to the Small thumbs folder. The Bridge
window is, by default, divided into fi ve main panels:
two panels on the left, the large content browser panel
in the middle, and two more panels on the right, each labeled
black in Figure 1-5. (Violet labels show ancillary options.)
Content panel
Filter, Collections,
and Export panels
Favorites and
Folders panels
Navigation
controls
Toggle
compact view
Shortcut buttons
Metadata and
Keywords panels
Preview panel
Thumbnail size
slider bar
Panel dividers Thumbnail
previews
Photo- and camera-
View options
Search
Preset Sort/fi lter
Figure 1-5 .
11
Organizing Your Artwork
Get Adobe Illustrator CS5 One-on-One now with the O’Reilly learning platform.
O’Reilly members experience books, live events, courses curated by job role, and more from O’Reilly and nearly 200 top publishers.

