Chapter 4. Decorator Pattern
I try to decorate my imagination as much as I can.
Pictures deface walls more often than they decorate them.
William Wordsworth (Poet and a guy who really understood bandwidth)
What is the Decorator Pattern?
The Decorator pattern wasn’t developed with a web designer or developer in mind, but it could well have been. A few years back, we developed a web site and were cognizant of the fact that periodically we’d have to update it. The design was set up so that substitution of one element for an updated one was fairly simple, and it required no major change in the code or structure. Because we didn’t have to update it too often, this wasn’t much of a problem. However, had we needed to update elements or features on a fairly regular basis, our design would have left a good deal to be desired.
Imagining situations where you need to update or change certain parts of a web site on a regular basis isn’t difficult. If your client is a retailer with regular advertising such as weekly specials and new products introduced periodically, you want to have flexibility in your web design and structure. You may want to use features of your basic structure that assure change is easily accommodated, but you don’t have to alter the basic structure itself in any way.
The Decorator pattern addresses the issue of maintaining the structure while having the ability to make changes by decorating the different components that make up the application. The decorations are composed of descriptions and/or methods used to wrap different objects in the application. As you will see, this design pattern allows you to mix and match all the different components and decorations to optimize flexibility and expandability, while core structure classes remain unaltered.
Key Features
We can understand the Decorator pattern in terms of two key features. Often, developers want to add unique responsibilities for an object without adding those same responsibilities to the whole class. Among other design patterns, the Decorator pattern’s characterized by adding unique responsibilities. The identifying characteristic of the Decorator pattern is to add responsibilities in a uniquely Decorator fashion. Wrapping a component in an object that adds a responsibility follows a couple of guidelines:
Decorators can appear wherever a component object can.
At runtime, you can mix and match combinations of decorators as needed.
To understand the Decorator design pattern’s key features, you need to consider some alternatives to implementing the work the pattern does. Essentially, your project requires that you add new features and responsibilities to individual objects rather than the entire class. To do so using inheritance would bloat the class and change the structure with each new feature. Every single object would inherit all of the features and functionality of every other object, and that’s not what you want.
Note
In this chapter, you will see the term “component” a good deal. The reference to component here is wholly unrelated to the components in Flash, used for UIs, Media, Data and other purposes. In the context of this chapter, a component refers to a concrete instance that is decorated with another concrete instance called a decorator. So, for the time being, don’t think of components as anything other than something that gets decorated. (In the last application example of a Decorator design pattern in this chapter, you’ll be using Flash UI components, but by then you’ll be able to distinguish the different kind of components.)
Imagine you’re setting up an automobile dealership site. You can choose between different models of autos and add different features—options. You can set up options such as an MP3 player, Global Positioning System (GPS), cloth, vinyl or leather seat covers, and different kinds of alarm systems. If you use inheritance, every one of those options would have to be in every object. What’s more, you’d need to have all the models in your main class as well. That’s absurd! Why would anyone need both cloth and vinyl seats or be both a Ford Escape and a Chevrolet Malibu? Then, if a new option were introduced, you’d have to bloat the class with yet another option for every single object. However, if you can just wrap a single responsibility around a component when and if you need it, you can keep your program slim, trim and ready to adapt.
The key to understanding the Decorator design pattern is to understand that it uses inheritance and employs abstract classes; however, as you know from Chapter 2, ActionScript 3.0 doesn’t support abstract classes. You can create classes that work like abstract classes, simply by not instantiating them directly. In fact, that’s what an abstract class is to some extent—a class that you do not instantiate but can extend. They work something like an interface, but while you can implement an interface and its abstract methods, you cannot extend it. (You were introduced to using interfaces in Chapter 1, and in Chapter 5, you will be using a design pattern that employs interfaces.)
Note
Lack of support of abstract classes is a sore point with some Flash and Flex developers. Before firing off an impassioned email to Adobe, though, first take a look at the ECMAScript Rev 4 specs. These specifications don’t exactly support abstract classes either, at this point in time.
Why are abstract classes important for the Decorator pattern? Like interfaces, you can create abstract methods that can be implemented in different ways. At the same time, you can use them to create subclasses so that core properties can be inherited in ways not possible with interfaces alone.
The Decorator Model
The Decorator outlined in the class diagram notation shows two key elements: component and decorator. The component represents what’s to be decorated, and the decorator is the abstract class for the concrete decorations. The concrete component is what’s actually decorated, and the concrete decorations are the actual decorations. All of the concrete decorations and the concrete component are subclassed from the same source. Keeping that in mind, take a look at the class diagram in Figure 4-1:
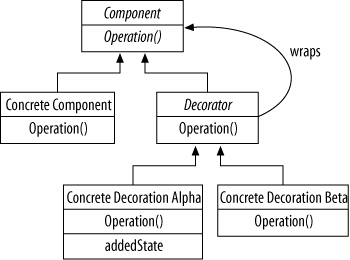
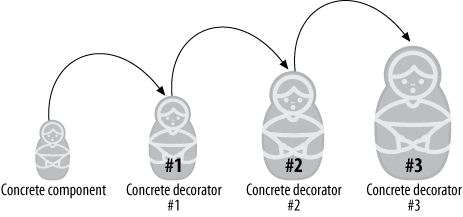
In the most basic sense, the component is the Christmas tree, and the decorations are the ornaments. Each concrete decorator wraps the tree and is subclassed from the same source as the tree. A better way to think about components and decorators is more like the nesting dolls from Japan and Russia. The innermost doll is the component, and it’s placed into a decorator. Then the component and decorator are placed into another decorator, and then into the next decorator. Figure 4-2 shows this model.
Probably the most important thing to remember about the Decorator pattern is that its purpose is to allow additional elements to be added to a class without altering the base class. So instead of making changes by changing the class, the class is decorated with subclasses that don’t interfere with the class from which the decorators were derived.
Key OOP Concepts Used with the Decorator Pattern
Sometimes when you think about key OOP concepts such as inheritance, you have to consider its larger consequences. The upside of inheritance is that once a superclass has been established, all of the subclasses inherit its features. However, you may not want or need all of the “stuff” for every subclass from a superclass. If you want to add functionality to an object, subclassing may not be the way to go, because everything else subclassed from the same superclass may be unnecessarily burdened by unused functionality.
Unwanted Inheritance
At the end of this chapter, you will see an example of a car dealership where users select models of cars with a choice of options for those cars. If all the options were derived from a superclass, that would mean that every car would have all the options, whether or not you wanted them. One option in the example is a rear view camera used with minivans and large SUVs with limited rear vision. Such an option would be superfluous on a sports car such as a Chevrolet Corvette, Morgan, or Ferrari. However, with subclassing, that’s exactly what would happen. Every subclass gets everything from the superclass. So here’s a case where we’d have to look beyond simple inheritance. Depending on how the application’s written, even the components would all have the same features. A pickup truck would be subclassed from the same component as a luxury car—both inheriting features they don’t want and wouldn’t use.
Wrapping Responsibilities
The Decorator design pattern is also known as the Wrapper pattern. The concept of “wrapping” is at the heart of the Decorator design pattern. So what does it mean to “wrap” one object in another? One way to think about wrapping is to imagine wrapping a gift. The wrapper transforms the gift, but the gift does not inherit the characteristics of the wrapper—it only uses the wrapping. Unlike subclassing, which extends one class into another, wrapping allows one object to use another’s characteristics without extending either the wrapped object or the object doing the wrapping.
The wrapping with which most ActionScript programmers are familiar is that
used for transforming data types from one type to another. For example, the
Number class can wrap a string variable,
and then that variable has the characteristics of the Number class. Figure 4-3 illustrates a common wrapper function:
Note
When we look at wrapping one object with another object, we can think of
it as a class intercepting API calls intended for a specific instance of
another class. The example in Figure 4-3 shows that the Number class is intercepting a call to an
instance of the String class. The result
is that the l variable, an unsigned
integer, is able to accept the assignment of the s variable as a number. That’s because the s variable is wrapped in a Number class, and is treated as a
number.
Using the Decorator class, components are wrapped in decorators. The wrapping class is a concrete instance of a decorator, and the wrapped class is an instance of the concrete component class. Thus, the concrete component now “contains” the characteristics of the wrapper, but the characteristics are not inherited. Figure 4-4 shows an example.

The concrete component that’s wrapped by another class borrows characteristics of the wrapping class. When those characteristics are not needed, the instance of the concrete class is simply instantiated without being wrapped.
Flexibility and Adaptability
One good OOP practice is to create your classes so that they can be extended but not changed. If a class is changed, especially one with subclasses, you can quickly destroy an application. So the trick is to set up your classes so that it’s easy to extend them, yet keep them safe from alteration.
The Decorator design pattern allows you to do this. The model is grounded in a
single class that is the superclass to all others. This core class is an
abstract component class. An abstract decorator class is subclassed from this
class, re-implementing the core methods. (In the context of ActionScript 3.0,
the abstract nature of the class is simulated by using the
override statement when re-implementing
methods in subclasses.) All the other concrete component and decorator classes
have the same root superclass, even though the decorator classes are subclassed
from the abstract decorator class, and the component classes are directly from
the abstract component class. So, when the concrete component objects are
wrapped in concrete decorator objects, both objects share the same root
superclass. Thus, the decorated objects can keep the core object unmodified
while changing its responsibilities.
In a larger OOP framework, the Decorator pattern can add and subtract functionality from an object by wrapping selected components with selected decorators. Second, it can add more than a single functionality to an object by wrapping one wrapper inside another wrapper. As a result, the design pattern can change functionality without changing structure.
Minimalist Abstract Decorator
To get started with the Decorator design pattern, a minimum implementation needs the following:
An abstract component
An abstract decorator
A concrete component
Concrete decorators
For the sake of clarity, two decorators will be devised so that you can better see how the structure works (and it’s closer to the model shown in Figure 4-1.) Of all the classes devised in this pattern, by far the most important is the initial abstract class modeling the component. Every other class is subclassed from this initial class.
Abstract Component Class
To begin the process of creating a Decorator design pattern, create a
component. You might think of a component as an undecorated Christmas tree, or
even a person deciding what to wear. It’s simple because all of the added
features are handled by decorators. Example 4-1 has only a single string variable that will be used to describe the
component. Save the script as Component.as.
package
{
    //Abstract Component in Decorator Design Pattern
    //**************
    //Abstract class
    public class Component
    {
        internal var information:String;

        public function getInformation():String
        {
            return information;
        }
    }
}
From this point on, all the classes will extend the Component class. Keeping
in mind that the class is an abstract one—or at least is treated as one—its
primary function is to establish a basic structure for the rest of the
application. It contains a single variable, information, and a single getter function, getInformation(). These elements set up both the
concrete components and decorations. Both components and decorations need to
display information about their characteristics. A concrete Christmas tree
displays information that lets you know that it’s a Christmas tree instead of
another kind of object that can be decorated, such as a front yard to be
decorated with gnomes and pink plastic flamingoes. Additionally, you want to be
able to retrieve information, and so it has a getter function.
Abstract Decorator Class
Next, the abstract decorator is a subclass class of the Component class that inherits the information variable, so nothing is needed as far
as the information variable is concerned. In
fact, nothing’s required for this simple example other than defining the class
as an extension of the Component class.
However, the getInformation method is
re-implemented independently of the Component
class, using the override statement—which
does what it says on the tin; it overrides parent class methods. This is done to
distinguish the same method being used for the Decorator class from the method being used for the Component class. All the concrete decorations are
subclassed from the Decorator class, and all
concrete components are subclassed directly from the Component class. Further on, the concrete components will be
wrapped in concrete decorators, and such distinctions become important in more
complex implementations of the Decorator design pattern. The trace() statement is used to show you where in the
process the abstract Decorator class appears. Save Example 4-2
as Decorator.as.
package
{
    //Abstract Decorator in Decorator Design Pattern
    //**************
    //Abstract class
    public class Decorator extends Component
    {
        trace("|*|Decorator|*|");
        override public function getInformation():String
        {
            return information;
        }
    }
}
Once the two abstract classes, Component
and Decorator, have been established, it’s
time to work with the concrete classes. For this example, only a single concrete
component is created. Cleverly named ConcreteComponent, this class represents whatever will be
decorated in a Decorator design pattern. You can have multiple concrete
components that all use the same set of decorations, or only a single one. Later
in this chapter, you will see an application where multiple concrete classes are
decorated by a single set of decorators. The nice thing about the Decorator is
that you can add as many concrete components as you want. Imagine a business web
site where the concrete component represents an e-business site that you’ve
worked on for several months. Using a Decorator design pattern, you’ve developed
several useful and tested elements that are applied using decorators. Shortly
after the project is complete, you get a request to develop another site with a
different main product and an overlapping set of elements. Rather than starting
from scratch, all you have to do is to add a different concrete component class
and some new decorators that aren’t available in the original set.
Example 4-3 shows that the concrete component does
little more than extend the Component class
and add a constructor. It inherits all of the features of the Component class,
and uses the information variable to place a
message in the Output window to point to the decorators. Save the code in Example 4-3 as ConcreteComponent.as.
package
{
    //Concrete Component
    public class ConcreteComponent extends Component
    {
        public function ConcreteComponent()
        {
            //\u2794 is Unicode for a right-pointing arrow
            information = "Concrete Component is decorated with \u2794";
        }
    }
}
Note
In Example 4-3, you see that Unicode is inserted using the format \u + character code value. In the example, an arrow character is formed using Unicode 2794. To search for a character you may want to use, see http://www.fileformat.info/info/unicode/char/search.htm. You’ll find several different arrow characters you can use, including \u0363, \u2192, \u21aa, and \u21d2.
The next step is to build concrete decorator classes. In this abstract example, two concrete decorators will wrap themselves around the concrete component. So, to get started, we’ll need a Component instance variable to hold the component we’re wrapping.
var components:Component;
The variable is named components, with an
“s,” because component is a built-in word in
ActionScript 3.0. This variable is referenced in the decorator’s methods. Next,
we need a way to affix the components
variable to the object being wrapped. The following code shows how the component
being wrapped is passed to the decorator’s constructor.
public function DecConA(components:Component)
{
    this.components=components;
}
Finally, you need a getter function to get the unique
information from the concrete decorator. The public method inherited from the
Decorator class must be set up using the
override statement. Here, the method gets
both the concrete component’s information [components.getInformation()], and adds on that of the concrete
decoration [+ " Decoration Alpha:"]:
override public function getInformation():String
{
    return components.getInformation() + " Decoration Alpha:";
}
Concrete Decorations
Now, we’re all set to write the concrete decorator classes. Save Example 4-4 and Example 4-5 as DecConA.as and DecConB.as, respectively.
Note
In several of the decorator classes, you’ll see:
this.components = components;
Such code is a non-standard use of the this identifier, but it makes sense in this context because
it differentiates the variable and parameter. Normally, you wouldn’t use the
this identifier in this manner. The
variable and parameter names are identical to emphasize the use of the
abstract class in both cases, with one passing the value to the
other.
package
{
    //Concrete Decorator "Alpha"
    public class DecConA extends Decorator
    {
        private var components:Component;
        public function DecConA(components:Component)
        {
            this.components=components;
        }
        override public function getInformation():String
        {
            return components.getInformation() + " Decoration Alpha:";
        }
    }
}package
{
//Concrete Decorator "Beta"
public class DecConB extends Decorator
{
var components:Component;
public function DecConB(components:Component) {
this.components=components;
}
override public function getInformation():String
{
return components.getInformation() + " Decoration Beta:";
}
}
}Wrapping Up
To execute the Decorator design pattern, the whole key lies in knowing how to wrap a component in a concrete decorator. First, you need to instantiate a concrete component.
var testComponent:Component = new ConcreteComponent();
Then, you wrap the component in one or more decorations using the following format:
componentInstance=new ConcreteDecorator(testComponent);
So, in our example, with two concrete decorations, we’d write:
testComponent=new DecConA(testComponent);
testComponent=new DecConB(testComponent);
At this point, testComponent is decorated
with two decorations. We could duplicate the above lines adding the same two
decorations as often as we wanted. Think of the decorations as red and green
Christmas tree ornaments. The tree could be covered with nothing but red and
green ornaments, rather than just one of each. The Decorator design pattern is
employed cumulatively. That is, as you add each decoration, it’s added to those
already wrapping the concrete component.
Finally, to see what havoc we’re wrought, we use the getter method—getInformation():
trace(testComponent.getInformation());
To see how all of this works, save Example 4-6 as DecTest.as in an ActionScript file. Then open a
new Flash document file, and type DecTest in
the Document class window in the Properties panel.
package
{
    import flash.display.Sprite;
    public class DecTest extends Sprite
    {
        public function DecTest()
        {
            //Instantiate Concrete Component
            var testComponent:Component = new ConcreteComponent();
            //Wrap first decorator around component
            testComponent=new DecConA(testComponent);
            //Wrap second decorator around component
            testComponent=new DecConB(testComponent);
            //Output results
            trace(testComponent.getInformation());
        }
    }
}
Figure 4-5 shows what you should see in your Output window when you test the movie.

To understand what’s going on in the Decorator pattern, go back and look at
Figure 4-2. The example
application first instantiated a ConcreteComponent() object. That object displays a message
pointing to its decorations. Imagine that object (testComponent) as the smallest can to the far left in Figure 4-2. That can is then
placed into decorator Can #1. At this point, the concrete component object
(testComponent) is decorated with Can #1,
but retains its original properties –much in the same way that a lawn decorated
with a family of gnomes still retains its property of green grass. Next, Can #1,
which now contains the concrete component, is dropped into Can #2. Now Can #2
has both Can #1 and the Concrete component Can. Thus, Can #2 has all of the
properties of itself plus those of the cans inside.
In a sense, the whole process works like the compound operator, plus-equal (+=). Each decorator attaches itself to the existing component and its decorator. As each decorator is added, all the previous ones are retained but not duplicated, unless you add the same decorator more than once. So, as the output shows, you can add as many decorations as you want simply by wrapping them in the existing object in one of the decorators.
Applying a Simple Decorator Pattern in Flash: Paper Doll
You can move from a conceptual example to a concrete one with a computerized paper
doll game. The paper doll component is the doll being dressed, and the decorations
are clothing items selected for the doll. Using ActionScript’s new Loader class, different GIF files are used to decorate
a base GIF image of a Victorian paper doll. As in the previous abstract example,
this example uses a single concrete component and several decorations.
This concrete example does not have an interface—keeping the focus on the application’s use of a Decorator pattern. However, it does have a graphic output so you can see the pattern’s ultimate output. (Later in this chapter, there’s an example with a full interface.)
Setting Up the Component Class
The first class is the component class, Model. From this, all other classes are subclasses. It’s very
simple but key to the success of the application. As you can see, it’s very
close to the previous abstract Decorator. It consists of a method, getDressed(), and a string variable, whatToWear, as shown in Example 4-7.
Save the file as Model.as.
package
{
    //Abstract class
    public class Model
    {
       protected var whatToWear:String;
        public function getDressed():String
        {
            return whatToWear;
        }
    }
}
Keep in mind that Example 4-7 should be treated as an abstract
class. So the method getDressed() needs to be
created as an override public function for it to work the way we want. However,
the property whatToWear doesn’t need to be
changed from its inherited characteristics.
Decorator Class Dressing the Dolls
Example 4-8 is the abstract Decorator class, Dresser, which extends the component class,
Model. The major contribution here is
simply re-implementing the getDressed()
method with a reference to the inherited whatToWear property.
package
{
    //Abstract class
    public class Dresser extends Model
    {
        override public function getDressed():String
        {
            return whatToWear;
        }
    }
}
All of the concrete decorators will be subclassed for this class.
The Concrete Classes
Once the two main abstract classes in the Decorator pattern have been
established, you’re all set to create the concrete ones. In the previous
minimalist Decorator example, you saw the output using the trace() statement. Instead of trace() statements, both the concrete component
and decorators need to be formatted for later parsing, so a tilde character
(~) has been added as a demarcation
point. Because all the strings from both the concrete component and decorators
are grouped together into a single large string, the tilde serves as cutting
point.
Concrete component class
The concrete component class is the only concrete class that extends
directly from the abstract concrete class. All of the others in this
application extend from the abstract decorator class. Using a simple
constructor function, Sue(), the class
assigns a value to the whatToWear
variable. This is enough to identify the class as an instance of the main
abstract component class, Model, and to
establish a unique name. All decorations use the concrete component as the
target for the decorations. Save Example 4-9 as Sue.as.
package
{
    public class Sue extends Model
    {
        public function Sue()
        {
            whatToWear="~sue";
        }
    }
}
If you want to create more concrete component classes, all you need to do
is create a similar class with a different name and value for the whatToWear variable. With this structure, you
have no limit to the number of new concrete components you can add.
Concrete decorator classes
Moving from the minimalist example previously shown in this chapter, it’s
a little easier to see how the Decorator pattern works by actually seeing
something happening in a graphic display. When the initial instance of the
concrete component is created, all references in the concrete decorator
class are to that instance. (See Example 4-16, where the
concrete component is wrapped in the decorators.) In all the concrete
decorator classes, the reference to the model variable is a reference to the concrete component
object. In this case, that’s the instance of the Sue() class, but it can be any instance of any concrete
component. That’s why, if you wish to expand the application to include more
concrete components (paper dolls to dress), you don’t have to make any
fundamental changes. Just add another concrete component class. In Example 4-10 to Example 4-15, the captions are
the filenames.
package
{
    public class OrangeDress extends Dresser
    {
        private var model:Model;
        public function OrangeDress(model:Model)
        {
            this.model=model;
        }
        override public function getDressed():String
        {
            return model.getDressed() + "~orangedress";
        }
    }
}package
{
public class BlueDress extends Dresser
{
private var model:Model;
public function BlueDress(model:Model)
{
this.model=model;
}
override public function getDressed():String
{
return model.getDressed() + "~bluedress";
}
}
}package
{
public class Bow extends Dresser
{
private var model:Model;
public function Bow(model:Model)
{
this.model=model;
}
override public function getDressed():String
{
return model.getDressed() + "~bow";
}
}
}package
{
public class Umbrella extends Dresser
{
private var model:Model;
public function Umbrella (model:Model)
{
this.model=model;
}
override public function getDressed():String
{
return model.getDressed() + "~ umbrella ";
}
}
}package
{
public class Hat extends Dresser
{
private var model:Model;
public function Hat(model:Model)
{
this.model=model;
}
override public function getDressed():String
{
return model.getDressed() + "~hat";
}
}
}package
{
public class Muff extends Dresser
{
private var model:Model;
public function Muff(model:Model)
{
this.model=model;
}
override public function getDressed():String
{
return model.getDressed() + "~muff";
}
}
}All six decorations can be used in any combination you want with the
instance of the Model class. This next
section shows how to implement the Decorator pattern using the different
decorators.
Implementing the Paper Doll Decorator
As noted, no interface was created for implementing this application, and so you can see clearly how the concrete component is wrapped by the decorators. Then, on the stage, you can see the effects of the different combinations.
The sequence is:
Instantiate a concrete component.
Wrap the concrete component in the desired decorator instance using the format:
componentInstance = new DecoratorInstance(componentInstance)
Apply the getter method (
getDressed()) to the concrete component instance initiate to get the fully wrapped values. The values will include those of the concrete component instance and the applied decorations.
Example 4-16 illustrates how to implement the paper doll decorator.
package
{
    import flash.display.Loader;
    import flash.net.URLRequest;
    import flash.display.Sprite;
    public class FashionShow extends Sprite
    {
        var ensemble:Array=new Array();
        public function FashionShow()
        {
            trace("||--Working--||");
            var doll:Model = new Sue();
            doll=new Hat(doll);
            doll=new OrangeDress(doll);
            //doll=new BlueDress(doll);
            //doll=new Umbrella(doll);
            doll=new Bow(doll);
            doll=new Muff(doll);
            var ready2wear:String=doll.getDressed();
            sewingMachine(ready2wear);
            for (x=0; x < ensemble.length; x++)
            {
                clothesOn(ensemble[x]);
            }
        }
        private function sewingMachine(wardrobe:String):Array
        {
            ensemble=wardrobe.split("~");
            ensemble.shift();
            return ensemble;
        }
        private function clothesOn(outfit:String)
        {
            var clothier:Loader=new Loader();
            var item:String="clothes/" + outfit + ".gif";
            var getItem:URLRequest=new URLRequest(item);
            clothier.load(getItem);
            this.addChild(clothier);
        }
    }
}
Once you’ve got everything ready to go, you’ll need some GIF files. The model
(concrete component) should be an image of a doll that you will clothe with the
Decorator pattern. Each filename needs to be the name of the value assigned to
the whatToWear variable in the concrete
component or decorator listing, minus the tilde (~) character. For example, the concrete component, (Sue), whatToWear variable is assigned the string value "~sue" and so the GIF filename for that component
would be sue.gif. The decorator BlueDress has a whatToWear value of "~bluedress,” and so the image with the blue dress would be named
bluedress.gif. Place all the GIF files,
including the file representing the doll model, in a folder named clothes.
Finally, open up a new Flash document and set the stage dimensions to 300 ×
650. In the Properties panel’s Document class window, type in FashionShow. The size and shape of your stage will
depend on the size of the paper dolls you use.
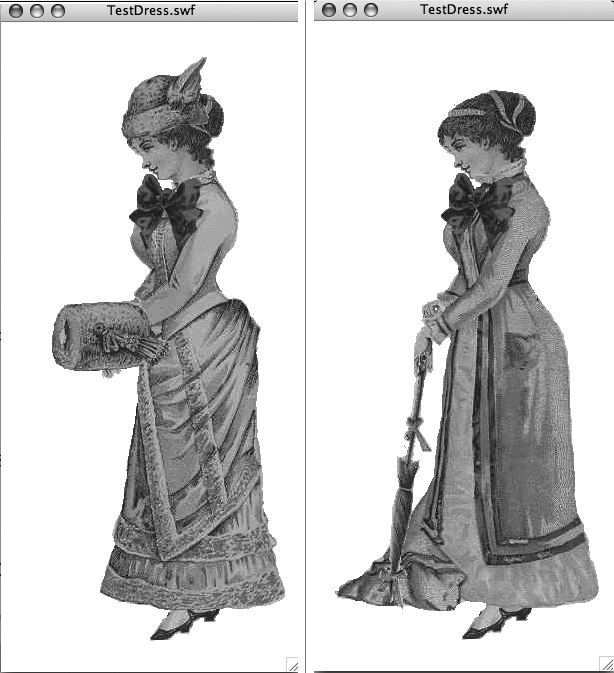
Figure 4-6 shows two different combinations of decorations on the paper doll. The image on the left decorates with the hat, bow, orange dress, and muff, while the second is the blue dress, the bow and an umbrella. Each appears very different just by changing the combination of decorations.
Instead of paper dolls, any component could be decorated with any characteristics. Also, you can include more than a single property or method in a decoration. In the next section, we’ll take a look at adding additional properties with the Decorator design pattern.
Decorating with Deadly Sins and Heavenly Virtues
Action gaming pits different kinds of heroes and villains against one another, and the combatants have different weapons and shields. That is, they’re decorated with different characteristics and abilities. In order to see how to add some more functions to a Decorator pattern, what could be more appropriate than pitting good against evil?
Table 4-1 shows a list of deadly sins and heavenly virtues. (The list is considerably updated from Dante’s Inferno and Prudentius’ epic poem, Psychomachia, both of whom I understand were using Commodore-64’s to make their lists.)
Deadly Sin | Description | Virtue | Description |
Rage | Uncontrolled anger—striking out at syntax errors | Compassion | Caring about others—Helping procedural programmer transition to OOP |
Malice | Meanness, malevolence, ill will, cruelty, and hatred toward others–unkind remarks about Linux. | Courage | Doing the right thing regardless of the danger—taking on object-oriented programming |
Obfuscation | Hiding the truth— redefining an act, knowledge by adding confusion—coding without comments | Hope | Belief in eventual success of good over evil—you really can complete the project on time |
Arrogance | Excessive pride, not considering others’ beliefs, feelings, or knowledge—belief that Microsoft Windows is the only real OS | Justice | A fair balance and even chance—using Windows, Mac OS and Linux |
Prejudice | Judging others on the basis of stereotypes and not their actions—teasing Mac users | Openness | Capacity to consider new knowledge, ideas, and contrary ideas—writing a program on a Mac |
Dogmatisms | Narrow, inflexible belief even in light of evidence to the contrary—continue to use procedural programming methods | Integrity | Maintaining values even when tempted to abandon them for short term gains—foregoing hacks even though they’d get the job done and the client would never know |
Indifference | Seeing suffering and doing nothing or even caring to help—unwilling to offer help in learning OOP | Diligence | Willingness to stick with an especially difficult task to complete it—learning design patterns |
Thinking about what has been presented so far in this chapter, the first thing that comes to mind is a property that describes each of the deadly sins and heavenly virtues. That’s easy enough, because just like the paper doll example, all we have to do is to assign a property value to each decorator. However, we can do more with the Decorator design pattern, as you’ll see in the next two sections.
Adding Properties and Methods
Up to now, we’ve used a single string variable with a single getter method for
the basic abstract component class. However, like any other class, this basic
structure can accommodate more than a single variable or function. Example 4-17 shows three variables and getter functions. Save the
script as Component.as.
package
{
    //Abstract class
    public class Component
    {
        protected var soul:String="All that is inside a spirit";
        protected var goodness:Number;
        protected var vice:Number;

        public function getSoul():String
        {
            return soul;
        }
        public function good():Number
        {
            return goodness;
        }
        public function evil():Number
        {
            return vice;
        }
    }
}
Like the previous examples, we begin with a string property, soul. (It’s assigned a string literal, but that’s
really not necessary because it’s an abstract class and will never be seen or
used—just a clarification.) Next, two numeric properties are defined, goodness and vice. These two properties will collect all the accumulated good
and evil in a soul.
Next, three getter functions are supplied to get the values of the string and two numeric variables. Now the abstract component class is all set to go.
Multiple Concrete Components
We could look at one soul at a time, but what fun is that? More important, in
a lot of applications, having a single component to decorate isn’t too useful
either. So instead of having a single soul to decorate, we’ll add two. For the
time being, we’ll forego any debates about original sin and start our souls with
a clean slate. Both goodness and vice will be set to zero. Just give them different
soul values so they can be
differentiated.
Example 4-18 and Example 4-19 provide the concrete
components for Dick and Jane classes. Each class just needs a string value
for soul and numeric values for goodness and vice—all inherited properties from the Component class. Save Example 4-18 as Dick.as, and Example 4-19 as Jane.as.
package
{
    public class Dick extends Component
    {
        public function Dick()
        {
            soul = "Dick's soul\n";
            goodness=0;
            vice=0;
        }
    }
}package
{
public class Jane extends Component
{
public function Jane()
{
soul = "Jane's soul\n";
goodness=0;
vice=0;
}
}
}These concrete component classes are exactly like the previous examples we’ve examined, except we have two instead of one. Furthermore, instead of using a single string variable, two additional numeric variables are added, along with their assigned values. Otherwise, they’re just the same.
In these two concrete classes, the properties are inherited directly from the
abstract Component class. No overrides or
other special adjustments are needed. This is because the Dick and Jane
classes are components, both to be decorated by the decorator classes. The
overrides that generate unique methods and characteristics for the concrete
decorators are accomplished by the decorator classes.
Therefore, overrides by the concrete component classes are unnecessary.
Decorating with Multiple Properties
Multiple properties and methods are not difficult to add to components, and
the same is true for decorator classes. Instead of a single property and method,
you do essentially the same thing using multiple methods and classes. Example 4-20 shows the abstract Decorator class, subclassed from the Component class. Save the script as Decorator.as.
package
{
    //Abstract class
    public class Decorator extends Component
    {
        override public function getSoul():String
        {
            return soul;
        }
        override public function good():Number
        {
            return goodness;
        }
        override public function evil():Number
        {
            return vice;
        }
    }
}
As a subclass of the Component class, this
Decorator abstract class does nothing
more than re-implement the getter functions—one returning a string, and the
other two returning a number. The properties that are to be returned were
originally defined as properties in the Component class, and as a subclass of Component, the Decorator class
doesn’t have to re-implement them. However, as you’ve seen in previous examples,
the getter functions are re-implemented. The only difference is that there are
more of them. However, the process and logic are the same.
Multiple Method Concrete Decorations
When it comes to the concrete decorations in this example application, we’re going to see something slightly new. First, take a look at Example 4-21. It’s a generic example and should not be placed in as actual code. Just look at it. Several actual concrete elements with working code will replace generic values.
package
{
    //Generic—NOT implemented
    public class GoodEvil extends Decorator
    {
        private var components:Component;
        public function GoodEvil(components:Component)
         {
            this.components=components;
        }
        override public function getSoul():String
        {
            return components.getSoul() + "|GoodEvil";
        }
        override public function good():Number
        {
            return +/-00 + components.good();
        }
        override public function evil():Number
        {
            return +/-00 + components.evil();
        }
    }
}
If you break down Example 4-21, the first
part looks exactly like the previous examples. A Component instance, components, is instantiated, and the constructor function wraps the
components object in itself:
var components:Component;
public function GoodEvil(components:Component)
{
    this.components=components;
}
Next, the script re-implements the getter function, getSoul(), to return both the current value of the concrete
component’s decorations plus its own decoration value. Again, this is what
previous examples have done.
override public function getSoul():String
{
    return components.getSoul() + "|GoodEvil";
}
The next two functions add or subtract numeric values using the good() and evil() methods. Each good adds to a good and subtracts from an
evil, and vice versa for a vice—adds to evil and subtracts
from good. So depending on the concrete decorator, you add or subtract from each
of the two return values, and add that to the current value of the concrete
component.
override public function good():Number
{
    return +/-00 + components.good();
}
override public function evil():Number
{
    return +/-00 + components.evil();
}
Example 4-22 to Example 4-35 make up the seven deadly (revised) sins and seven heavenly (revised) virtues. However, what they really represent is the flexibility of the Decorator design pattern. (Also, they illustrate the complex issue of saving souls.)
The Good and Evil Concrete Decorators
Following are 14 concrete decorator classes. They’re all the same except for the names and values assigned to the numeric properties. It’s a lot easier just to do one, and then paste it into a new ActionScript file and edit in changes rather than doing them all from scratch. Once you’ve completed all 14, go ahead and add two more—good and evil concrete decorators of your own making. In Example 4-22 through Example 4-35, the filename is in the caption.
Heavenly Virtues
package
{
    public class Integrity extends Decorator
    {
        private var components:Component;
        public function Integrity(components:Component) {
            this.components=components;
        }
        override public function getSoul():String
        {
            return components.getSoul() + "|Integrity";
        }
        override public function good():Number
        {
            return 14 + components.good();
        }
        override public function evil():Number
        {
            return −6 + components.evil();
        }
    }
}package
{
public class Hope extends Decorator
{
private var components:Component;
public function Hope(components:Component)
{
this.components=components;
}
override public function getSoul():String
{
return components.getSoul() + "|Hope";
}
override public function good():Number
{
return 5 + components.good();
}
override public function evil():Number
{
return −10 + components.evil();
}
}
}package
{
public class Courage extends Decorator
{
private var components:Component;
public function Courage(components:Component)
{
this.components=components;
}
override public function getSoul():String
{
return components.getSoul() + "|Courage";
}
override public function good():Number
{
return 10 + components.good();
}
override public function evil():Number
{
return −8 + components.evil();
}
}
}package
{
public class Compassion extends Decorator
{
private var components:Component;
public function Compassion(components:Component)
{
this.components=components;
}
override public function getSoul():String
{
return components.getSoul() + "|Compassion";
}
override public function good():Number
{
return 7 + components.good();
}
override public function evil():Number
{
return −15 + components.evil();
}
}
}package
{
public class Openness extends Decorator
{
private var components:Component;
public function Openness(components:Component)
{
this.components=components;
}
override public function getSoul():String
{
return components.getSoul() + "|Openness";
}
override public function good():Number
{
return 12 + components.good();
}
override public function evil():Number
{
return −15 + components.evil();
}
}
}package
{
public class Diligence extends Decorator
{
private var components:Component;
public function Diligence(components:Component)
{
this.components=components;
}
override public function getSoul():String
{
return components.getSoul() + "|Diligence";
}
override public function good():Number
{
return 10 + components.good();
}
override public function evil():Number
{
return −5 + components.evil();
}
}
}package
{
public class Justice extends Decorator
{
private var components:Component;
public function Justice(components:Component)
{
this.components=components;
}
override public function getSoul():String
{
return components.getSoul() + "|Justice";
}
override public function good():Number
{
return 9 + components.good();
}
override public function evil():Number
{
return −9 + components.evil();
}
}
}Deadly Sins
package
{
    public class Rage extends Decorator
    {
        private var components:Component;
        public function Rage(components:Component)
        {
            this.components=components;
        }
        override public function getSoul():String
        {
            return components.getSoul() + "|Rage";
        }
        override public function good():Number
        {
            return −9 + components.good();
        }
        override public function evil():Number
        {
            return 8 + components.evil();
        }
    }
}package
{
public class Malice extends Decorator
{
private var components:Component;
public function Malice(components:Component)
{
this.components=components;
}
override public function getSoul():String
{
return components.getSoul() + "|Malice";
}
override public function good():Number
{
return −14 + components.good();
}
override public function evil():Number
{
return 12 + components.evil();
}
}
}package
{
public class Prejudice extends Decorator
{
private var components:Component;
public function Prejudice(components:Component)
{
this.components=components;
}
override public function getSoul():String
{
return components.getSoul() + "|Prejudice";
}
override public function good():Number
{
return −10 + components.good();
}
override public function evil():Number
{
return 15 + components.evil();
}
}
}package
{
public class Obsfuscation extends Decorator
{
private var components:Component;
public function Obsfuscation(components:Component)
{
this.components=components;
}
override public function getSoul():String
{
return components.getSoul() + "|Obsfuscation";
}
override public function good():Number
{
return −12 + components.good();
}
override public function evil():Number
{
return 7 + components.evil();
}
}
}package
{
public class Dogmatisms extends Decorator
{
private var components:Component;
public function Dogmatisms(components:Component)
{
this.components=components;
}
override public function getSoul():String
{
return components.getSoul() + "|Dogmatisms";
}
override public function good():Number
{
return −12 + components.good();
}
override public function evil():Number
{
return 15 + components.evil();
}
}
}package
{
public class Arrogance extends Decorator
{
private var components:Component;
public function Arrogance(components:Component)
{
this.components=components;
}
override public function getSoul():String
{
return components.getSoul() + "|Arrogance";
}
override public function good():Number
{
return −5 + components.good();
}
override public function evil():Number
{
return 5 + components.evil();
}
}
} package
{
public class Indifference extends Decorator
{
private var components:Component;
public function Indifference(components:Component)
{
this.components=components;
}
override public function getSoul():String
{
return components.getSoul() + "|Indifference";
}
override public function good():Number
{
return −9 + components.good();
}
override public function evil():Number
{
return 10 + components.evil();
}
}
}At this point you can add your own concrete decorators. Use the same format as the others. You can also add additional concrete components. So instead of just Dick and Jane, you can add others you’d like to decorate with good and evil.
Implementing the Good and Evil Decorator
Instead of a single implementation, you can try out two different implementations. The first one dresses up the two different concrete components, and sends the results to the output window. The second takes the results, uses them to place movie clips on a “soul graph,” and adds a label to an angel or devil movie clip—depending on whether good or evil is predominant.
Dual implementation
The first implementation decorates both the Dick and Jane concrete
components. This one is set up to use all 14 deadly sins and heavenly
virtues, but you can use any combination you want. As each concrete
component (life and light) is wrapped, the good and evil
properties are incremented or decremented, depending on which decorator
wraps the concrete component. The reference to the components object in each of the decorators is a reference to
the concrete component being wrapped. With each new decorator, then, the
value goes up and down depending on the wrapping decorator. Save Example 4-36 as MainDual.as
in an ActionScript file. Open a new Flash document file, and save it as a
Dual.fla. Type in MainDual in the Document class window in the
Dual.fla Properties panel, and resave
it as MainDual.as. Now test the movie.
package
{
    import flash.display.Sprite;
    public class MainDual extends Sprite
    {
        public function MainDual()
        {
            trace("||--Judging--||");
            var life:Component=new Dick();
            var light:Component=new Jane();
            //***Add Good
            life=new Courage(life);
            light=new Hope(light);
            light=new Compassion(light);
            life=new Openness(life);
            life=new Diligence(life);
            light=new Justice(light);
            //***Add Evil
            light=new Malice(light);
            life=new Prejudice(life);
            life=new Dogmatisms(life);
            life=new Arrogance(life);
            life=new Indifference(life);
            life=new Rage(life);
            light=new Obsfuscation(light);
            trace(life.getSoul()+"\nTotal Virture: "+
                 (life.good()-life.evil()));
            trace(light.getSoul()+"\nTotal Virture: "+
                 (light.good()-light.evil()));
        }
    }
}
The output for all of the good and evil together is:
||--Judging--||
Dick's soul
|Courage|Openness|Diligence|Prejudice|Dogmatisms|Arrogance
     |Indifference|Rage
Total Virture: −38
Jane's soul
|Hope|Compassion|Justice|Malice|Obsfuscation
Total Virture: 10
Because the trace() statement subtracts
the evil() method from the good() method total value, any positive
results indicate an abundance of good characteristics, and a negative result
shows a plethora of negative traits.
You can “multi-wrap” using the same decorator more than once on the same concrete component. (Someone who thinks he can get the month-behind project done on time by not sleeping for a week is doubly hopeful, has a triple dose of diligence, and perhaps a double dose of arrogance.)
Charting souls
Like any of the other design patterns, what you do with the output is up
to you. However, because ActionScript 3.0 is part of Flash, this next
implementation shows how to place the output into different formats with
graphic elements. The getSoul() generates
a string, and the good() and evil() methods generate numbers. The string
will be placed in a text field embedded in a movie clip, and the vertical
position of the movie clip will be determined by the values generated by the
good() and evil() methods. To get started, save the script in Example 4-37 in an ActionScript file named Soul.as.
package
{
    import flash.display.Sprite;
    import flash.display.MovieClip;
    public class Soul extends Sprite
    {
        //Instantiate the two MovieClip objects in
        //the Library
        var devil:Devil=new Devil();
        var angel:Angel=new Angel();
        public function Soul()
        {
            var life:Component=new Jane();
            //***Add Good***
            life=new Courage(life);
            life=new Compassion(life);
            life=new Hope(life);
            //life=new Integrity(life);
            life=new Openness(life);
            life=new Diligence(life);
            life=new Justice(life);
            //***Add Evil***
            life=new Malice(life);
            life=new Prejudice(life);
            //life=new Dogmatisms(life);
            life=new Arrogance(life);
            //life=new Indifference(life);
            //life=new Rage(life);
            //life=new Obsfuscation(life);
            setAngelDevil(life.good(),life.evil(),life.getSoul());
        }
        private function setAngelDevil(right:Number,wrong:Number,
             eternalsoul:String)
        {
            this.addChild(devil);
            this.addChild(angel);
            var booWrong:Number=Number(wrong>0);
            var booRight:Number=Number(right>0);
            devil.x=330;
            devil.y=270-((wrong*booWrong)*(270/72));
            angel.x=96;
            angel.y=270-((right*booRight)*(270/60));
            if (booWrong)
            {
                devil.soul_txt.text=eternalsoul;
            } else
            {
                angel.soul_txt.text=eternalsoul;
            }
        }
    }
}
In looking at the script, all it does is pass the three different values
generated by the getter methods, good(),
evil() and getSoul(), to the setAngelDevil() function. The setAngelDevil() function uses two movie clips from the
library and positions them on the stage. Depending on the outcome, the
concrete component’s name appears in the angel or devil icon. Figure 4-7
shows what the output will look like. Use it as a guide for setting up your
stage.
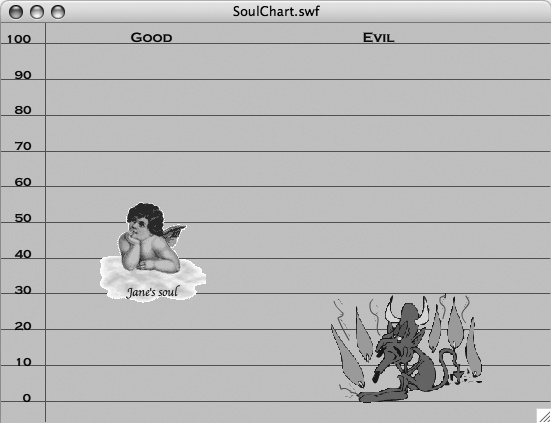
The following steps guide you through the process of preparing the two MovieClip classes in the Flash IDE and setting the stage as a “soul chart.”
Open a new Flash document file, type in
Soulin the Document class window, and save the file asSoulChart.fla.Add a layer to the existing layer, and name the top layer, “Labels” and the bottom layer “Lines.” (Say that last sentence fast three times!)
Select Insert → New Symbol from the menu bar. Type in “Angel” in the Name window, and click the Export for ActionScript checkbox. Click OK. You are now in the Symbol Edit Mode. (Be sure to capitalize the “A” in “Angel” because this is a class name.)
In the Symbol Edit window, draw or import an image of an angel.
Click the Text icon in the Tools panel, and select Dynamic Text for the type of text. In the Properties panel, provide the instance name
soul_txtfor the dynamic text object.Exit the Symbol Edit Mode by clicking the Scene 1 icon. You should now see a movie clip icon in the Library named “Angel.”
Repeat steps 3 to 6, substituting “Devil” for “Angel.” Once you’re finished, you should see both Devil and Angel movie clip icons in the Library panel.
Click the Lines layer and add 11 horizontal lines and one vertical line as shown in Figure 4-7. Lock the layer.
Click the Labels layer, number the lines from 0 to 100, and place a “Good” and “Evil” label at the top of the stage as shown in Figure 4-7. Lock the layer and save the file once again.
By adding and removing the comment lines in the Soul.as file, you can change the vertical positions of the
angel and devil images. You may have to make some adjustments depending on
the size of your angel and devil movie clips and/or if you change the
default size of the stage from 550 by 400.
Dynamic Selection of Concrete Components and Decorations: a Hybrid Car Dealership
Up to this point, the examples have focused on different dimensions of the Decorator design pattern, with the emphasis on how the different elements in the Decorator design pattern can be used with different components and decorations. Both concrete and abstract output has shown different ways to display information, but no example has illustrated how to input data dynamically. This Decorator example uses the case of selecting automobiles and their options to illustrate how to dynamically input data for both decorators and concrete components.
Imagine that you are responsible for creating and maintaining a web site for a car dealership. With each year, new models appear, and different options are made available. You never know what options are going to be added or dropped, or even if the same car models will be around from one year to the next. You’ve decided to use the Decorator pattern because you can easily add or drop both concrete components and concrete decorators. The concrete components will be the different models, and the options are the different decorations for any model selected. So whenever a new model appears, you simply update the concrete component to reflect those changes. Likewise with the options available for any of the models, all you need to change are the concrete decorations. You can easily add or change decorations without altering the program’s basic structure.
Setting Up the Hybrid Car Components
This particular dealership has decided to specialize in four hybrid model cars. This example uses four such cars, the Prius, Mercury Mariner, Ford Escape and Honda Accord hybrids. So in addition to an abstract Component class, this example requires four concrete components.
Auto abstract component
To get started, the abstract component is cast as a class named Auto. It needs only a string for the name of
the car, and a numeric variable for the car’s price. Two getter functions
for auto type and price make up the rest of the abstract component. Example 4-38 shows the code saved as Auto.as.
package
{
    //Abstract class
    public class Auto
    {
        protected var information:String;
        protected var bucks:Number;

        public function getInformation():String
        {
            return information;
        }
        public function price():Number
        {
            return bucks;
        }
    }
}
As with all Decorator design patterns, all other classes are derived from
this abstract component class. In the next section, you’ll see that all of
the concrete component classes are subclasses of the Auto class.
Hybrid car classes concrete component
The four hybrid autos are placed into separate concrete component classes
that are all subclassed from the Auto
class. The constructor function assigns a value to the information property, and the price() function returns a value representing
the car’s price. In Example 4-39 to Example 4-42,
the captions are the filenames to use for saving each class.
package
{
    public class Prius extends Auto
    {
        public function Prius()
        {
            information = "Toyota Prius Hybrid~\n";
        }
        override public function price():Number
        {
            return 21725.00;
        }
    }
}package
{
public class Mariner extends Auto
{
public function Mariner()
{
information = "Mercury Mariner Hybrid~\n";
}
override public function price():Number
{
return 29225.00;
}
}
}package
{
public class Accord extends Auto
{
public function Accord()
{
information = "Accord Hybrid~\n";
}
override public function price():Number
{
return 30990.00;
}
}
}package
{
public class Escape extends Auto
{
public function Escape()
{
information = "Ford Escape Hybrid\n~";
}
override public function price():Number
{
return 26240.00;
}
}
}The prices here are based on prices found on the Internet, but they may or may not reflect prices at a later date. If you want to update prices or even use different autos, feel free to do so.
The \n escape character and the tilde
(~) characters are used for
formatting purposes. The \n is a line
break, and the tilde (~) helps in
separating out all the different models that become a big string as the
decorator merges them altogether. Without these, the output would be a
mess.
Using Auto Options as Decorators
With all of the concrete components in place, the next step will be to construct the decorator class and the concrete decorators. Like the components they decorate, they too will need an identification and price property as well as methods to return them. The abstract decorator will set that up so that the derived classes have the necessary properties and methods.
The options abstract decorator
As you have seen with other abstract decorator classes in this chapter,
it’s one of the simplest classes. Because it extends the abstract concrete
component class, it inherits all of the class’ properties. However, we need
to re-implement the getter function so that we can further re-implement it
for the delegations the different concrete decorators use. Example 4-43 shows the abstract decorator class to be
saved as Decorator.as.
package
{
    //Abstract class
    public class Decorator extends Auto
    {
        override public function getInformation():String
        {
            return information;
        }
    }
}
Because the information variable is
inherited from the Auto class, we need not redefine it here. It represents
an abstract string.
The options concrete decorators
The concrete decorators generate the information that adds the information property and price value to each
option. As a concrete component is wrapped in each, the string data are
added to any other strings that wrap the component. So, when the getInformation() method launches, it first
gets the delegated information from all other options and the concrete
component it wraps. In order not to get a huge string that we cannot
unravel, a tilde (~) on the end of the added string will help separate all
of the different decorations. Example 4-44 to Example 1-47 are labeled with the filenames used to save the
class.
package
{
    public class HeatedSeats extends Decorator
    {
        private var auto:Auto;
        public function HeatedSeats(auto:Auto)
        {
            this.auto=auto;
        }
        override public function getInformation():String
        {
            return auto.getInformation() + " Heated Seats~";
        }
        override public function price():Number
        {
            return 350.78 + auto.price();
        }
    }
}package
{
public class GPS extends Decorator
{
private var auto:Auto;
public function GPS(auto:Auto)
{
this.auto=auto;
}
override public function getInformation():String
{
return auto.getInformation() +
" Global Positioning System~";
}
override public function price():Number
{
return 345.88 + auto.price();
}
}
}package
{
public class RearViewVideo extends Decorator
{
private var auto:Auto;
public function RearViewVideo(auto:Auto)
{
this.auto=auto;
}
override public function getInformation():String
{
return auto.getInformation() + " Rear View Video~";
}
override public function price():Number
{
return 560.75 + auto.price();
}
}
}package
{
public class MP3 extends Decorator
{
private var auto:Auto;
public function MP3(auto:Auto)
{
this.auto=auto;
}
override public function getInformation():String
{
return auto.getInformation() + " MP3 Player~";
}
override public function price():Number
{
return 267.55 + auto.price();
}
}
}For this particular application, we’re not concerned with separating the
individual costs. In fact, we want each cost to be accumulated with the
others, including the cost of the concrete component we’re decorating. So
while the string value needs the tilde (~) for demarcation purposes, we don’t need it for the numeric
value.
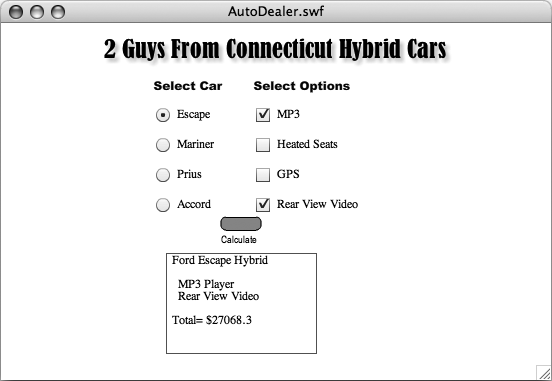
Setting Up the User Interface
The largest single class we’re going to use is the one to create the user
interface. The line numbers appear in the Example 4-48 for the
purpose of referencing lines in the code. A lot of the work done by this class,
named Deal, is to set up the interface
objects. These include the radio button, checkbox, and button components.
Additionally, a good hunk of code is required for the text field output window
and formatting for the output. So while the interface to the decorator pattern
may look unwieldy, it’s not decorator pattern’s fault. In fact, only the
getCar() (beginning on line 110) and
getOptions() (beginning on line142)
private functions are employed to pull out the information generated by the
Decorator pattern.
To get a handle on what the class does, enter the code from Example 4-48 and save it as Deal.as.
1 package
2 {
3     import fl.controls.CheckBox;
4     import fl.controls.RadioButton;
5     import fl.controls.Button;
6     import flash.display.Sprite;
7     import flash.display.MovieClip;
8     import flash.events.MouseEvent;
9     import flash.text.TextField;
10    import flash.text.TextFormat;
11
12    public class Deal extends Sprite
13    {
14        internal var checks:Array=[];
15        internal var cars:Array=[];
16        internal var carDeal:Auto;
17        public var dealText:TextField=new TextField();
18
19        //Constructor Function
20        public function Deal ():void
21        {
22            getRadios ();
23            getChecks ();
24            doDealButton ();
25            showDeal ();
26        }
27        //Add button from Library
28        private function doDealButton ():void
29        {
30            var doDeal:Button=new Button();
31            this.addChild (doDeal);
32            doDeal.x=215;
33            doDeal.y=195;
34            doDeal.label="Make Deal";
35            doDeal.addEventListener (MouseEvent.CLICK,getPackage);
36        }
37        //**
38        //Get information from Decorator and display it
39        //**
40        private function getPackage (e:MouseEvent):void
41        {
42            getCar ();
43            getOptions ();
44            if (carDeal == null)
45            {
46                return;
47            }
48            else
49            {
50                var nowDrive:String=carDeal.getInformation()+"\nTotal=
 $"+carDeal.price();
51            }
52            dealText.text=formatMachine(nowDrive);
53        }
54        //Format Output
55        private function formatMachine (format:String):String
56        {
57            if (format.indexOf("~") != −1)
58            {
59                format=format.split("~").join("\n");
60            }
61            return format;
62        }
63        //Text Field & Format
64        private function showDeal ():void
65        {
66            dealText.width=150;
67            dealText.height=100;
68            dealText.wordWrap=true;
69            dealText.multiline=true;
70            dealText.x=165;
71            dealText.y=230;
72            dealText.border=true;
73            dealText.borderColor=0xcc0000;
74            var dealerFormat:TextFormat=new TextFormat();
75            dealerFormat.leftMargin=4;
76            dealerFormat.rightMargin=4;
77            dealText.defaultTextFormat=dealerFormat;
78            this.addChild (dealText);
79        }
80        //Add Check boxes for Options (Concrete Decorators)
81        private function getChecks ():void
82        {
83            var gizmos:Array=new Array("MP3","Heated Seats",
"GPS", "Rear View Video");
84            var saloon:uint=gizmos.length;
85            var giz:uint;
86            for (giz=0; giz<saloon; giz++)
87            {
88                checks[giz]=new CheckBox();
89                this.addChild (checks[giz]);
90                checks[giz].width=150;
91                checks[giz].x=250;
92                checks[giz].y=80+(giz*30);
93                checks[giz].label=gizmos[giz];
94            }
95        }
96        //Add Radio buttons Auto (Concrete Components)
97        private function getRadios ():void
98        {
99            var car:Array=new Array("Escape","Mariner","Prius","Accord");
100           var saloon:uint=car.length;
101           var ride:uint;
102           for (ride=0; ride<saloon; ride++)
103           {
104               cars[ride]=new RadioButton();
105               cars[ride].groupName="deals";
106               this.addChild (cars[ride]);
107               cars[ride].x=150;
108               cars[ride].y=80+(ride*30);
109               cars[ride].label=car[ride];
110           }
111       }
112       //Select Auto and create Concrete Component
113       private function getCar ():void
114       {
115           var tracker:String;
116           var hybrid:uint;
117           for (hybrid=0; hybrid<cars.length; hybrid++)
118           {
119               if (cars[hybrid].selected)
120               {
121                   tracker=cars[hybrid].label;
122                   switch (tracker)
123                   {
124                       case "Escape" :
125                           carDeal = new Escape();
126                           break;
127
128                       case "Mariner" :
129                           carDeal = new Mariner();
130                           break;
131
132                       case "Prius" :
133                           carDeal = new Prius();
134                           break;
135
136                       case "Accord" :
137                           carDeal = new Accord();
138                           break;
139                   }
140               }
141           }
142       }
143       //Select options -- wrap Concrete Component in Decorator
144       private function getOptions ():void
145       {
146           var tracker:String;
147           var toy:uint;
148           for (toy=0; toy<checks.length; toy++)
149           {
150               if (checks[toy].selected)
151               {
152                   tracker=checks[toy].label;
153                   switch (tracker)
154                   {
155                       case "MP3" :
156                           carDeal = new MP3(carDeal);
157                           break;
158
159                       case "Heated Seats" :
160                           carDeal = new HeatedSeats(carDeal);
161                           break;
162
163                       case "GPS" :
164                           carDeal = new GPS(carDeal);
165                           break;
166
167                       case "Rear View Video" :
168                           carDeal = new RearViewVideo(carDeal);
169                   }
170               }
171           }
172       }
173   }
174 }
175
Creating the document and setting the stage
Once you’ve saved the Deal.as file,
you’ll need to do a little work on a Flash document file. The following
steps will guide you.
Open a new Flash document and save it as AutoDealer.fla in the same folder as the .as files.
In the Document class window, type in
Deal, and resave the file.Using Figure 4-8 as a guide, use Static text to add the header “2 Guys From Connecticut Hybrid Cars.” Beneath the header, at horizontal position 150, type in “Select Car,” and on the same line at horizontal position 250, type in “Select Options.”
Open the Components and Library panels and drag a copy of the radio button and the checkbox to the Library.
Select Insert→Symbol in the menu bar, and select Button as Type. In the Name window, type in
Button(which is the default name), and click the Import for ActionScript checkbox. Click OK to enter the Button Symbol editor indicated by the special four-frame Timeline.In the Button Symbol editor, add a layer, and, selecting the top layer, use the Rectangle Tool to draw a rectangle with colors to suit your tastes with 8-point rounded corners located at x=0, y=0. Size it to W=43, H=13. Add keyframes to all of the frames in the top layer. Select the object in the Over frame and swap (reverse) the stroke and fill colors.
Add keyframes to the first three frames in the lower layer. In the Up frame, using a Static text and narrow sans serif 10-point font type, type “Calculate” centered below the button. In the Over frame, do the same thing, but type in “Total Cost.” Leave the Down frame empty.
Check to make sure your Library shows the following: CheckBox, CheckBoxSkins, Component Assets, Button, RadioButton, RadioButtonSkins. If it does, you should be all set.
The next step is to test the application. All the buttons and the text field are automatically placed on the stage. Figure 4-8 shows what you can expect to see if everything is working as expected:
Implementing the concrete components and their decorators
The pattern implementation process requires that certain things are in
place so that the user can choose what she wants as far as both concrete
components (car model) and concrete decorators are concerned. Initially, the
script must first find which car has been selected. So the function getCar() loops through the radio buttons until
it finds which one is selected. When it locates it, it simply assigns an
instance of carDeal with one of the
concrete components such as
carDeal = new Mariner();
The carDeal object has to be
instantiated outside a function so that it can be used by more than a single
private function. On line 15 of Example 4-48, the carDeal object is instantiated as an Auto data type. (The internal statement is added to draw attention to the fact
that the variable is available to any caller in the same package—even though
it is the default state when instantiating variables.)
Once the carDeal object has been
created, the script looks at the options selected. Using the getOptions() function, each of the checkboxes
is compared to its selection state. When a selected option is found, the
option, a concrete decorator, wraps the concrete object carDeal. For example, if one of the selections
is heated seats, the code section in the switch statement looks like the
following:
case "Heated Seats":
carDeal = new HeatedSeats(carDeal);
break;
Because more than one decorator can be selected, as each selected option is located, the concrete object can be wrapped more than once. Thus, any or all of the options can be added to the selected auto.
Summary
The Decorator design pattern excels in adding features to core objects without having to fundamentally change those objects. Like the ornaments on a Christmas tree, the ornaments change the appearance of the tree, but the tree itself is not changed at all. Anything from the appearance of a web site to the contents of an online shopping cart can be structured using a Decorator pattern.
The Decorator should be considered a core design pattern when your project has to be updated with the addition of new objects and new features for those objects. We like to think of the Decorator as a “100-year” pattern. Imagining concrete components as types of people and decorations as the clothes they wear, it’s not too difficult to envision a web site being updated with different kinds of people spanning a century—from a blacksmith at the beginning of the 20th century to a nanotechnologist at the beginning of the 21st century. Likewise, all kinds of people can be styled with a range of clothing over the same time span, from a blacksmith’s leather apron in 1900 to an astronaut’s spacesuit in 2000. However, the programmer who is thinking ahead from one century to the next is able to use a Decorator pattern, and doesn’t have to change the core component at all. He just adds more concrete components and decorators as needed.
At the same time that the Decorator pattern is open to adding new features without changing the structure of the program, both components and decorators can be deleted when they’re no longer needed. Further, changes to existing components and decorators are easy to make without altering anything other than their specifics, such as a string’s label or a number’s value.
The Decorator pattern, though, has certain drawbacks. For example, in this chapter, some readers may have been thinking that they could have programmed the same exact functionality for some of the sample applications using a fraction of the code and far fewer classes. That’s definitely true, and for specific applications, the Decorator design pattern may be like swatting a fly with an elephant gun. However, like all design patterns, the developer has to be judicious in selecting which, if any pattern, he wants to employ. That decision needs to be made not just on the current size of the application, though. When starting any project where the Decorator pattern is considered, you have to ask yourself: are the concrete components and decorators going to grow and change or are they going to be fairly static? So, even though your application may begin as an acorn, you have to envision the oak tree as a possibility and plan accordingly.
Get ActionScript 3.0 Design Patterns now with the O’Reilly learning platform.
O’Reilly members experience books, live events, courses curated by job role, and more from O’Reilly and nearly 200 top publishers.

